Stop throwing away your pretty candle jars! 🕯️ He Stop throwing away your pretty candle jars! 🕯️

Here’s the easiest hack for removing leftover candle wax from antique jars, mugs, and vintage vessels so you can reuse them! 🤍

I found this adorable antique candle from Antique Candle Co., and one of my favorite things about it is that once the candle is finished, you can repurpose the vintage vessel instead of throwing it away.

Here’s how I remove the leftover wax:

🕯️ Pour boiling water into the candle vessel
🕯️ Let it sit for several hours until the wax solidifies and floats to the top
🕯️ Scoop out the hardened wax (I save mine to use in my wax warmer!)
🕯️ Remove the leftover sticky wick with a little Goo Gone
🕯️ Wash the vessel thoroughly and you’re done!

Such an easy candle jar cleaning hack and the perfect way to upcycle antique jars, vintage candle vessels, and pretty containers into something you can actually use again! ♻️

Have you tried this candle wax removal hack before?!

Comment SHOP below to receive a DM with the link to this post on my LTK ⬇ https://liketk.it/6lGsH

#lifehacks #candlehack #vintagecandleholder #repurposing #fallcandles
Who knew cupcake liners could make homemade canned Who knew cupcake liners could make homemade canned goods look this cute?! 🍂🤎

If you’re looking for an easy fall DIY or a budget-friendly way to dress up your homemade canned goods, this is the cutest little hack! Simply place a cupcake liner over the lid before screwing on the ring, then finish it off with a printable label and a little twine or ribbon.

It’s the perfect way to turn homemade apple butter into a beautiful fall hostess gift, neighbor gift, teacher gift, or Thanksgiving gift in just a few minutes. Simple, inexpensive, and so much cuter than a plain mason jar!

Would you gift these to someone this fall? 🍎🍂

Save this idea for fall canning season and follow for more easy fall DIYs, cozy decorating ideas, and homemade gift inspiration! 

Comment SHOP below to receive a DM with the link to this post on my LTK ⬇ https://liketk.it/6lGwV

#fallhacks #kitchenhack #cannedgoods #applebutter #fallgifts
Fall is almost here, which means it’s officially a Fall is almost here, which means it’s officially apple orchard season! 🍎 One of my favorite fall traditions is picking fresh Honeycrisp apples straight from the orchard. There is just nothing better than a crisp, juicy apple on a cool autumn day!

I always stock up because I love freezing fresh apple slices to enjoy all year long. They’re perfect for making these easy Crockpot Cinnamon Apples whenever the craving hits! They’re soft, warm, full of cinnamon flavor, and make the perfect fall side dish, dessert, or sweet snack. Plus, this slow cooker apple recipe couldn’t be easier to make.

If you’re looking for cozy fall recipes, simple apple recipes, or an easy crockpot dessert, you have to try this one!

Comment “RECIPE” below and I’ll send it straight to you! 🍎🍂

#crockpotrecipes #cinnamonapple #cinnamonapples #fallbaking #fallrecipes
Y’all, I am SO tired of this 😩💔 I woke up this mor Y’all, I am SO tired of this 😩💔 I woke up this morning not feeling great, but like I always do, I tried to push through it. I was sitting at my laptop doing a little work when suddenly my hands started shaking so badly that I couldn’t control what I was doing. My HR spiked up to 180 and I threw up as well. And honestly? I’m frustrated, scared, and completely exhausted from not knowing WHY this is happening.

I finally got my MRI results back on Friday, and fortunately (but also unfortunately), they didn’t find anything major. And I’ll admit it… I bawled. 😭

Of course I don’t want something seriously wrong with me. But at the same time, I desperately want a diagnosis. I want answers. After dealing with unexplained symptoms for so long, getting “normal” test results can almost feel like another dead end.

My neurologist had mentioned the possibility of Chiari malformation, so I honestly thought that might finally explain some of my symptoms. Now that the MRI didn’t show that, I feel like I’m back at square one.

Because this isn’t normal. 😩

What am I supposed to do for work when my hands are shaking like this?! I was working as a dental hygienist, and can you imagine trying to clean someone’s teeth while your hands are trembling uncontrollably? It’s terrifying to even think about.
My short-term disability still hasn’t been approved either, so I’m sitting here wondering what I’m supposed to do next while my health and career feel completely uncertain.

I have another appointment with my doctor on Friday, so I’m trying to remind myself that this is just another step in the process. But it feels like it’s been nothing but waiting for appointments, waiting for tests, waiting for results… and still no answers.

This has truly been the hardest season of my life.

I’m trying so hard to trust God through all of this, even when I don’t understand what He’s doing. 🙏🏻 It’s just really hard when you don’t know what your future, your health, or even your career is going to look like.

So if you’ve been following along through this health journey, please keep praying that I finally get some answers. 🤍
If you’re part of the Abandoned Golf Wives Social If you’re part of the Abandoned Golf Wives Social Club, come join me! 😜 Because if he’s going to spend every weekend on the golf course, I’m at least going to have a cute outfit about it. 😂

When I saw this adorable shirt from Pink Lily, I HAD to have it immediately—especially because it pairs perfectly with my “he’s golfing” hat. ⛳️😂

At this point, I might as well make being a golf wife my entire personality, right?! 🤣

Tag your fellow golf wives who totally get it! 👇🏼

Comment SHOP below to receive a DM with the link to this post on my LTK ⬇ https://liketk.it/6lqMU

#golfhumor #husbandwifejokes #husbandwifehumor #golfing #golfjokes
When I spotted these plain little white ceramic gh When I spotted these plain little white ceramic ghosts at the Target Dollar Spot, I knew they had SO much potential! Instead of leaving them plain, I gave them a quick makeover and turned them into the cutest antiqued gold Halloween decor that looks way more expensive than it actually is! 🙌

Here’s how I did it:

👻 First, I sprayed the ceramic ghosts with black spray paint.
✨ Then I lightly layered metallic gold spray paint over the top. I didn’t want them super shiny—I was going for that aged, antique gold pottery look.
🖤 Finally, I used a little black acrylic paint to make their eyes stand out more.

And that’s it! Such an easy DIY Halloween decor makeover, and I think they turned out ADORABLE! 🥹

I love finding inexpensive Target Dollar Spot finds and giving them a high-end look with a little DIY magic.

Would you believe these started as plain white ghosts from Target?! 👻

Comment SHOP below to receive a DM with the link to this post on my LTK ⬇ https://liketk.it/6llsc

#potterybarndupe #targetdollarspot #targetdollarspotfinds #diyghost #ghosties
If pressing the “CLOSE DOOR” button the second I g If pressing the “CLOSE DOOR” button the second I get on the elevator so I can avoid small talk is wrong… I don’t want to be right. 😂🙈

I’m just THAT introverted. 🤣 My social battery has a daily limit, and sometimes I’ve already hit my maximum number of conversations before I even get to where I’m going. 😅

No offense… I just need to ride this elevator in peace and silence 🤣

Please tell me I’m not the only introvert who does this?! 👀

#introvertlife #introvertproblems #introverting #relatablehumor #relatablecontent
It’s officially been ONE FULL YEAR since my health It’s officially been ONE FULL YEAR since my health started spiraling. 💔

A year ago today, I was at work when my heart rate suddenly spiked so high that I became extremely dizzy and shaky and genuinely thought I was going to pass out. I went to the ER afterward just to be safe, and of course… everything looked “normal.” My EKG was normal. They could see that my heart rate had spiked, but they couldn’t tell me why.

Little did I know that one scary episode would turn into a daily battle with unexplained symptoms. Fast forward one year and I’m dealing with even worse symptoms, including frequent heart rate spikes, dizziness, shakiness/tremors, fatigue, and so much more. And the hardest part? I STILL DON’T HAVE ANSWERS.

I can’t even work anymore. I’ve spent months waiting for appointments, getting test after test, waiting for results, and hoping that this will finally be the thing that explains what’s happening… only to end up with more questions.

And honestly? I feel crazy sometimes. Not because I think this is all in my head, but because it’s incredibly hard to keep telling people how badly you feel when test after test doesn’t give you an answer. 😭

It’s been a really rough week emotionally, and I’m having a hard time dealing with all of this. I feel like I’m constantly taking one step forward and two steps back. How long am I going to have to wait before I finally have answers? How much longer until I can start feeling like myself and actually live my life again?

I’m so tired of waiting. I’m tired of being passed from appointment to appointment. I’m tired of having no real help in the meantime. And I’m tired of feeling like I have to fight so hard just to be heard. 💔 I’m trying so hard to let go, trust God, and believe that there’s a reason for all of this… but y’all, IS IT HARD. 😢

I’m praying that after this past year, I’m finally getting closer to some answers. Until then, I’m just taking it one day at a time. If you’re also living with unexplained symptoms, chronic illness, POTS symptoms, tremors, dizziness, heart rate spikes, or a long diagnostic journey, please know you’re not alone. ❤️Here’s to hoping year two looks very different from year one!
Don’t let those vacation seashells sit in a drawer Don’t let those vacation seashells sit in a drawer collecting dust! 🐚🤍 TURN THEM INTO WALL ART INSTEAD!

If you’re anything like me, you come home from every beach trip with a pocketful of seashells and absolutely no idea what to do with them. 😂 So I turned mine into this easy DIY seashell wall decor and I’m OBSESSED with how it turned out!

All you need is:
🐚 Seashells
🤍 A small canvas
🔥 Hot glue
🎨 White spray paint
🪵 Optional wood trim for a frame

I love that you can customize this with shells from your favorite beach trip, making it such a sweet way to preserve those vacation memories. And the neutral white + wood combination makes it work with almost any home decor style!

You could even make a whole gallery wall with shells from different beaches you’ve visited! 🥹🌊

Save this DIY for your next beach vacation! And if you have a stash of seashells at home, this is your sign to finally DO something with them. 😂🐚

I have the full step-by-step tutorial on the blog! Comment “SHELLS” and I’ll send you the link! 🤍

#seashell #seashelldecor #coastaldecor #seashellart #coastaldecorating
Apparently, this little Christmas decoration has b Apparently, this little Christmas decoration has been hanging out in here ALL YEAR and I just never noticed it. 🤣

Tell me I’m not the only one who does this?! I swear every time I switch out my seasonal home decor, I find at least ONE random piece from months ago that somehow survived the decor rotation. 😂

Fall decorating is officially underway over here, but apparently Christmas wanted one last cameo. 🎄😂

Please tell me I’m not alone! 👇🏼

#failvideos #failvideo #falldecorating #falldecor #relatablecontent
  • Home
  • Subscribe
  • About Me
  • The Blog
    • DIY
      • Turning a Builder Grade Home Into Something More
      • Outdoor
      • Home Improvement
      • Repurpose and Upcycling
      • Home Decor
        • Christmas
        • Everyday Decor
        • Fall
        • Spring
        • Summer
        • Winter
    • Recipes
      • What To Cook?
    • Travel
      • Traveling and Antiquing
      • Lifestyle
    • Whimsy Home Wednesday
  • Contact Me
  • Privacy Policy
    • Disclaimer
  • Home
  • Subscribe
  • About Me
  • The Blog
    • DIY
      • Turning a Builder Grade Home Into Something More
      • Outdoor
      • Home Improvement
      • Repurpose and Upcycling
      • Home Decor
        • Christmas
        • Everyday Decor
        • Fall
        • Spring
        • Summer
        • Winter
    • Recipes
      • What To Cook?
    • Travel
      • Traveling and Antiquing
      • Lifestyle
    • Whimsy Home Wednesday
  • Contact Me
  • Privacy Policy
    • Disclaimer

Mornings on Macedonia

DIY, Decor, & More

Lifestyle · December 12, 2021

What to Expect When Microblading

Over Thanksgiving break, I decided to do something a little out of the ordinary for me. I got my eyebrows microbladed! I have always been a little curious about the procedure, but I decided to just go for it.

So if you’re like me and curious, I thought I would create a comprehensive post on what to expect when microblading your eyebrows!

That way, you are all prepared for the process when you go. I am sharing completely raw and unedited photos with you all so you can really get a good idea of the full experience!

I went to see Stacie at the amazing Asheville Microblading and Lash. She did a phenomenal job and I was super impressed with how easy the appointment was and how wonderful my brows turned out to be afterwards.
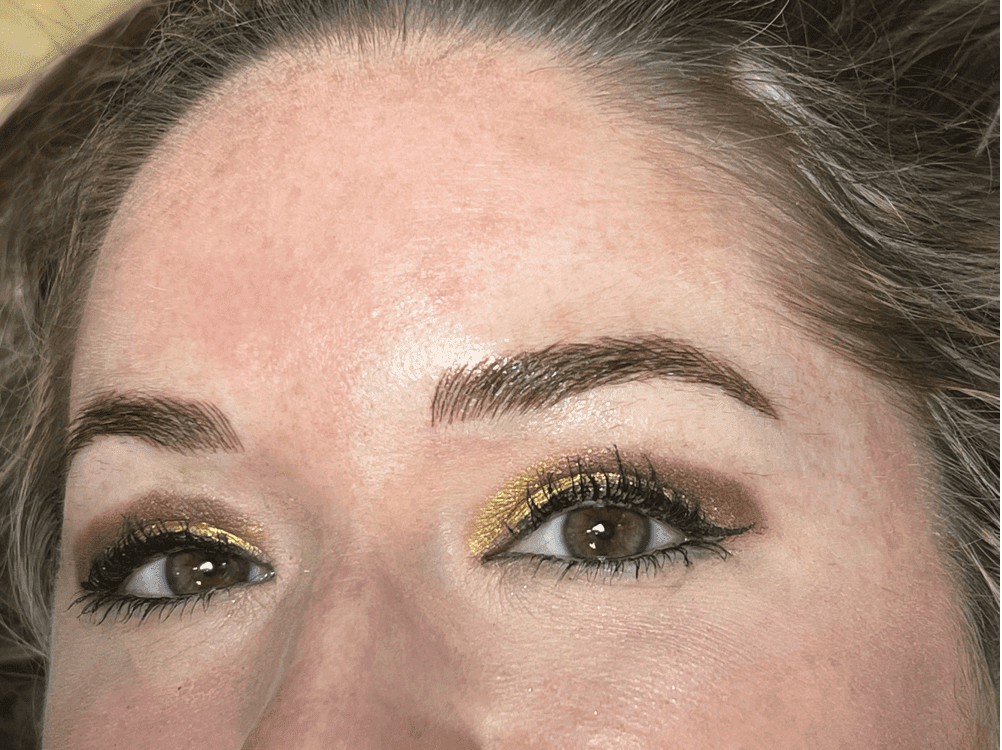
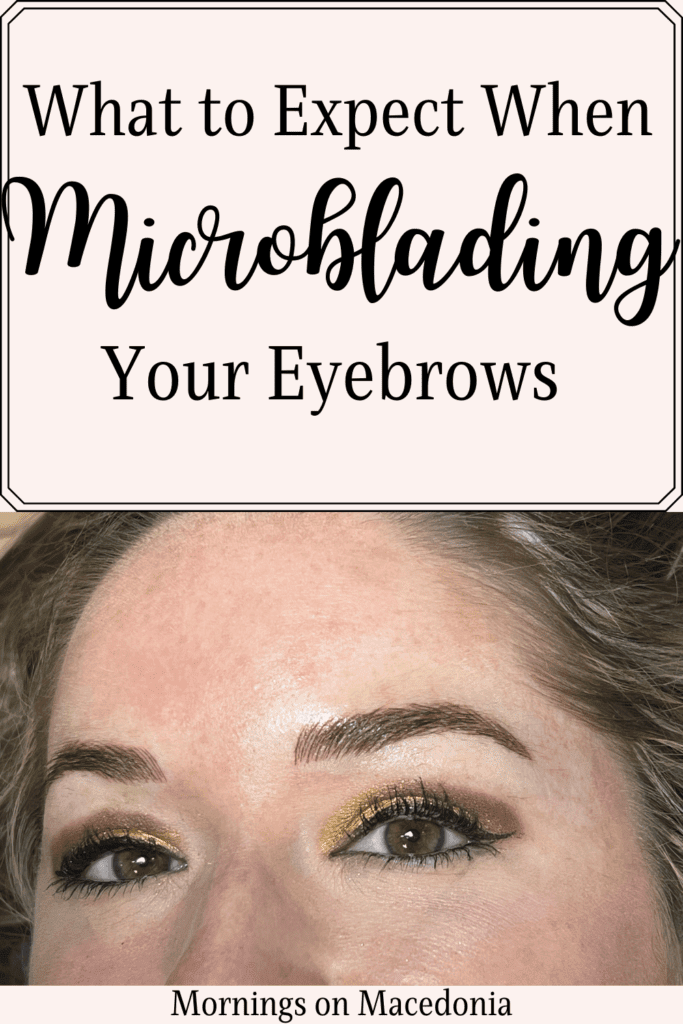
After Microblading
I mean I can’t get over how amazing they look!
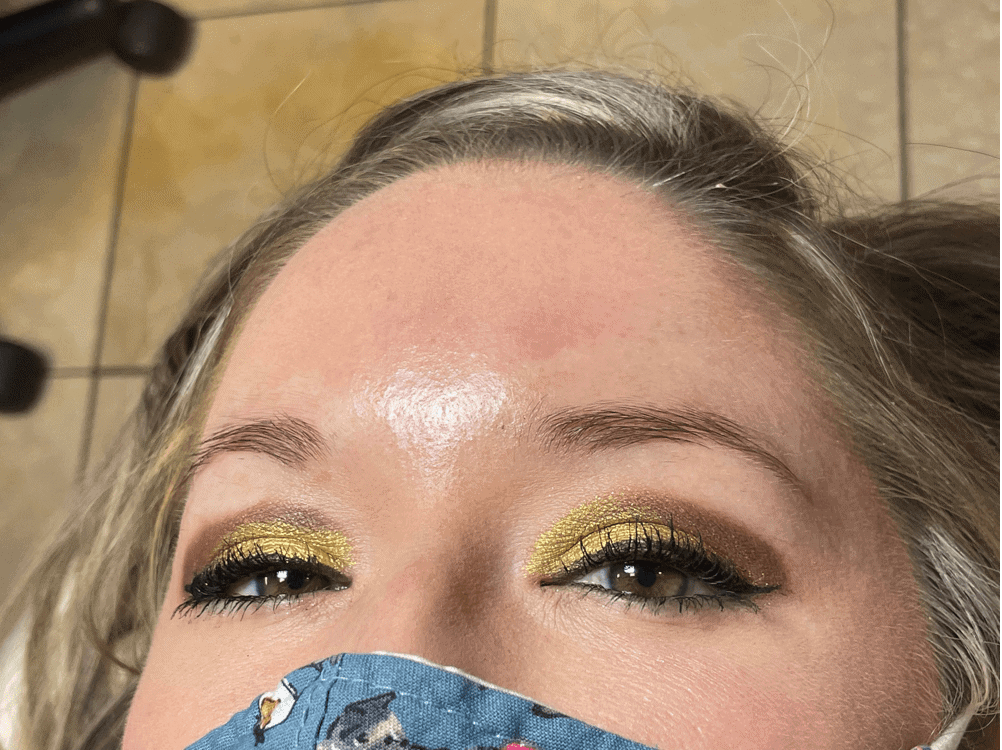
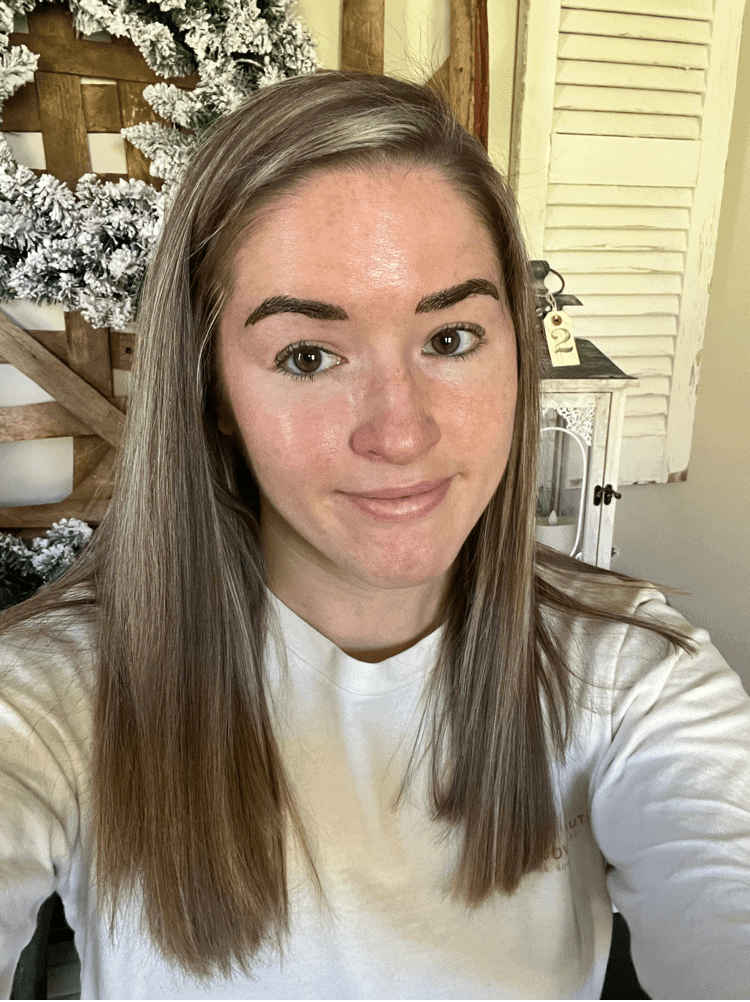
Before Microblading
Here is what they looked like before, such a difference!

What is Microblading?

First of all, I am going to start off with what even is microblading? You may have heard of it before, or you may not even know anything about it.

Either way, I am here to give you a run down of what it is and what to expect.
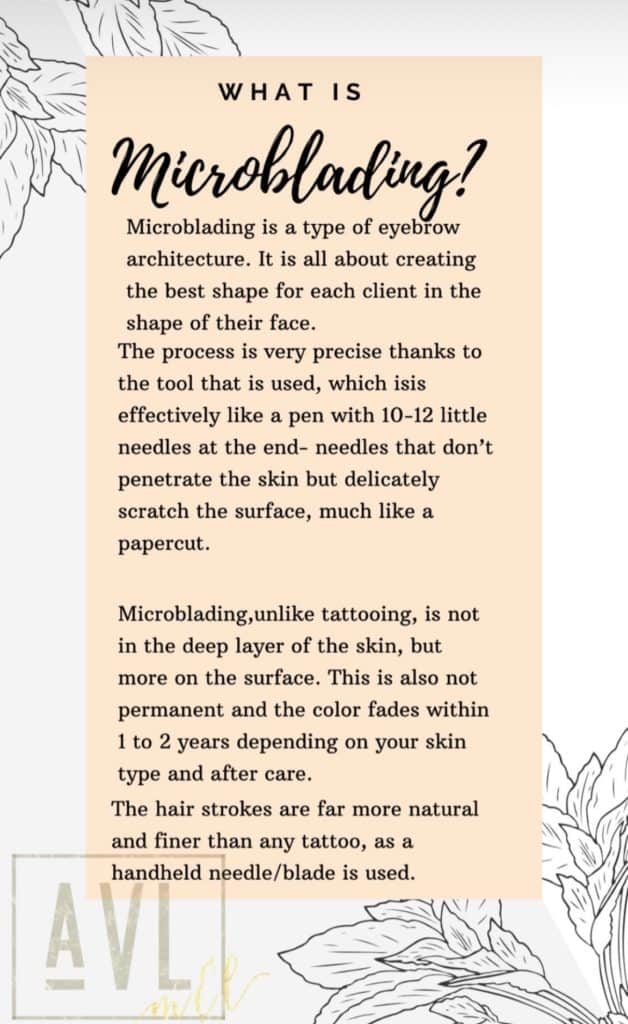
What is Microblading

What To Do Before Your Appointment

  • No coffee, caffeine, alcohol 24 hours before appointment
  • No Aspirin, Niacin, Vitamin E, or Ibuprofen 24 hours before appointment
  • Don’t tan or have intense sun exposure before appointment
  • No waxing 2-3 days before your procedure
  • No chemical peels, dermabrasion, laser or any other intense treatments for 2 weeks prior

If you read online, it may say not to wear make up to your appointment as well. But Stacie told me it was actually best to come in with your make up and your brows completely filled in.

That way she can see how you like to do your brows and can mimic how you would normally do them as well.

Is Microblading Painful

In my personal experience, I did not think it was painful at all. She applied a numbing cream on my eyebrows as soon as I walked in the door and started filling out paperwork.

That definitely helps a lot and really the only thing I felt was a slight sting here and there. But on a scale of 1-10, I would say it was just a 2 at most.

Some people are more sensitive though so they may tell you otherwise. But in my experience, it wasn’t bad at all.
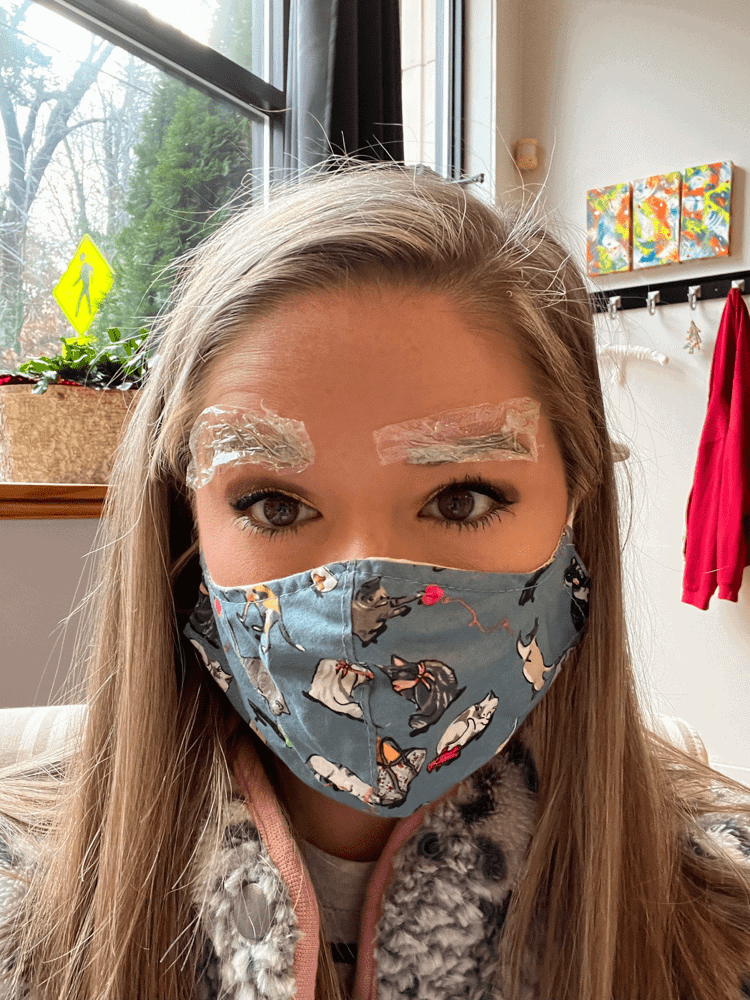
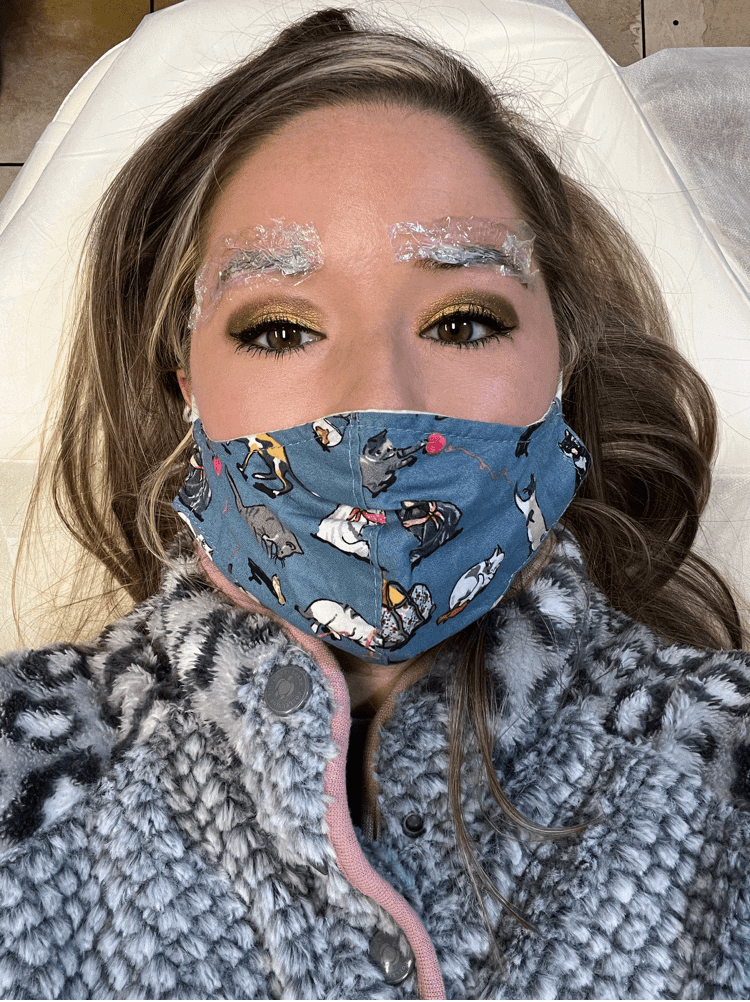
Me with numbing cream filling out paperwork
Filling out paperwork with the numbing cream already working its magic!
Getting ready to start microblading procedure
Getting ready to start the procedure here.

What To Do After Your Appointment

  • Clean area with an esthetic wipe as needed for lymphatic fluid
  • Apply a thin layer of ointment (given to you on the day of your appointment) on your eyebrows twice a day for four days. Always apply with clean fingertips or an applicator.
  • Do not let area get wet for 2 weeks. Apply the ointment before showers.
  • Do not rub, touch, scrub, or pick at scabs, this will cause pigment discoloration and scarring
  • Do not apply makeup, lotions, creams, or anything else on treated area until fully healed
  • Avoid heavy sweating for the first 10 days after appointment. This can cause the pigment to blur or fade out due to the salt in your sweat.
  • Avoid tanning beds and direct sunlight for 3 weeks after
  • Avoid sleeping on your face for the fist 10 days after. A satin pillowcase is also recommended while healing.

What to Expect When Microblading

So now that I have given you a little background on what microblading is and what you should and shouldn’t do beforehand, now I am going to give you my first hand experience at it!

I tried to document the first several days right after my appointment so you could get a very clear idea on what to expect when microblading and how the healing process really is.

Day of the Appointment

I’m breaking down everything that happened during the actual appointment day here and the steps taken after the procedure was done the first day.

Mapping out Your Eyebrows

The first thing Stacie does is measure your entire face and then map out where your eyebrows should be.

She definitely does an incredible job with this and is really good about listening to your input as well.

As she says, you’re the boss in this situation and she wants you to be happy with the outcome so she was great to work with.

I didn’t have any problems or concerns with how she mapped them out and I was ready to get started!
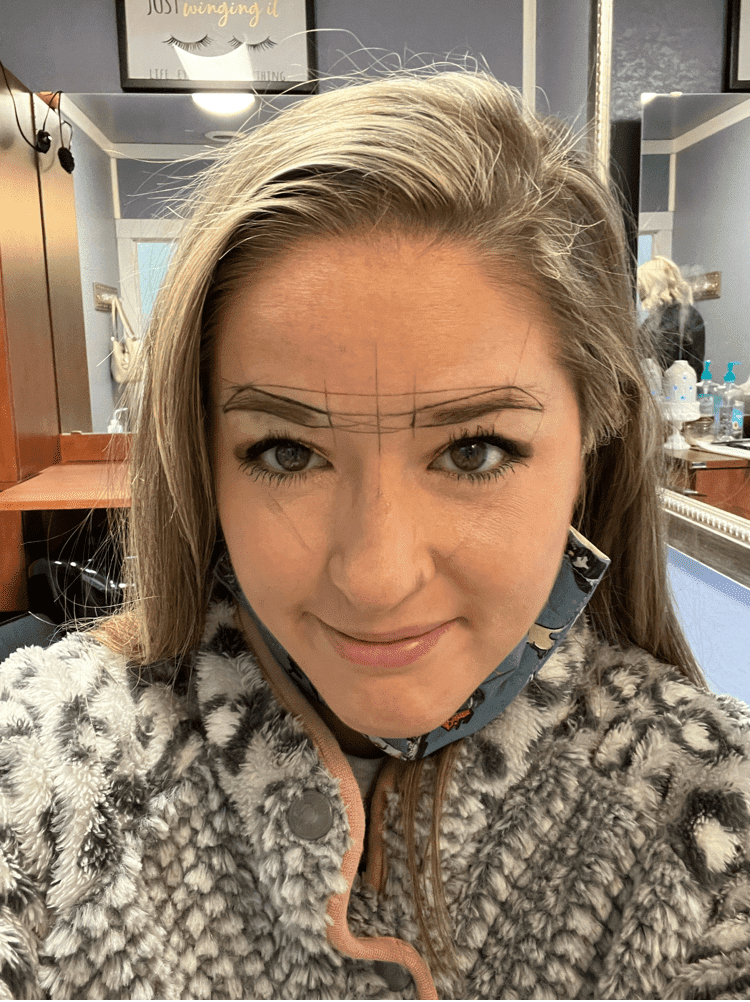
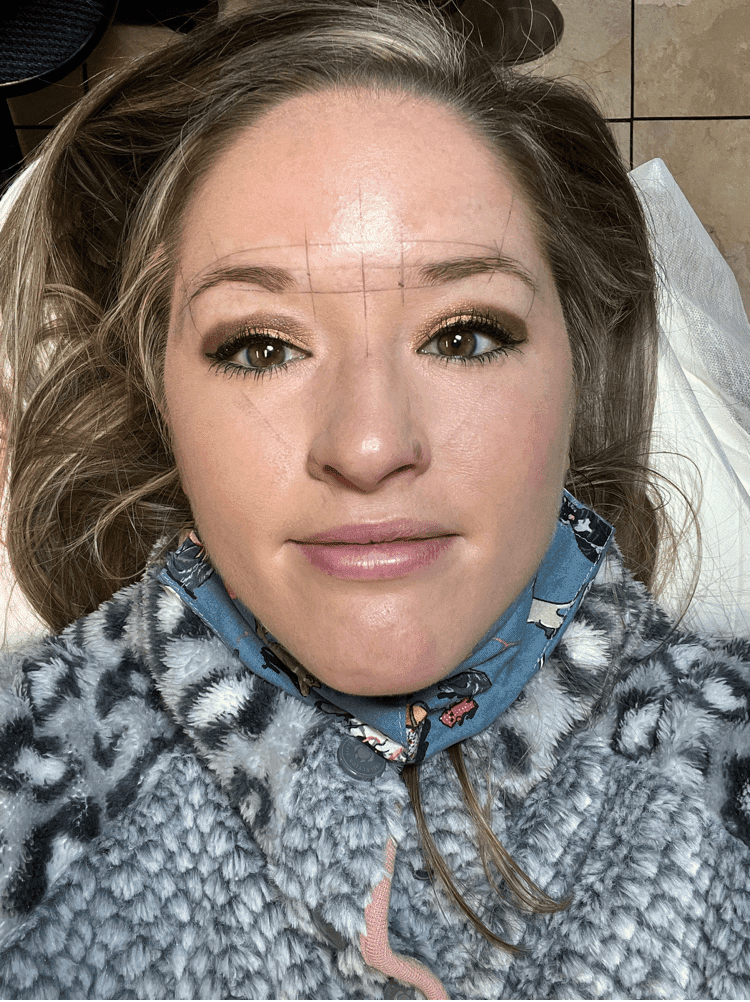
Getting my eyebrows mapped out
Mapped out Eyebrows
Here they are all mapped out.

Applying the Microshading

After they are all mapped out, she begins to choose a color for you. She will apply a little dot above your eyebrow to test it out first to see how it dries and if you like it or not.

We ended up doing a mix of those two colors pictured below and I am very happy with how it turned out. We went with a combo of Killer Brunette/ Midnight Sun by Jen Boyd inks.

I like my brows to be a little darker so that’s what we went with. But if you like your brows to be lighter, then she will definitely do that for you too!

And don’t be scared by the picture in the middle! That’s just the color being added to the brows. Obviously the excess will wipe away and that is definitely not what microblading is.

A lot of people Google about the process and see pictures like that and freak out. Not knowing that this is really not the final result at all! In the last photo, you can see just how good they look after!
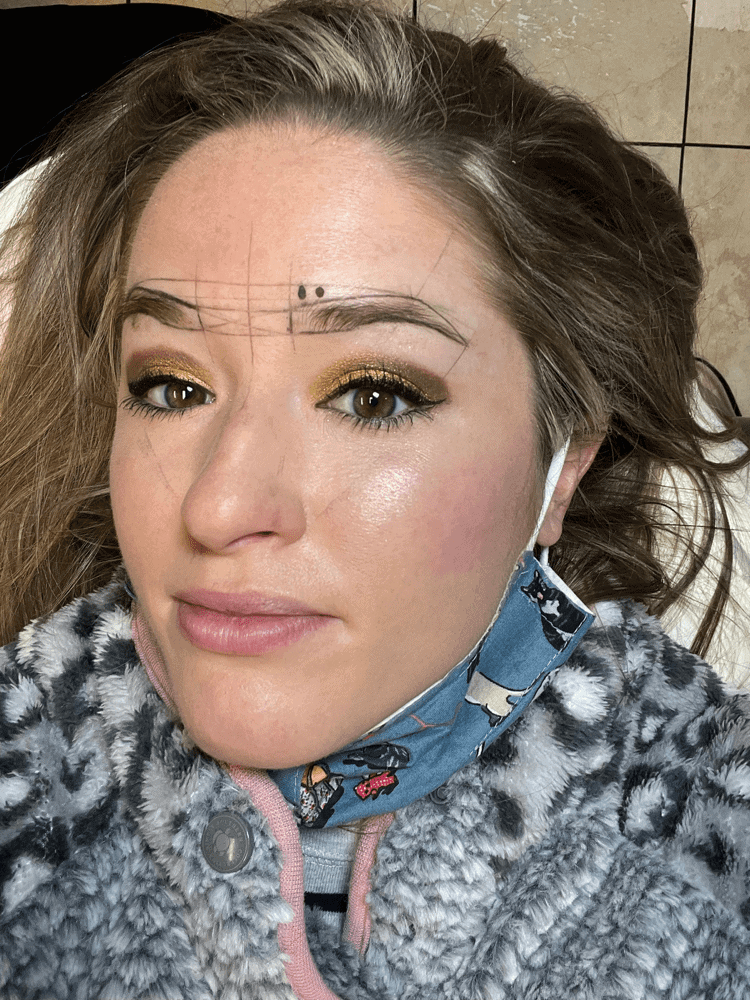
Choosing a shade
Testing out the colors.
Applying the shade to eyebrows
Applying the colors.
After the first microblading process

After the Procedure

Like I said above, the day of the appointment was fine and not painful at all. She gives you some ointment that you need to apply on your brows twice a day after the procedure for four full days.

She already put some on my eyebrows before I left so I didn’t have to apply it but once on the first day.

I was told to wash the area carefully with clean hands and a mild soap. I use Dove White soap and that was fine. But also Cetaphil and Cervue would work just fine too.

The hardest part for me during the whole healing process was just the fact that I couldn’t sleep on my face. I am a stomach sleeper so trying to just sleep on my back or lightly on my side was miserable!

I was paranoid and afraid that I would accidentally roll over in my sleep and sleep on my face. So because of that as well I was a little restless and couldn’t sleep that well.

But all in all, it was only for 10 days and it was totally worth it in my opinion! But I will say, I was super glad for those 10 days to be over!

Day After the Appointment

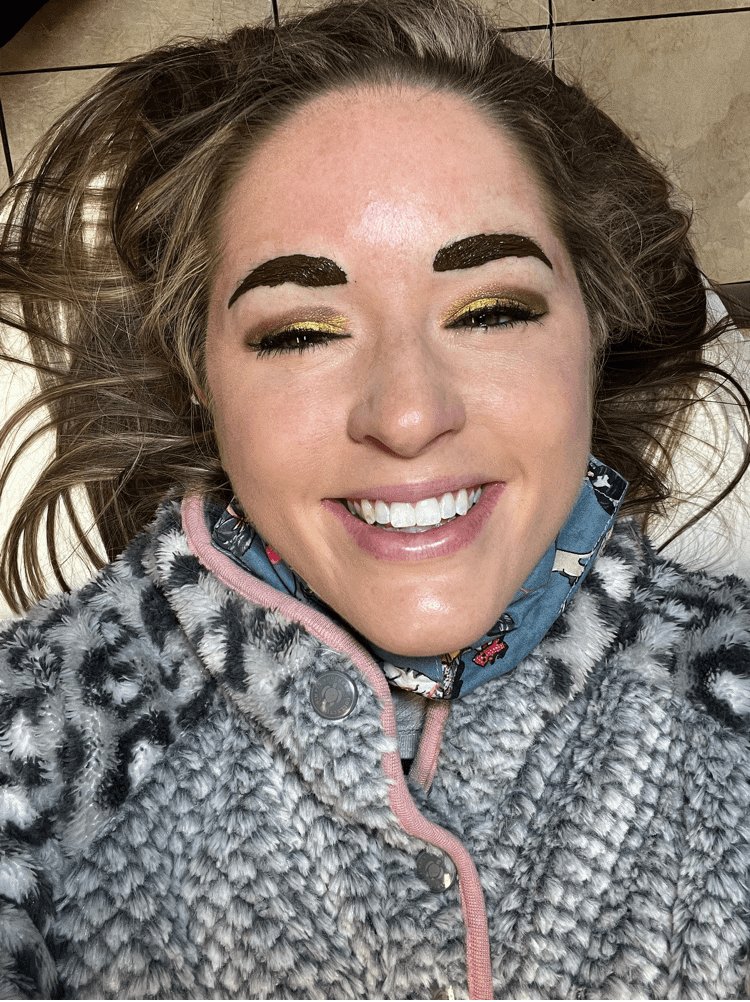
So I loved the way my eyebrows looked after the initial appointment. I was blown away by the shape and color of them and thought they looked perfect.

I will tell you though that day 2 is a different story! Thankfully Stacie warned me ahead of time and told me you will probably hate them the next day.

I am so glad she told me that because I would have definitely been freaking out!

They were a lot thicker and bushier and darker than they originally were the first day. So this is something very important to expect when microblading.

It can be a roller coaster of emotions and it isn’t just perfect from day one. It is a process and you should be aware of that before you do it.

I will show you guys a picture of how I looked below. If you’re fans of The Office, it definitely gave me a Pam’s Halloween Costume vibe of Charlie Chaplin, if you will!

But thankfully, the bushiness only lasted a day and by day 3 it was already looking much better!
Day after Microblading Appointment
A little too bushy here for my liking!

Day 3 and 4 After the Appointment

Thankfully, as I stated above, I was looking much better the third day after. And again, still having no pain or other side effects other than slight itchiness.

It started more so on the night of day 3 and all day on day 4. But once I got through that, that was the worst of it. It’s only bad because you can’t technically reach up there and scratch it!

I would raise and lower my eyebrows a lot whenever they felt itchy and that usually would take it away or at least get my mind off of it.
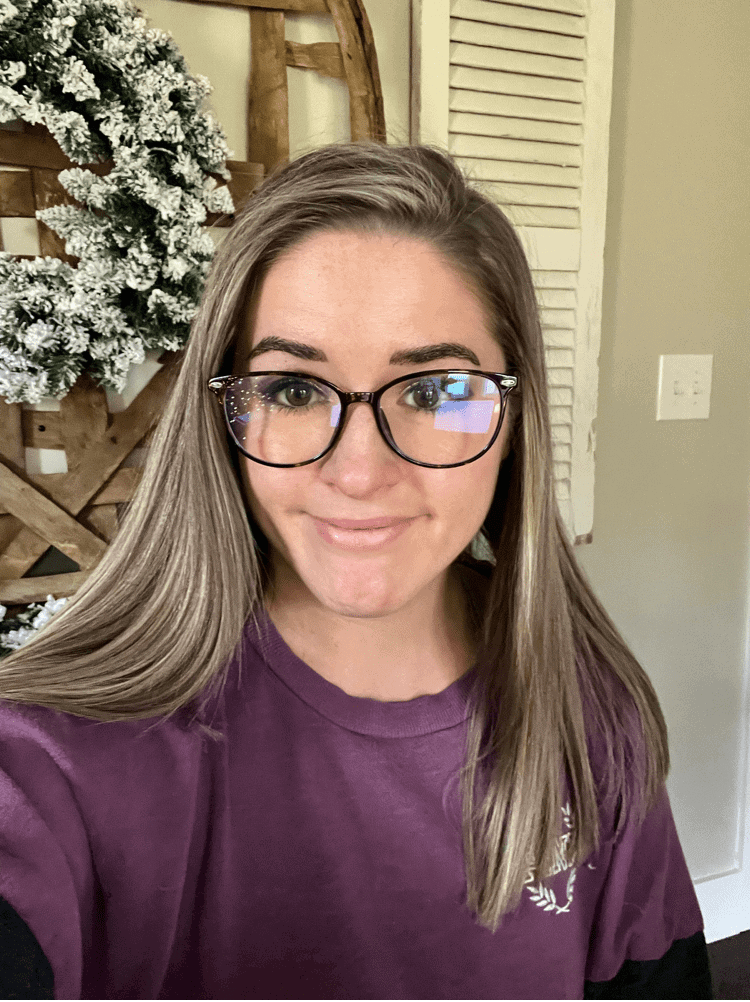
Day 4 after microblading
Looking a little better here on Day 4 after the appointment!

Days 5-7 After Appointment

So now I am going to cover what to expect when microblading about a week after the initial appointment. I was told that these next few days I would experience some flaking and scabbing in the area.

But in all honesty, I didn’t really notice anything too extreme. They were feeling much, much better at this point and definitely not as itchy at all. Although, I am still hating sleeping on my back at this point!

Days 8-10 After Appointment

At this stage you will experience what they call “milk skin” because it does start to fade out after healing.

You will notice it starts to disappear a little bit as the days go on after the initial appointment.

I noticed it was fading more so on my left side which made since because I usually sleep on that side more.

Days 14-28 After Appointment

At this stage of microblading, you will notice that they are starting to come back in. Although they may appear a little patchy at first.

I also still noticed some dryness/flakiness at this point as well. I would say that was the only annoying thing going on at this point.

I just made sure to stay mega moisturized! Once you get through this stage, you are almost all set because it is almost time for your touch up appointment!

4-6 Weeks After Appointment

Time for your touch up session! She will perfect your eyebrows at this session and after that, you will be all done for awhile. You won’t have to bother with them again for about a year and a half to two years!

So in my opinion, it is totally worth it! I hope this post really helped you with what to expect when microblading if you were on the fence about it.

You should honestly just do it because I am sure you will be so happy with your results like I am!

And if you have any more questions for me about the microbladning process, I would love to answer them for you below!
What to Expect When microblading
Pin for Later!

See More Lifestyle Posts Like This Here!

In: Lifestyle · Tagged: Microblading

About Charity Gentry

I love Jesus, coffee, and home decor. I also love to cook and bake as well as read in my spare time! Follow along with me for all my latest DIY projects and ideas!

join the club

You’ll Also Love

Game Day Gift BasketGame Day Gift Basket Idea
The Best Mortgage CalculatorsThe Best Mortgage Calculators
Christmas Beauty FavesBeauty Gift Guide

Comments

  1. Jenny in Neverland says

    December 13, 2021 at 11:03 am

    Your eyebrows look fab! I’ve wanted to try microblading. I currently get my eyebrows tinted, which works well for me but obviously they need to be topped up really regularly. My only apprehension with microblading is that my eyebrows are SO fair (as in, if they’re not tinted, you can barely see them) so I’d worry they’d look too out of place. Maybe something I’ll look into! Thanks for sharing your experience!

    Reply
    • Charity Gentry says

      December 13, 2021 at 11:03 pm

      No problem at all! You should definitely try it out, I am so happy with mine!

      Reply
  2. Sue Berk Koch says

    December 13, 2021 at 12:26 pm

    Your eyebrows look great! Thanks so much for walking us through the procedure!

    –Sue
    https://susanberkkoch.com/blog/

    Reply
    • Charity Gentry says

      December 13, 2021 at 11:06 pm

      Thank you so much Sue. I am so glad you think so!

      Reply
  3. Eleanor Jones says

    December 13, 2021 at 2:44 pm

    Thank you for sharing this experience 🙂 I love hearing about these things before deciding whether I want to give them a go myself x

    Reply
    • Charity Gentry says

      December 13, 2021 at 11:06 pm

      Yes, it definitely helps reading about the process first before actually doing it yourself!

      Reply
  4. Katie says

    December 13, 2021 at 4:54 pm

    Wow! Your eyebrows look great! I naturally have really thick, dark eyebrows (which I hate!) so I’ve never considered microblading, but it seems like people also use it to help shape their brows rather than just for color and thickness.

    Reply
    • Charity Gentry says

      December 13, 2021 at 11:12 pm

      Yes you can definitely do it just to shape them! You don’t even have to add color to them if you don’t want to!

      Reply
  5. Lucy says

    December 13, 2021 at 5:59 pm

    Your eyebrows look fab lovely! I’ve always debated having microblading and this post really helped me so much! x

    Lucy | http://www.lucymary.co.uk

    Reply
    • Charity Gentry says

      December 13, 2021 at 11:13 pm

      Thank you so much Lucy. You definitely should. I am so happy with how mine turned out!

      Reply
  6. Caroline says

    December 13, 2021 at 11:40 pm

    I’ve always been really interested in the idea of microblading, there’s so much misinformation out there so I really loved that you posted this 🙂 Btw, your eyebrows look incredible! xx

    Reply
    • Charity Gentry says

      December 14, 2021 at 12:42 am

      Awe thanks so much Caroline. There is a lot of misinformation out there, so I wanted to be as detailed as possible when explaining the process to everyone! It was totally worth it for sure!

      Reply
  7. Nyxie says

    December 14, 2021 at 1:58 pm

    Your brows look amazing! I just would be so scared to get it done. I’m a bit of a wimp!

    Reply
    • Charity Gentry says

      December 15, 2021 at 12:09 am

      Lol it didn’t hurt at all. I promise. It was totally worth it!

      Reply
  8. Jodie says

    December 14, 2021 at 2:12 pm

    I’ve been contemplating having microblading as well so your post has been extremely helpful to learn about the process and what to expect. I love your brows! Thanks for sharing.

    Reply
    • Charity Gentry says

      December 15, 2021 at 12:10 am

      Oh good. I am so glad this post helped you then!

      Reply

Leave a Reply Cancel reply

Your email address will not be published. Required fields are marked *

Recipe Rating


Next Post >

DIY Fireplace: Subway Tile and Installation

Recent Posts

  • Easy 3-Ingredient Apple Cobbler with Sugar Cookie Dough
  • DIY Pottery Barn Dupe Ghosts: Easy Target Dollar Spot Halloween Decor
  • Easy Slow Cooker BBQ Chicken Recipe
  • Easy Cinnamon Apple Coffee Cake (Made with Fresh or Frozen Apples!)
  • DIY Oyster Shell Ghosts: An Easy Coastal Halloween Craft

Archives

Categories

  • About Me
  • Christmas
  • DIY
  • Everyday Decor
  • Fall
  • Home Improvement
  • Lifestyle
  • Outdoor
  • Recipes
  • Repurpose and Upcycling
  • Spring
  • Summer
  • The Blog
  • Travel
  • Uncategorized
  • Whimsy Home Wednesday
  • Winter

About Me

About Me

Follow along with me for all things home decor and modern farmhouse style! I also love sharing simple DIY projects and how to style and decorate every room of your house! Thanks for stopping by!


Shop My Home!

join the club

trending now

instagram

Follow @mornings_on_macedonia

Stop throwing away your pretty candle jars! 🕯️ He Stop throwing away your pretty candle jars! 🕯️

Here’s the easiest hack for removing leftover candle wax from antique jars, mugs, and vintage vessels so you can reuse them! 🤍

I found this adorable antique candle from Antique Candle Co., and one of my favorite things about it is that once the candle is finished, you can repurpose the vintage vessel instead of throwing it away.

Here’s how I remove the leftover wax:

🕯️ Pour boiling water into the candle vessel
🕯️ Let it sit for several hours until the wax solidifies and floats to the top
🕯️ Scoop out the hardened wax (I save mine to use in my wax warmer!)
🕯️ Remove the leftover sticky wick with a little Goo Gone
🕯️ Wash the vessel thoroughly and you’re done!

Such an easy candle jar cleaning hack and the perfect way to upcycle antique jars, vintage candle vessels, and pretty containers into something you can actually use again! ♻️

Have you tried this candle wax removal hack before?!

Comment SHOP below to receive a DM with the link to this post on my LTK ⬇ https://liketk.it/6lGsH

#lifehacks #candlehack #vintagecandleholder #repurposing #fallcandles
Who knew cupcake liners could make homemade canned Who knew cupcake liners could make homemade canned goods look this cute?! 🍂🤎

If you’re looking for an easy fall DIY or a budget-friendly way to dress up your homemade canned goods, this is the cutest little hack! Simply place a cupcake liner over the lid before screwing on the ring, then finish it off with a printable label and a little twine or ribbon.

It’s the perfect way to turn homemade apple butter into a beautiful fall hostess gift, neighbor gift, teacher gift, or Thanksgiving gift in just a few minutes. Simple, inexpensive, and so much cuter than a plain mason jar!

Would you gift these to someone this fall? 🍎🍂

Save this idea for fall canning season and follow for more easy fall DIYs, cozy decorating ideas, and homemade gift inspiration! 

Comment SHOP below to receive a DM with the link to this post on my LTK ⬇ https://liketk.it/6lGwV

#fallhacks #kitchenhack #cannedgoods #applebutter #fallgifts
Fall is almost here, which means it’s officially a Fall is almost here, which means it’s officially apple orchard season! 🍎 One of my favorite fall traditions is picking fresh Honeycrisp apples straight from the orchard. There is just nothing better than a crisp, juicy apple on a cool autumn day!

I always stock up because I love freezing fresh apple slices to enjoy all year long. They’re perfect for making these easy Crockpot Cinnamon Apples whenever the craving hits! They’re soft, warm, full of cinnamon flavor, and make the perfect fall side dish, dessert, or sweet snack. Plus, this slow cooker apple recipe couldn’t be easier to make.

If you’re looking for cozy fall recipes, simple apple recipes, or an easy crockpot dessert, you have to try this one!

Comment “RECIPE” below and I’ll send it straight to you! 🍎🍂

#crockpotrecipes #cinnamonapple #cinnamonapples #fallbaking #fallrecipes
Y’all, I am SO tired of this 😩💔 I woke up this mor Y’all, I am SO tired of this 😩💔 I woke up this morning not feeling great, but like I always do, I tried to push through it. I was sitting at my laptop doing a little work when suddenly my hands started shaking so badly that I couldn’t control what I was doing. My HR spiked up to 180 and I threw up as well. And honestly? I’m frustrated, scared, and completely exhausted from not knowing WHY this is happening.

I finally got my MRI results back on Friday, and fortunately (but also unfortunately), they didn’t find anything major. And I’ll admit it… I bawled. 😭

Of course I don’t want something seriously wrong with me. But at the same time, I desperately want a diagnosis. I want answers. After dealing with unexplained symptoms for so long, getting “normal” test results can almost feel like another dead end.

My neurologist had mentioned the possibility of Chiari malformation, so I honestly thought that might finally explain some of my symptoms. Now that the MRI didn’t show that, I feel like I’m back at square one.

Because this isn’t normal. 😩

What am I supposed to do for work when my hands are shaking like this?! I was working as a dental hygienist, and can you imagine trying to clean someone’s teeth while your hands are trembling uncontrollably? It’s terrifying to even think about.
My short-term disability still hasn’t been approved either, so I’m sitting here wondering what I’m supposed to do next while my health and career feel completely uncertain.

I have another appointment with my doctor on Friday, so I’m trying to remind myself that this is just another step in the process. But it feels like it’s been nothing but waiting for appointments, waiting for tests, waiting for results… and still no answers.

This has truly been the hardest season of my life.

I’m trying so hard to trust God through all of this, even when I don’t understand what He’s doing. 🙏🏻 It’s just really hard when you don’t know what your future, your health, or even your career is going to look like.

So if you’ve been following along through this health journey, please keep praying that I finally get some answers. 🤍
If you’re part of the Abandoned Golf Wives Social If you’re part of the Abandoned Golf Wives Social Club, come join me! 😜 Because if he’s going to spend every weekend on the golf course, I’m at least going to have a cute outfit about it. 😂

When I saw this adorable shirt from Pink Lily, I HAD to have it immediately—especially because it pairs perfectly with my “he’s golfing” hat. ⛳️😂

At this point, I might as well make being a golf wife my entire personality, right?! 🤣

Tag your fellow golf wives who totally get it! 👇🏼

Comment SHOP below to receive a DM with the link to this post on my LTK ⬇ https://liketk.it/6lqMU

#golfhumor #husbandwifejokes #husbandwifehumor #golfing #golfjokes
When I spotted these plain little white ceramic gh When I spotted these plain little white ceramic ghosts at the Target Dollar Spot, I knew they had SO much potential! Instead of leaving them plain, I gave them a quick makeover and turned them into the cutest antiqued gold Halloween decor that looks way more expensive than it actually is! 🙌

Here’s how I did it:

👻 First, I sprayed the ceramic ghosts with black spray paint.
✨ Then I lightly layered metallic gold spray paint over the top. I didn’t want them super shiny—I was going for that aged, antique gold pottery look.
🖤 Finally, I used a little black acrylic paint to make their eyes stand out more.

And that’s it! Such an easy DIY Halloween decor makeover, and I think they turned out ADORABLE! 🥹

I love finding inexpensive Target Dollar Spot finds and giving them a high-end look with a little DIY magic.

Would you believe these started as plain white ghosts from Target?! 👻

Comment SHOP below to receive a DM with the link to this post on my LTK ⬇ https://liketk.it/6llsc

#potterybarndupe #targetdollarspot #targetdollarspotfinds #diyghost #ghosties
If pressing the “CLOSE DOOR” button the second I g If pressing the “CLOSE DOOR” button the second I get on the elevator so I can avoid small talk is wrong… I don’t want to be right. 😂🙈

I’m just THAT introverted. 🤣 My social battery has a daily limit, and sometimes I’ve already hit my maximum number of conversations before I even get to where I’m going. 😅

No offense… I just need to ride this elevator in peace and silence 🤣

Please tell me I’m not the only introvert who does this?! 👀

#introvertlife #introvertproblems #introverting #relatablehumor #relatablecontent
It’s officially been ONE FULL YEAR since my health It’s officially been ONE FULL YEAR since my health started spiraling. 💔

A year ago today, I was at work when my heart rate suddenly spiked so high that I became extremely dizzy and shaky and genuinely thought I was going to pass out. I went to the ER afterward just to be safe, and of course… everything looked “normal.” My EKG was normal. They could see that my heart rate had spiked, but they couldn’t tell me why.

Little did I know that one scary episode would turn into a daily battle with unexplained symptoms. Fast forward one year and I’m dealing with even worse symptoms, including frequent heart rate spikes, dizziness, shakiness/tremors, fatigue, and so much more. And the hardest part? I STILL DON’T HAVE ANSWERS.

I can’t even work anymore. I’ve spent months waiting for appointments, getting test after test, waiting for results, and hoping that this will finally be the thing that explains what’s happening… only to end up with more questions.

And honestly? I feel crazy sometimes. Not because I think this is all in my head, but because it’s incredibly hard to keep telling people how badly you feel when test after test doesn’t give you an answer. 😭

It’s been a really rough week emotionally, and I’m having a hard time dealing with all of this. I feel like I’m constantly taking one step forward and two steps back. How long am I going to have to wait before I finally have answers? How much longer until I can start feeling like myself and actually live my life again?

I’m so tired of waiting. I’m tired of being passed from appointment to appointment. I’m tired of having no real help in the meantime. And I’m tired of feeling like I have to fight so hard just to be heard. 💔 I’m trying so hard to let go, trust God, and believe that there’s a reason for all of this… but y’all, IS IT HARD. 😢

I’m praying that after this past year, I’m finally getting closer to some answers. Until then, I’m just taking it one day at a time. If you’re also living with unexplained symptoms, chronic illness, POTS symptoms, tremors, dizziness, heart rate spikes, or a long diagnostic journey, please know you’re not alone. ❤️Here’s to hoping year two looks very different from year one!
Don’t let those vacation seashells sit in a drawer Don’t let those vacation seashells sit in a drawer collecting dust! 🐚🤍 TURN THEM INTO WALL ART INSTEAD!

If you’re anything like me, you come home from every beach trip with a pocketful of seashells and absolutely no idea what to do with them. 😂 So I turned mine into this easy DIY seashell wall decor and I’m OBSESSED with how it turned out!

All you need is:
🐚 Seashells
🤍 A small canvas
🔥 Hot glue
🎨 White spray paint
🪵 Optional wood trim for a frame

I love that you can customize this with shells from your favorite beach trip, making it such a sweet way to preserve those vacation memories. And the neutral white + wood combination makes it work with almost any home decor style!

You could even make a whole gallery wall with shells from different beaches you’ve visited! 🥹🌊

Save this DIY for your next beach vacation! And if you have a stash of seashells at home, this is your sign to finally DO something with them. 😂🐚

I have the full step-by-step tutorial on the blog! Comment “SHELLS” and I’ll send you the link! 🤍

#seashell #seashelldecor #coastaldecor #seashellart #coastaldecorating
Apparently, this little Christmas decoration has b Apparently, this little Christmas decoration has been hanging out in here ALL YEAR and I just never noticed it. 🤣

Tell me I’m not the only one who does this?! I swear every time I switch out my seasonal home decor, I find at least ONE random piece from months ago that somehow survived the decor rotation. 😂

Fall decorating is officially underway over here, but apparently Christmas wanted one last cameo. 🎄😂

Please tell me I’m not alone! 👇🏼

#failvideos #failvideo #falldecorating #falldecor #relatablecontent

Copyright © 2026 Mornings on Macedonia · Theme by 17th Avenue