
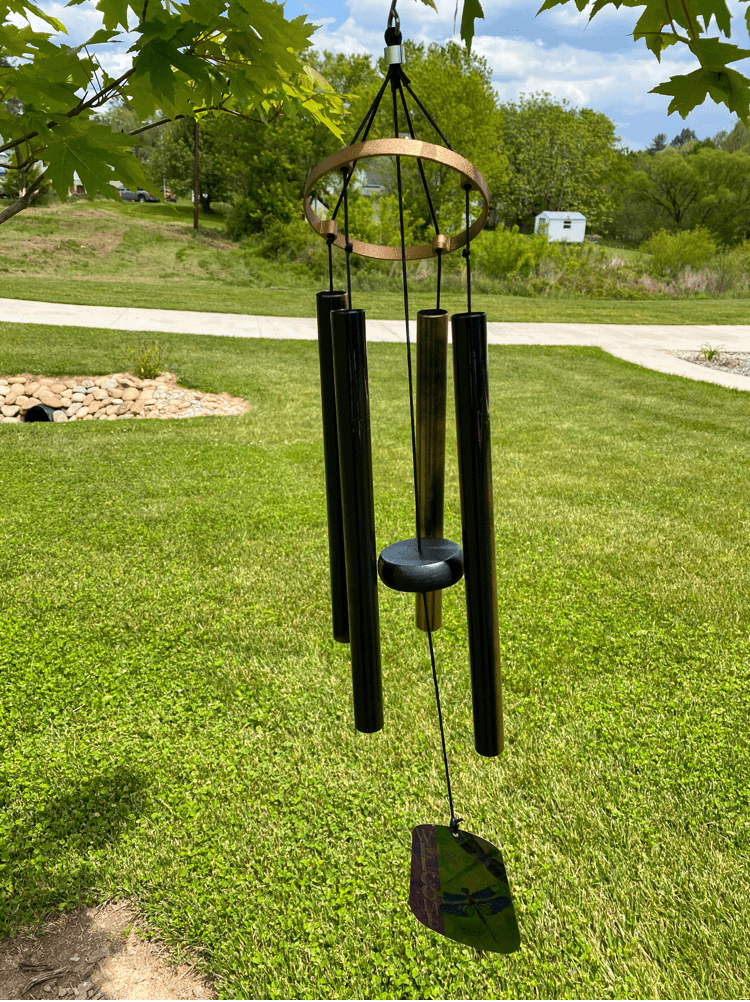
I was recently gifted a set of wind chimes for my birthday. And I was so excited because if you can believe it, I have actually never had a set of wind chimes before. However, the wind chimes did not really match the decor I already have for my porch. So there went my little creative brain again for this easy wind chime refresh project.
I thought that with a little spray paint and TLC, I could really make these into something special for my porch. And I am so happy with how they turned out! Keep on reading to see just how simple and easy it is to make!
This post contains affiliate links. Click here to read my disclosure policy.
Materials Needed for Wind Chime Refresh:
- Wind Chimes (obviously)
- Spray Paint (I used matte black)
- Hooks (to hang wind chime)
- Cricut Machine (optional, I have the Explore Air 2 machine)
- Vinyl (optional, to create a decal for the wind chimes)
- Cricut Tools & Accessories (optional, to help with the vinyl decal)

Spray Paint The Wind Chimes
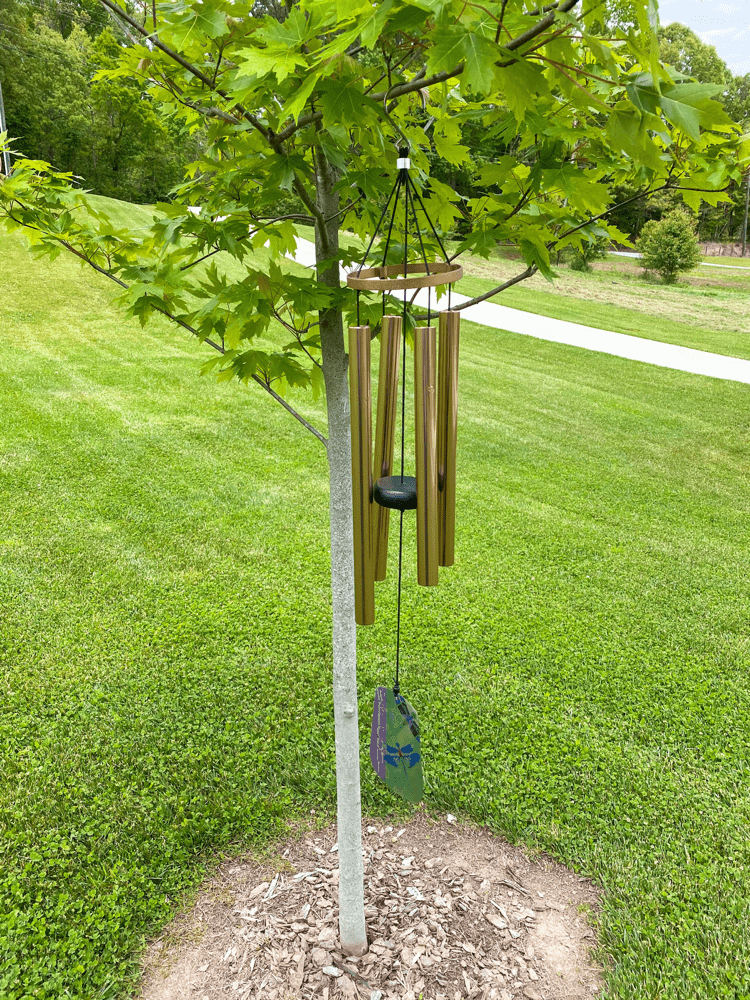
The first thing we did was find a good area to hang up the wind chimes to be able to paint them. We have a small tree in our front yard and not much around it.
So we hung the wind chimes on the lower branch and went to town! We were super careful to not spray the tree with the spray paint.
We just lightly spritzed a spray here and there, trying to let it dry in between.
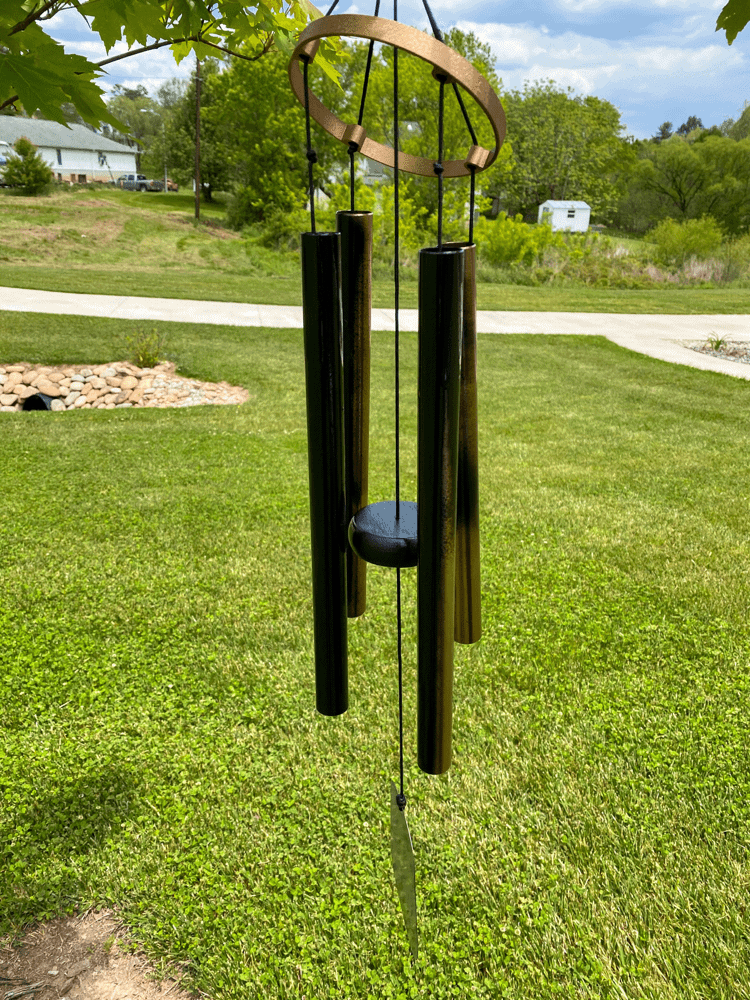
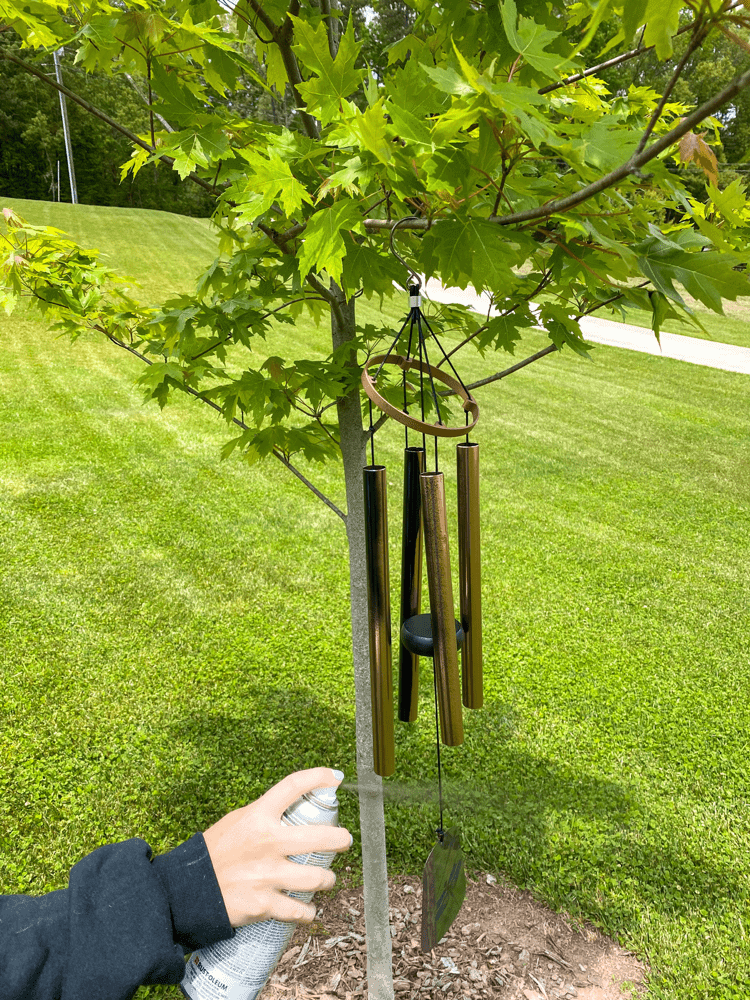
It took a total of two coats and we just let the first one dry completely before adding the second. Even though we were careful spraying it, there are still a few drip marks on it.
But that’s okay because from far away you can’t tell at all. And it was such a quick process to use spray paint rather than actually painting it on that I would rather sacrifice a few drip marks over hours of painting for perfection!
Hang Up The Wind Chimes
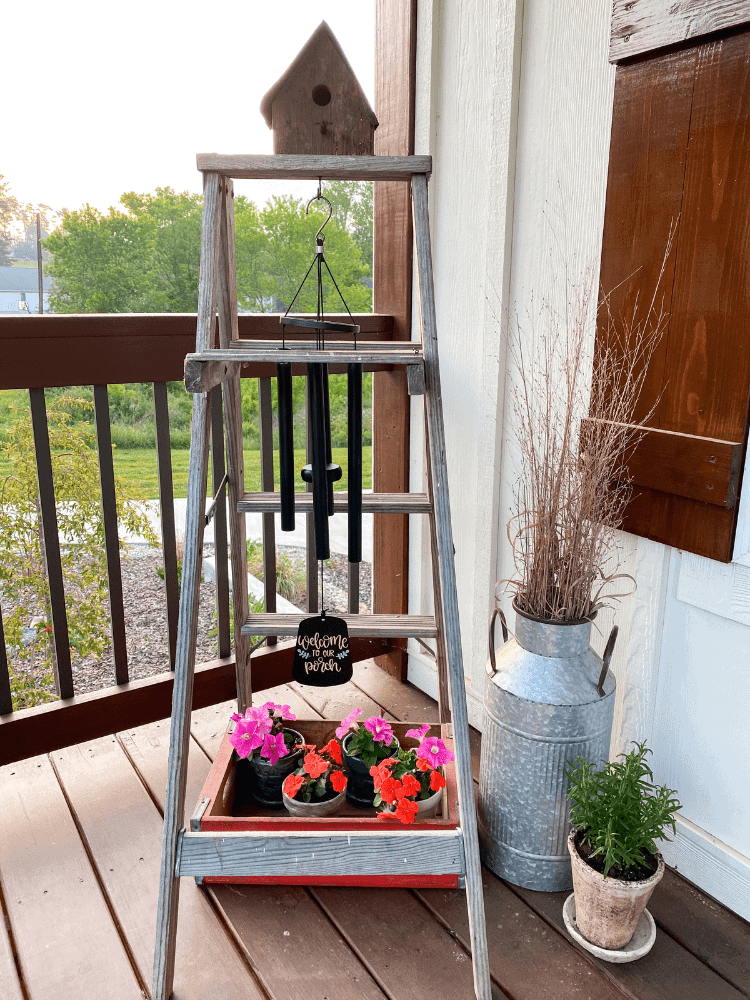
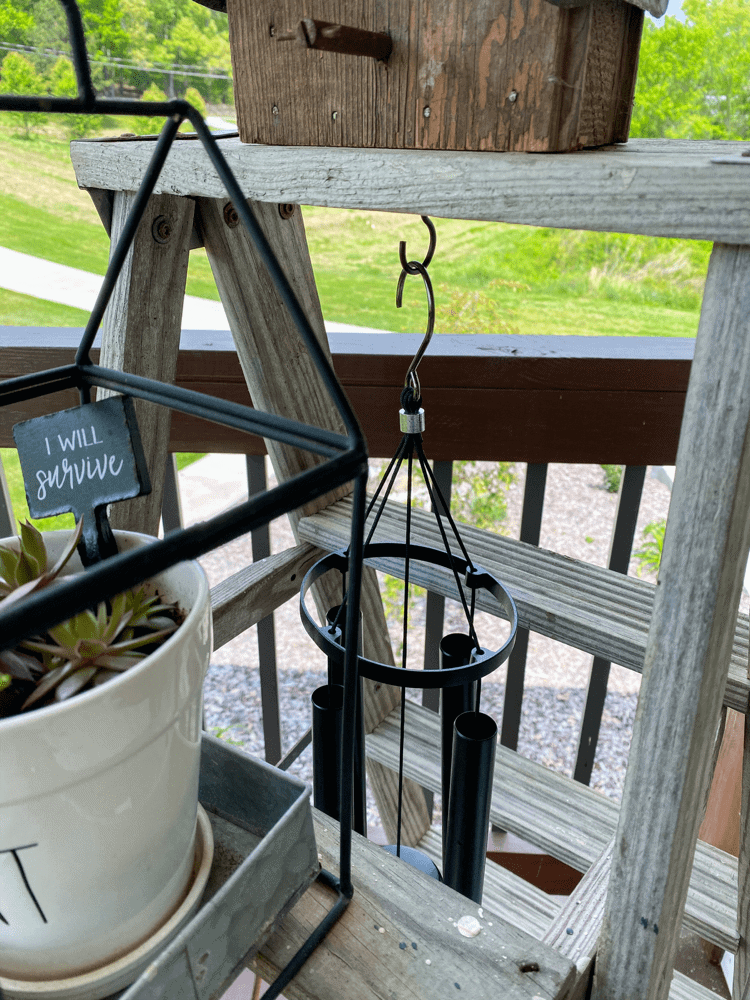
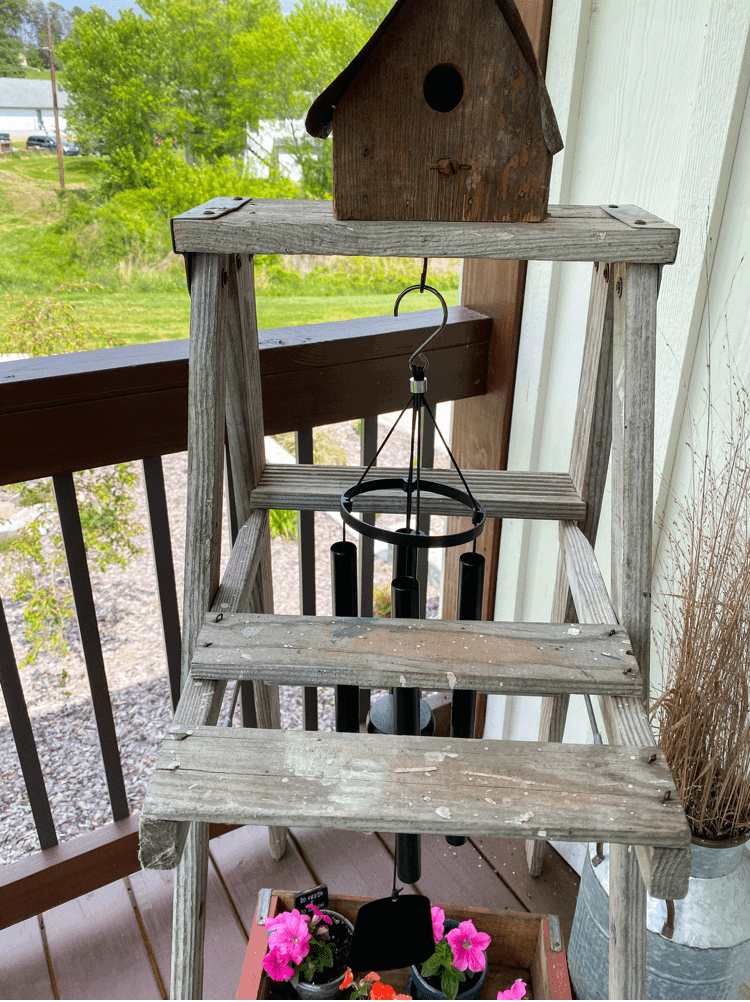
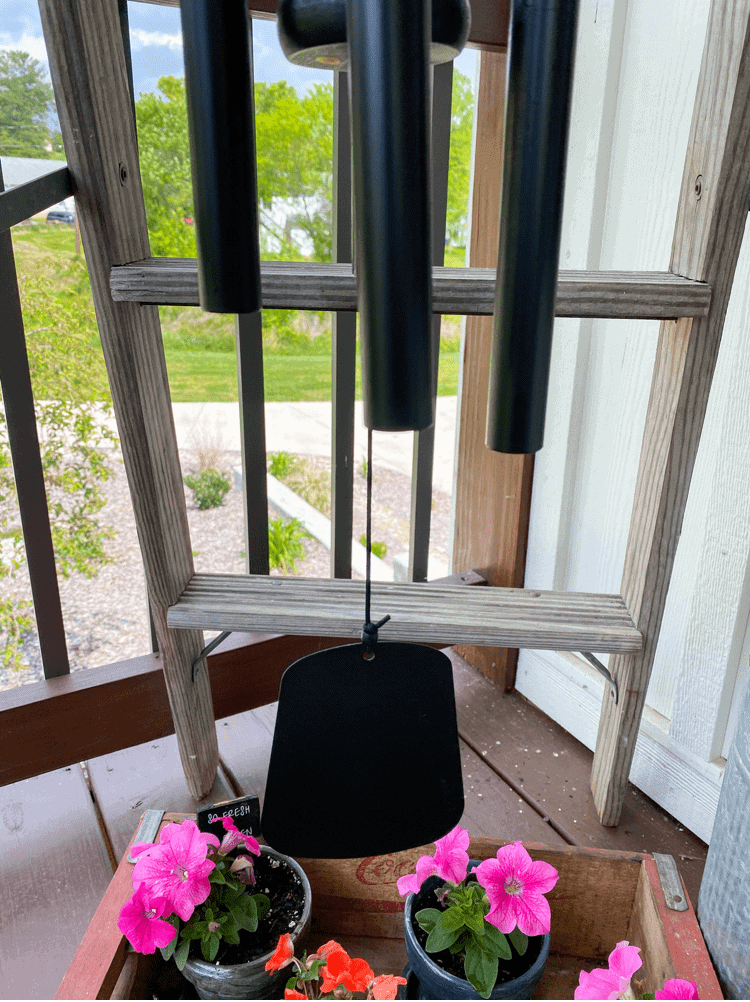
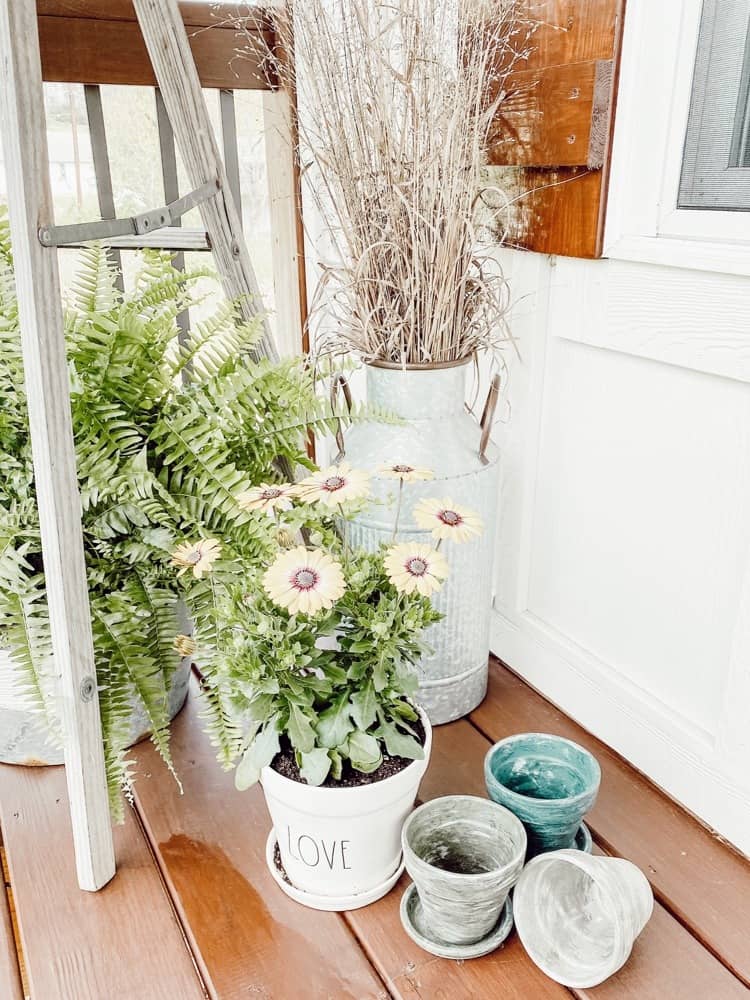
After the wind chimes are completely dry, you can then hang them up where you want. We did something a bit unconventional.
Instead of hanging them on the ceiling of our roof, we decided to hang them on my antique painters ladder.
I have this set up in the far corner of our porch and I thought it would be cool and different to add in the chimes here.
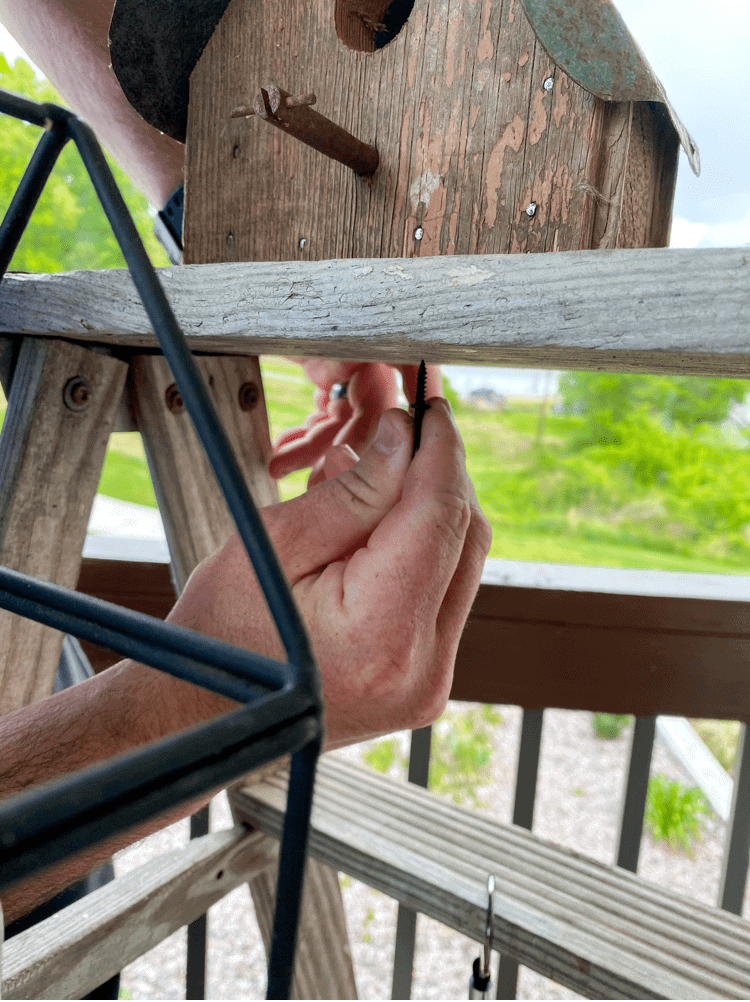
We simply got a screw hook and screwed it in on the bottom of the top shelf of the ladder. Then, we hung the wind chimes underneath the ladder.
I love how the matte black color looks on them here. I feel like if we kept it the original brassy color, it would not have matched my porch decor as well.
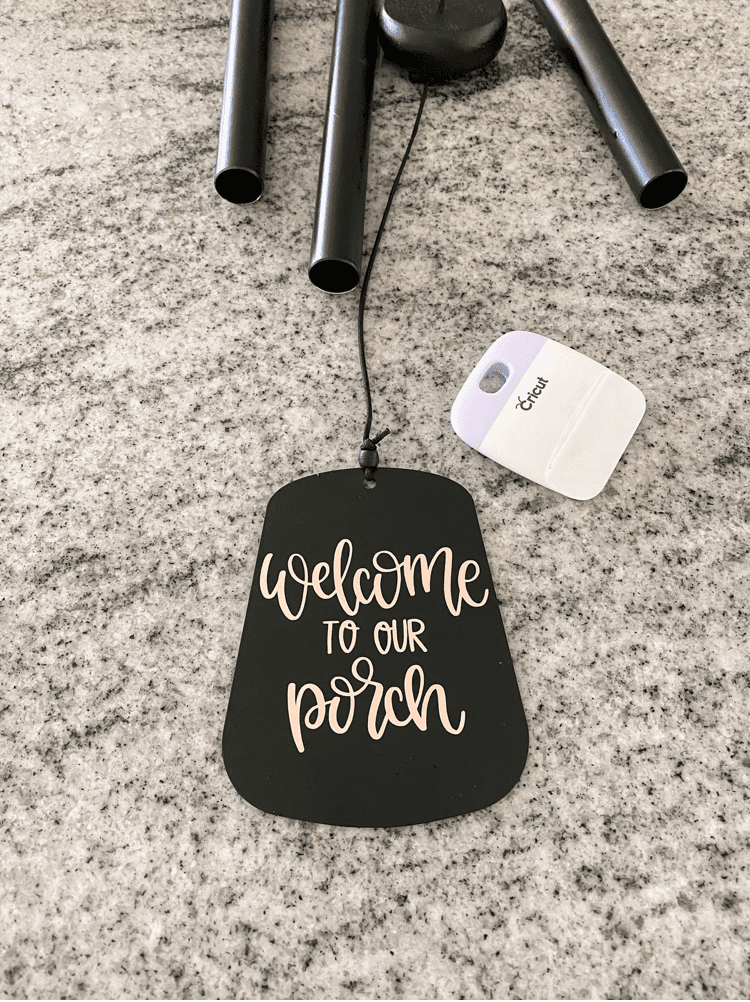
Add A Vinyl Decal To The Bottom Of The Wind Chime
This part is totally optional, but I recently got a Cricut Machine and I have been obsessed with it! So I am trying to decal all the things I can while I am learning it and playing around with it!
I thought it would be fun to add in a little decal on the bottom since we painted over that as well.
I think adding in the decal makes it more personal and fun. I found a cute “Welcome to our Porch” decal on the Cricut Design Space software.
This one was obviously perfect to use for this wind chimes refresh project.
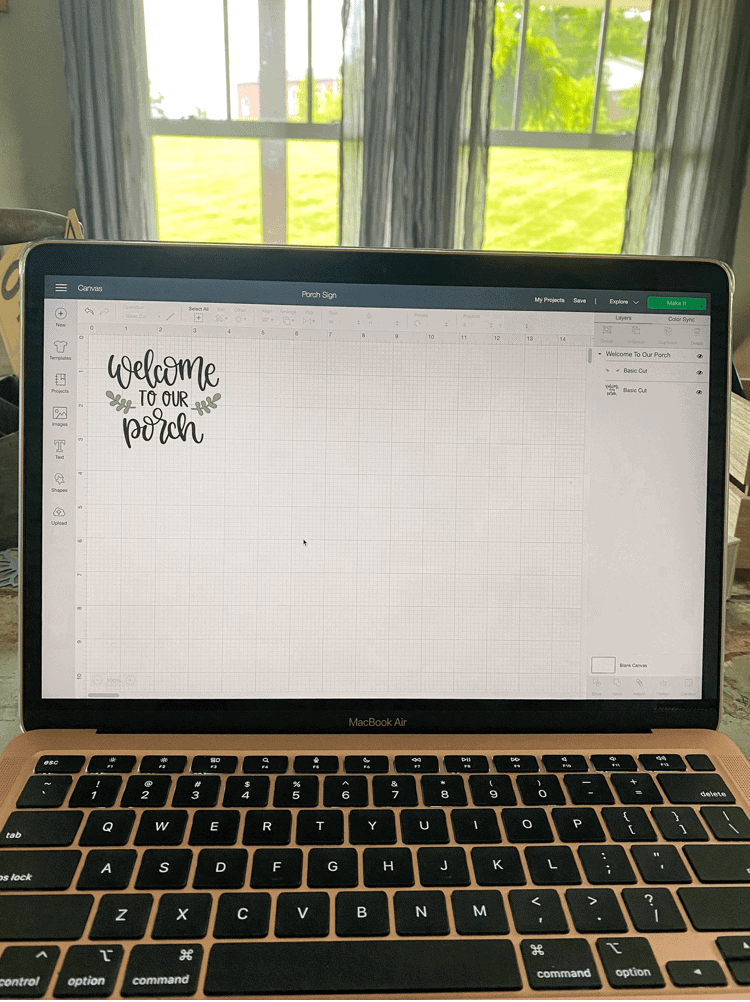
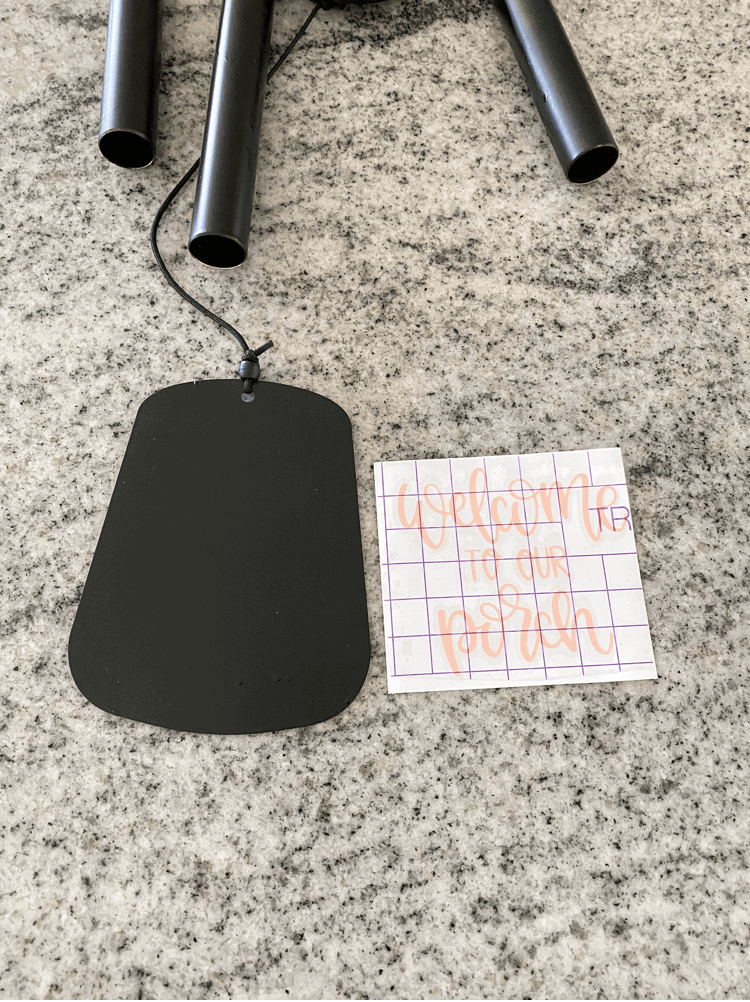
To do this, I simply measured the plaque on the bottom of the chimes so I knew what size to print out on the vinyl. Then, I used the weeder tool and peeled off the excess vinyl and then applied transfer tape to the top it.
That way I can easily adhere it to the wind chimes. And if all that seems foreign or complicated to you, don’t worry!
I have another blog post coming up soon where I go into much more detail on how to use the Cricut Machine and their products. So be sure to be on the lookout for that if interested!

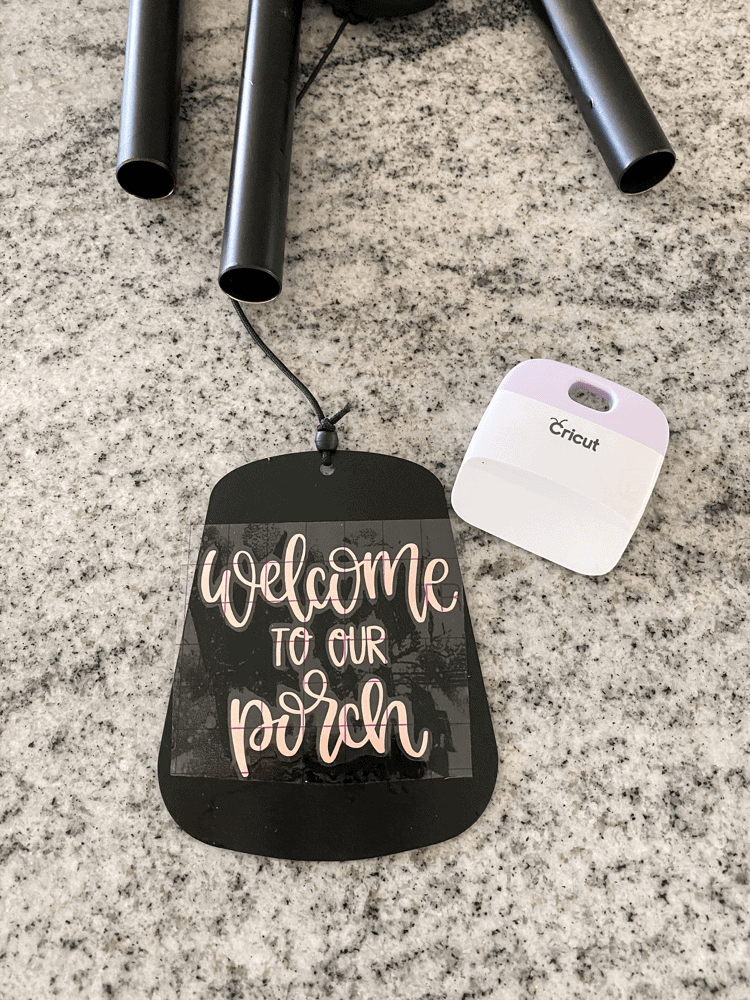
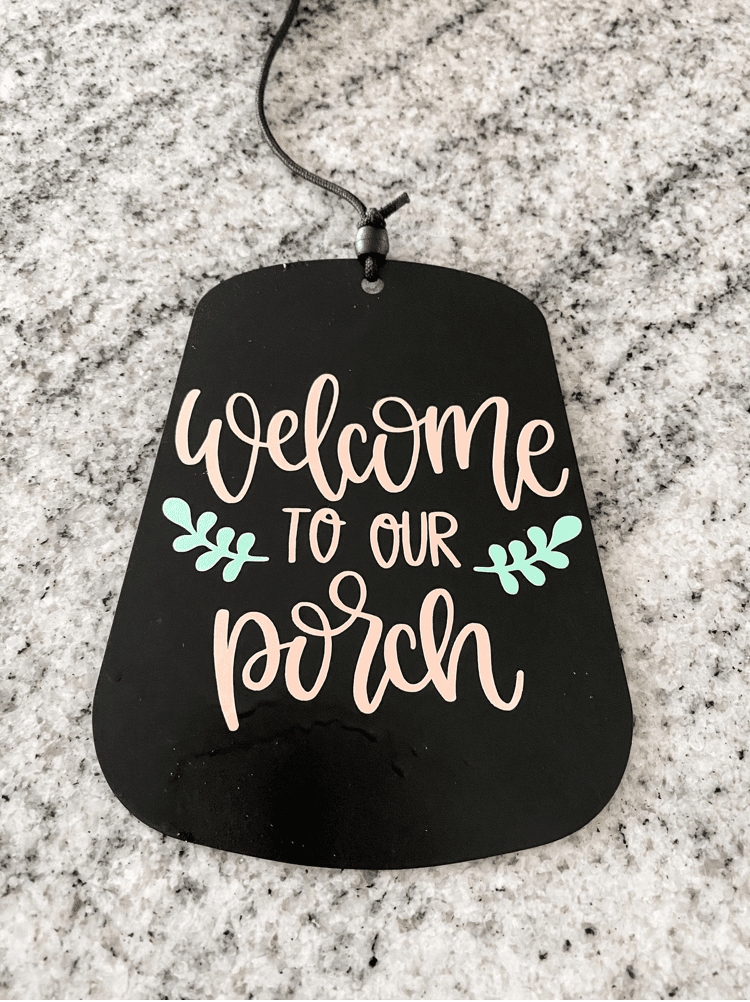
After adding the vinyl decal to the bottom of it, the refreshed wind chimes are officially done! How quick and easy is that?!
I always love to take something and transform it into something I love even more. This was such a perfect quick and easy DIY project and y’all know those are my favorite!
Just like my easy tray refresh project I did a few weeks ago too! Let me know what you think about the wind chimes and how they turned out below!


I don’t have a wind chime but you’ve got me wanting one now. And putting it on the porch is the perfect spot. I really like the idea of making the wind chime your own by painting and adding a decal or something else too. Thanks for sharing,
No problem at all! So glad you enjoyed it too!
What a beautiful transformation, it looks so chic and sleek now! Your DIYs are always extra Charity x
Awe thanks so much my friend. I really appreciate that compliment!
What an amazing refresh! The wind chimes look great and I absolutely love how you hung them on the ladder! Such a wonderful project! Thanks for sharing it!!
Thank you so much. I am so glad you enjoyed it too!
Wind chimes do look great hanging outside a door of a house and your wind chime is lovely and I love the refresh you’ve given it! x
Lucy | http://www.lucymary.co.uk
Thank you so much Lucy. I appreciate it!
Your home for the windchime! Very unique.
Thank you so much!
It is amazing how a little thing like painting this black immediately makes it look more classy! Love your creative hanging location too. I recently took down a battered old chime set and, not wanting to throw it away, kept it. I am glad I did, as this is the perfect way to breathe some life back into it.
Thanks for sharing! 🙂
I know right?! I love painting things! It instantly transformed the pieces!
Wow, this looks so fun! I definitely have an old wind chime that needs a refresh. Your projects are always so beautiful and creative. My daughter and I will have to do this for a summer project. Thank you for sharing! xx
Awe thanks so much! So glad you enjoy them!
I need a new clapper for my wind chime. Your post is a great nudge for me to finish the job so I can hear the lovely chimes again. Thanks!
—Sue
http://www.susanberkkoch.com/blog
Awe thanks so much! I am so glad it was a nudge for you then!
This is such a cute project! I loved how you made the wind chimes part of your decor and the whimsy it creates. Thanks for sharing.
Thank you Jodie. So glad you think so too!
What a cute post! I love the transformation and I have to admit, this has got me wanting a windchime! Loved the decal too – it just added a little something and looks great!
Thank you so much my friend. I appreciate it
Wow!
It’s amazing! I love to do such work but don’t have enough time for it.
Go ahead!
Thank you so much
Oh! I love wind chimes. They sound so calming. Thank you for sharing this cool DIY. Will try to make one.
Thank you! They are very calming for sure!
It looks fantastic! Such an easy thing to do. I love that you saw the potential in the chimes and found a way to make them fit into your decor. Also, I really love that little birdhouse on top of the ladder. It’s so cute 🙂
Thank you so much! I love that birdhouse too!
Wow I love this idea, and it’s perfect when you need a refresh. I think wind chimes are so beautiful and welcoming 🙂 x
Thank you! I think they are too!
This is the sweetest thing ever, I love the writing you’ve added for a final touch too xx
Thank you so much my friend. I appreciate it.
Awh I LOVE what you did with this wind chime! So cute and I love how you’ve decorated it / around it as well 🙂 x
Thank you so much Jenny. So glad you think so too
what a fun DIY! it turned out beautiful!
Thank you so much. I appreciate it
I’m starting to think that you’re deserving of the title “DIY Queen”! I love how you took something relatively ordinary and made it spectacular and perfect for your space. Wind chimes are wonderful to have and this little refresh makes a world of difference!
Awe thanks so much Stephanie! That made my day!
This is beautiful! You did a great job, and what a wonderful way to reuse a couple older items – it’s amazing what a simply coat of paint can do! The finished project with flowers at the bottom and the rustic ladder looks wonderful. Thank you for sharing.
Thank you so much. I am so happy you like it too!
I seriously need to get myself some wind chimes. There’s something super relaxing about hearing the gentle tinkling. Though with the crazy weather in the UK and my neighbours, I’m not sure they’d work at my apartment! xD Maybe I can slip them somewhere where I live!
Yes! I hope you find a good spot for them!
Great DIY! Thank you for sharing! Love the transformation! I have some wind chimes in my garden and they are so cool.
Thank you, I love wind chimes too!
This is a great idea! You make me wish I owned a Cricut
Yes! I have been loving mine so far! Glad I got it!
Hi Charity.
Great job! Your DIY abilities always put mine to shame 😉
Out of curiosity, because I’ve never owned any, don’t wind chimes keep you awake at night if it’s windy?
No I don’t ever hear them at night but it could be because our bedroom is on the opposite side from the porch. But even if we are siting in the living room watching tv at night, I don’t really hear them
I love a good wind chime. My nan and grandad used to have one right next to their front door – I’d completely forgotten about it until I read this post!
Rosie
Awe that’s so sweet that it brings back good memories like that for you!
I don’t actually have any wind chimes but this is a really great way to refresh them! Thank you for sharing this I really enjoyed reading it x
Thank you so much Kayleigh. I am so glad you think so too!
Thanks for sharing, this idea to do up wind chimes is lovely, I miss having mine as they fell down in a storm, hopefully I get something simular soon 🙂
Thank you! I hope you get something similar soon too!