The second I saw this black cat in the Target Hall The second I saw this black cat in the Target Halloween decor section, I knew exactly what I had to do… turn it into Charlie. 😹

Obviously, I couldn’t just leave this little black cat statue as-is when I have my very own fluffy tuxedo cat at home! So I grabbed some paint while I was at Target and came home for a little Halloween craft night with my very attentive supervisor. 😂

And when I say Charlie supervised… I mean she watched VERY closely to make sure I got her likeness just right. 👀

I used white paint to recreate her adorable tuxedo face, pink for her little nose, and green for her eyes. Her eyebrow whiskers came out slightly wonky, but honestly… hers are a little wonky in real life too, so we’re calling that accuracy. 😂

When the DIY cat statue was finally finished, Charlie inspected my work and… well… I’m not sure she was impressed. 😹
Obviously she knows she’s MUCH prettier in person, so her Target Halloween decor dupe simply wasn’t up to her standards.

But I think it turned out absolutely adorable! 🐈‍⬛🎃 This was such an easy and fun way to personalize inexpensive Halloween decor and make it look just like your own pet.
Now I need to know… would you paint one to look like your cat?! 👇🏻

Comment SHOP below to receive a DM with the link to this post on my LTK ⬇ https://liketk.it/6nshX

#halloweencat #catmom #halloweendecorations #halloweendiy #diyhalloween
🍎 Don’t let those fresh orchard apples go to waste 🍎 Don’t let those fresh orchard apples go to waste! Freeze them instead! 😉

Have you ever tried freezing fresh apple slices?! This is one of my favorite fall kitchen hacks, especially after a trip to the apple orchard! 🍏

Every fall, I come home with WAY more apples than we could possibly eat before they go bad 😂 So instead of letting them sit on the counter, I prep and freeze a big batch of apple slices to use all season long!

It takes a little extra time upfront, but having fresh apple slices ready in the freezer makes fall baking SO much easier. 🥧 You can grab exactly what you need whenever you’re craving apple pie, apple crisp, apple cobbler, apple bread, or any of your favorite cozy apple recipes!

Plus, it’s such an easy way to preserve those delicious fresh-picked apples from the orchard and enjoy them long after apple season is over. 🙌🏻🍎

Want to know how to freeze fresh apples the right way so they’re ready for all your fall baking?!

Comment “APPLES” below and I’ll send you my full step-by-step guide! 🍎❄️

And tell me, what’s the FIRST apple recipe you’d make with them?! 👇🏻

Comment SHOP below to receive a DM with the link to this post on my LTK ⬇ https://liketk.it/6m9Qm

#freshapples #frozenapples #kitchenhack #applerecipes #appledessert
There’s just one tiny problem… I can’t dance to sa There’s just one tiny problem… I can’t dance to save my life, I’m not Mormon, I’m not a mom, and I’m pretty sure binge-watching every season of The Secret Lives of Mormon Wives does NOT count as an application. 🤣

But seriously… why do all the Mormon wives look SO cute in their matching sweat sets?! Like they just casually throw one on and look effortlessly put together.

Meanwhile, most sweat sets have me looking like an oversized pumpkin with a drawstring. 🎃😂

BUT THIS ONE?! 👏🏻

This Aerie sweat set might finally be my MomTok moment because I’m obsessed. It’s comfy, cute, and actually makes me feel put together while still basically wearing pajamas, which is exactly the kind of fashion I support. 😂

And obviously, the only appropriate activity while wearing it is binge-watching the new season of SLOMW. 👀

So… who else already blew through the entire season?! 😂 I need to know ALL your thoughts because I have opinions. Drop yours below! 👇🏻

Comment SHOP below to receive a DM with the link to this post on my LTK ⬇ https://liketk.it/6nglm

#secretlivesofmormonwives #slomw #momtok #taylorfrankiepaul #realitytv
POV: you made the cutest DIY Halloween decor witho POV: you made the cutest DIY Halloween decor without buying a single thing 👻📖

This is your reminder that fall decor doesn’t have to be expensive! Some of my favorite seasonal decorations are DIY projects made with supplies I already have at home, and this spooky cute DIY ghost banner might be one of my favorites yet.

I started by brewing about 4 bags of black tea and letting it cool. While the tea was cooling, I tore a few pages out of an old book I already had and placed them in a shallow baking dish with the tea. I let the pages soak for several hours to give them that perfectly aged, vintage look.

Once the tea-stained book pages were dry, I used a ghost-shaped cookie cutter to trace little ghosts onto each page. Then I cut them out, added tiny faces with a Sharpie, and attached them to twine using mini clothespins.

And that’s it! 👻

I hung my DIY ghost garland on the hutch in my dining room, and I think it adds the perfect amount of spooky cute Halloween decor without spending a bunch of money.

You could easily customize this budget-friendly fall DIY too! Instead of ghosts, try pumpkins, leaves, bats, or whatever shape fits your fall decor. The possibilities are endless!

Save this easy DIY Halloween decor idea for your next fall craft night, and tell me: would you make the ghosts or switch them out for another fall shape?!

Comment SHOP below to receive a DM with the link to this post on my LTK ⬇ https://liketk.it/6ncXT

#diyhalloween #diyhalloweendecorations #halloweencrafts #diyfalldecor #halloweendecorations
If you have a major sweet tooth like me, you NEED If you have a major sweet tooth like me, you NEED to try this fun fall dessert idea! Instead of a traditional charcuterie board, load it up with all your favorite cookies, candies, chocolates, and seasonal treats for the ultimate fall dessert charcuterie board. 🍫🍬🍪

The best part?! It’s completely NO BAKE 🙌 Just grab your favorite fall and Halloween treats, arrange them on a board, and you have an easy dessert that looks like you put way more effort into it than you actually did. 😂

This would be SO cute for a Halloween party, fall girls’ night, Friendsgiving, movie night, or any fall get-together. 🎃👻 And you can easily customize it with whatever treats you love!

Honestly, I think dessert charcuterie boards might be better than regular charcuterie boards… but maybe that’s just my sweet tooth talking. 😆

Would you make a fall dessert board like this?! And more importantly… what treat are you grabbing FIRST?! 👇🏻 

#charcuterieboard #dessertcharcuterie #fallcharcuterieboard #dessertboard #falldesserts
Come style my screened in porch for fall with me! Come style my screened in porch for fall with me! 🎃

Who says the front porch gets to have all the fun?! 😂 I spend WAY more time on our screened-in porch, so of course I had to give it a cozy little fall makeover too!

This bar cart is one of my favorite spots to decorate because it’s so easy to switch out with the seasons. A few pumpkins, some warm fall colors, and simple seasonal touches instantly make this space feel so much cozier for fall. 🍁

And since this is basically my favorite spot to enjoy my morning coffee, I want it to feel just as festive as the rest of our home!

Of course, the cats also think the pumpkins are here specifically for them to knock over. 😹 Apparently they have VERY strong opinions about my fall porch decor.

Are you decorating your outdoor spaces for fall too, or do you keep all the pumpkins inside?! 🎃

Comment SHOP below to receive a DM with the link to this post on my LTK ⬇ https://liketk.it/6mGqj

#fallporch #fallporchdecor #screenedinporch #screenedporch #halloweenporch
DIY mercury glass pumpkins that still look this go DIY mercury glass pumpkins that still look this good YEARS later?! Sign me up! 🎃

I made these mercury glass pumpkins several years ago, and I’m still so in love with how they turned out! They honestly look just as good today as they did when I first made them, which makes this one of my favorite budget-friendly fall DIYs.

There’s just something so satisfying about taking an inexpensive Dollar Tree pumpkin and turning it into fall decor that looks way more expensive than it actually was. 🙌🏻 These have that beautiful vintage mercury glass look and are perfect for adding a little cozy, high-end touch to your fall and Halloween decor.

And the best part? You only need a few supplies and a few dollars to recreate them!

Comment “mercury glass” below and I’ll send you the full step-by-step tutorial! 🎃

Would you try this Dollar Tree fall decor DIY too?! Let me know below what you think! 

#dollartree #dollartreediy #dollartreefinds #potterybarndupe #mercuryglass
🍎🍂 SEPTEMBER MEANS IT’S OFFICIALLY TIME TO BAKE AL 🍎🍂 SEPTEMBER MEANS IT’S OFFICIALLY TIME TO BAKE ALL THE FALL THINGS!

And these Apple Cider Crinkle Cookies need to be at the top of your fall baking list! 😍 Made with nutty browned butter, a homemade apple cider reduction, and warm autumn spices, these cookies are rich, chewy, cozy, and basically taste like apple orchard season in cookie form.

They may sound fancy, but I promise this apple cider cookie recipe is actually so easy to make! 🙌

If you love apple desserts, fall cookies, and anything that makes your kitchen smell like autumn, you HAVE to try these! 🍎🍪

Comment “RECIPE” below and I’ll send you the full apple cider crinkle cookie recipe! 🍂

#applecider #applecookies #fallbaking #appledessert #falldesserts
Flower Lovin’ Friends! POV: YOU’RE READY FOR FALL… Flower Lovin’ Friends! POV: YOU’RE READY FOR FALL… BUT YOUR SUMMER FLOWERS DIDN’T GET THE MEMO 😂

I’ve been working on my fall front porch this weekend, and I’m loving how it’s coming together so far! 

It’s still SO warm here in North Carolina, which means all of my summer flowers and plants are still going strong. So instead of my usual neutral fall porch decor, we’re going a little more colorful this year and I think it looks so pretty! 🍂🌸

I added a new pumpkin doormat for a little fall refresh, but everything else is fall decor I’ve reused from years past. Proof that you definitely don’t need to buy all new decorations every season to give your porch a fresh look! 🙌🏻

And can we talk about FAUX MUMS?! I bought these last year, and it may have been one of my best fall decorating decisions because I can pull them out year after year and they still look perfect. Which is especially helpful considering I somehow manage to kill the real mums every single fall. 💀🤣

I still have a few finishing touches to add, but I’d say my colorful fall porch is off to a pretty good start! 🎃

Are you team REAL MUMS 🌼 or team FAUX MUMS because you can’t keep them alive either?! 😂

Hosts: 
@almost3acres
@jayhawkvintage
@mymapleleafhome 
@seaside_cottage_couture
@thecrowsnestsignco

Guest Hosts:

Heather @heathers_vintagecottage
Heather @turtledriftvintage

Returning Guest Hosts:
Cindy @tre.vue
Faith @the_retired_housewife

DM @flowerlovinfriends to join
#flowerlovinfriends #fallporch #mums #fallflowers #fallhomedecor
  • Home
  • Subscribe
  • About Me
  • The Blog
    • DIY
      • Turning a Builder Grade Home Into Something More
      • Outdoor
      • Home Improvement
      • Repurpose and Upcycling
      • Home Decor
        • Christmas
        • Everyday Decor
        • Fall
        • Spring
        • Summer
        • Winter
    • Recipes
      • What To Cook?
    • Travel
      • Traveling and Antiquing
      • Lifestyle
    • Whimsy Home Wednesday
  • Contact Me
  • Privacy Policy
    • Disclaimer
  • Home
  • Subscribe
  • About Me
  • The Blog
    • DIY
      • Turning a Builder Grade Home Into Something More
      • Outdoor
      • Home Improvement
      • Repurpose and Upcycling
      • Home Decor
        • Christmas
        • Everyday Decor
        • Fall
        • Spring
        • Summer
        • Winter
    • Recipes
      • What To Cook?
    • Travel
      • Traveling and Antiquing
      • Lifestyle
    • Whimsy Home Wednesday
  • Contact Me
  • Privacy Policy
    • Disclaimer

Mornings on Macedonia

DIY, Decor, & More

Home Improvement · February 27, 2021

My First Time Using Wallpaper

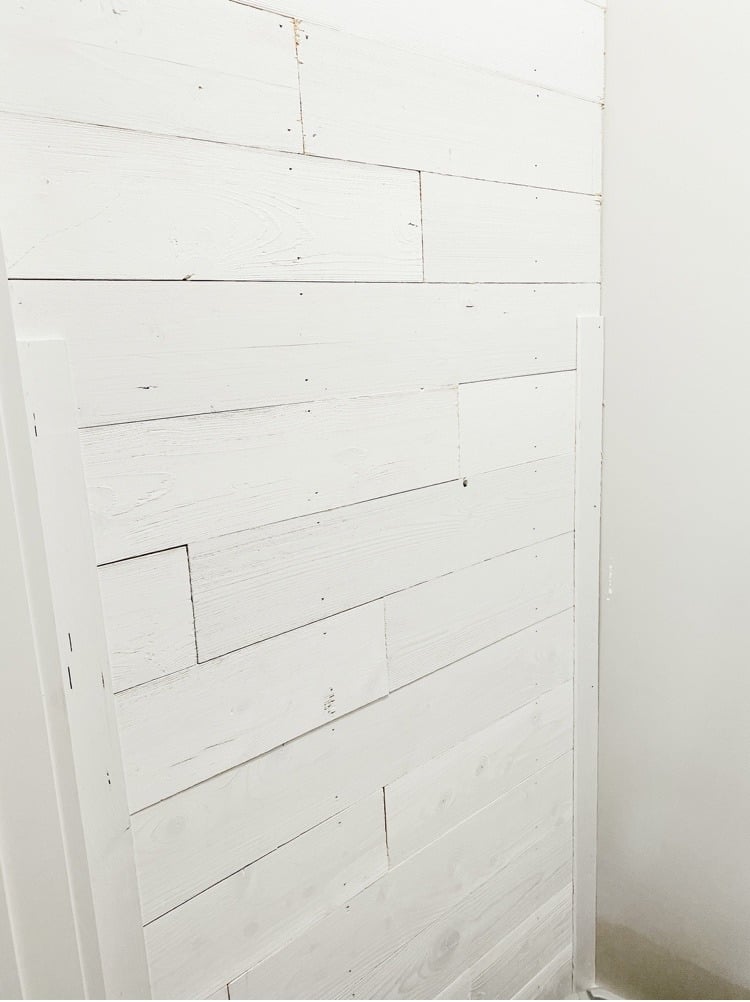
If you remember from my last post, I shared all about the DIY Shiplap Wall we did for Toby’s room. So now I am going to share with you all about my first time using wallpaper.

We decided that next to the shiplap wall, we wanted to do something fun and different there.

At the time, wallpaper seemed like a good idea. But y’all, I gotta tell you, this was probably the hardest project we have ever done together! Wallpaper is no joke!

I think it may be because we ended up getting the pre-pasted kind and not the peel and stick kind. But more on that later. At least the end result turned out okay!

I figured it would be fun to share the process with you and go more in depth with everything. In case you are thinking about using wallpaper for the first time too!
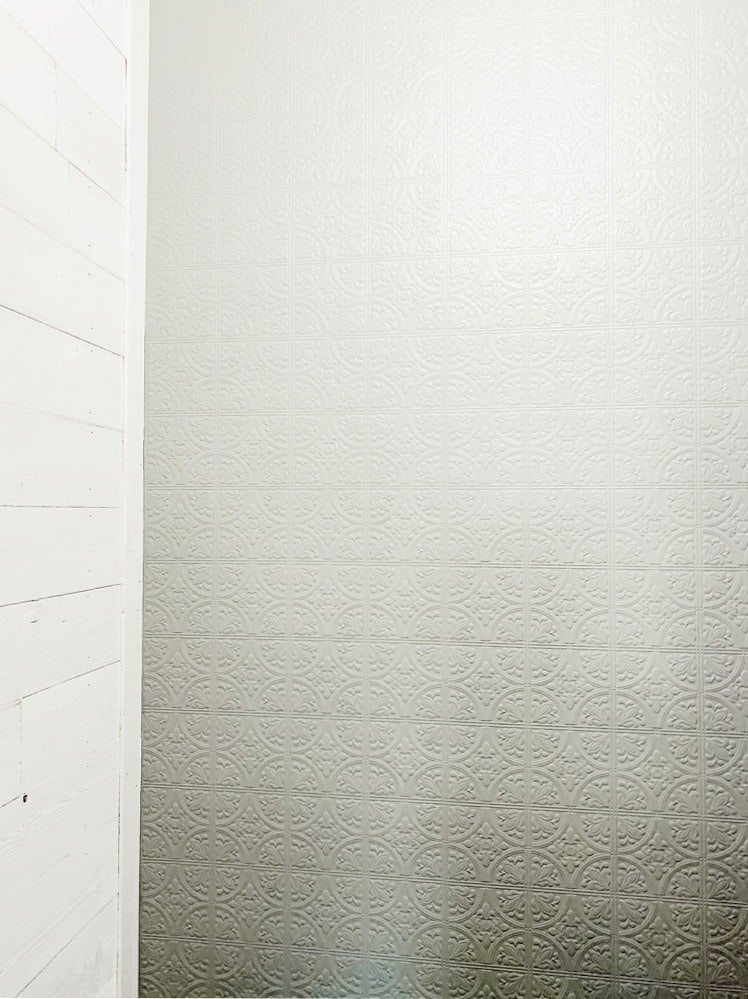
First time using wallpaper
Here is a view of the finished and painted wallpaper!

This post contains affiliate links. Click here to read my disclosure policy.

Supplies Needed:

  • Wallpaper (I used a textured, paintable wallpaper option)
  • Sharp knife to cut wallpaper
  • Sponge for applying water to the back of the wallpaper
  • Spray bottle to wet the wall before applying wallpaper
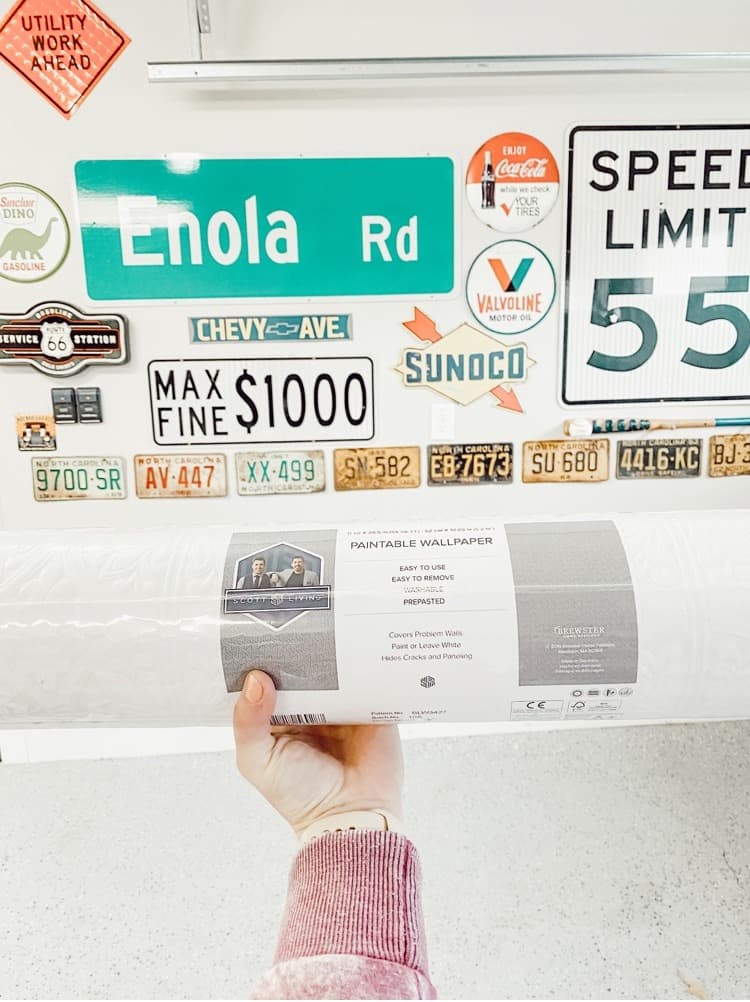
Paintable Wallpaper
This is the exact wallpaper that I used for this space. I will link a few other similar paintable wallpaper options for you below as well:

Measure and Cut

Once you have gathered all your supplies, now’s the time to measure the wall and begin to cut out the wallpaper.

We used a tape measure to get the right height for the wall. Then we placed the tap measure right onto the wallpaper and traced a line on the back so we knew where to cut it.
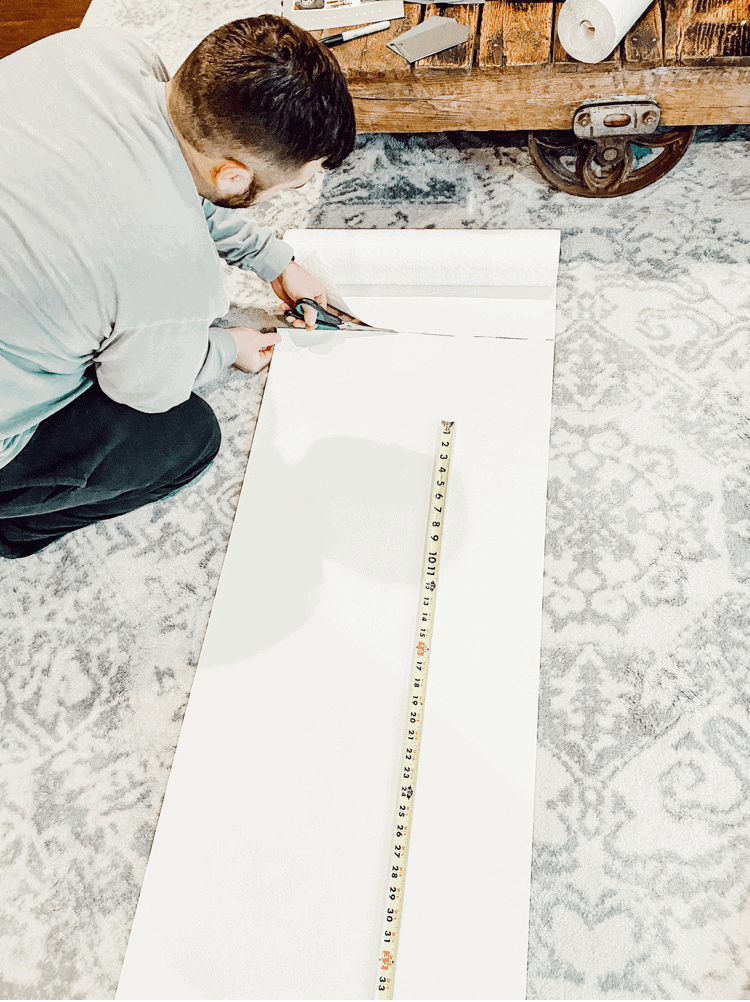
Measuring the Wallpaper
Measuring and cutting the wallpaper here.

You definitely want to overbuy on your wallpaper. We ended up getting plenty of extra rolls just in case we had some mess ups.

Especially, since this was our first time using wallpaper. And boy, did we have some mess ups during this process!

But thankfully, we still had two full rolls leftover and we were able to return them and get some money back too which is always nice!

Applying the Wallpaper to the Wall

So the cutting and measuring was super simple and easy compared to this next part. We ended up trying two different methods of applying the wallpaper to the wall.

Both weren’t exactly easy, but we ended up figuring it out enough to make it work.

I will go in to the pros and cons for each method below that way you can decide what you would want to do in this situation.

As I mentioned earlier, this wallpaper was pre-pasted. That means you have to apply water to the back of the paper to activate the paste.

As you can imagine, this is messy and tedious. I believe with peel and stick wallpaper, you do not have to do this.

Although, I cannot say for sure because again, this is my first time using wallpaper of any kind. But, from what I’ve seen, I think peel and stick may be an easier option for sure.

Method 1: Activate Wallpaper Paste With Sponge

With this method, we ended up getting a bucket full of water and a sponge. Then, we would lay out our already measured strips of wallpaper and activate the paste by using the wet sponge on the back.

This was messy and time consuming, but it seemed to work out okay. Before we would attach it to the wall, we also sprayed down the wall with water as well.
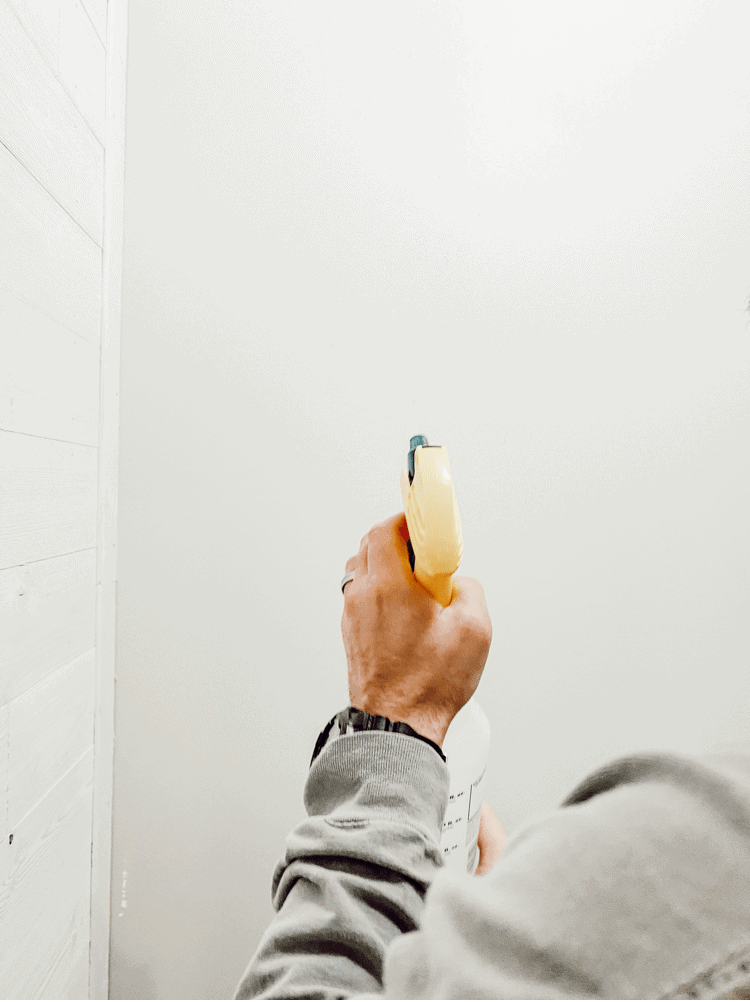
Spraying the Wall
We just used a plastic spray bottle to spray the wall down.

I will say by doing this method, it didn’t seem to really activate the paste all the way. I felt like we couldn’t get it wet enough and therefore it wasn’t really sticky enough to adhere perfectly to the wall.

We noticed a few bubbles even after smoothing the wallpaper down.
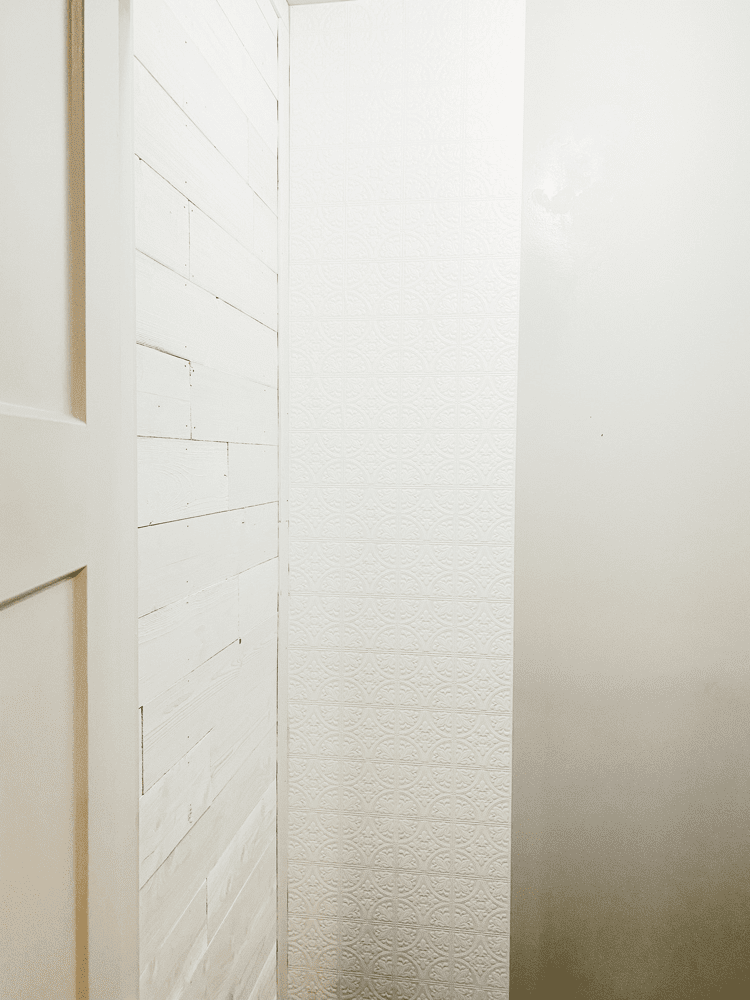
First strip of wallpaper on wall
We finally got the first strip of wallpaper up!

Method 2: Soak Wallpaper in Bin to Activate Paste

I feel like we had the least success with this other method that we tried. We thought since it wasn’t getting wet enough from the sponge, that maybe we should just soak it for a few minutes.

I got a big storage container and filled it with water. Then, we placed a strip of wallpaper in it until it was fully submerged.

We let it soak for about 5 minutes and then pulled it out. Now, if you thought the other method was messy, this was way worse!
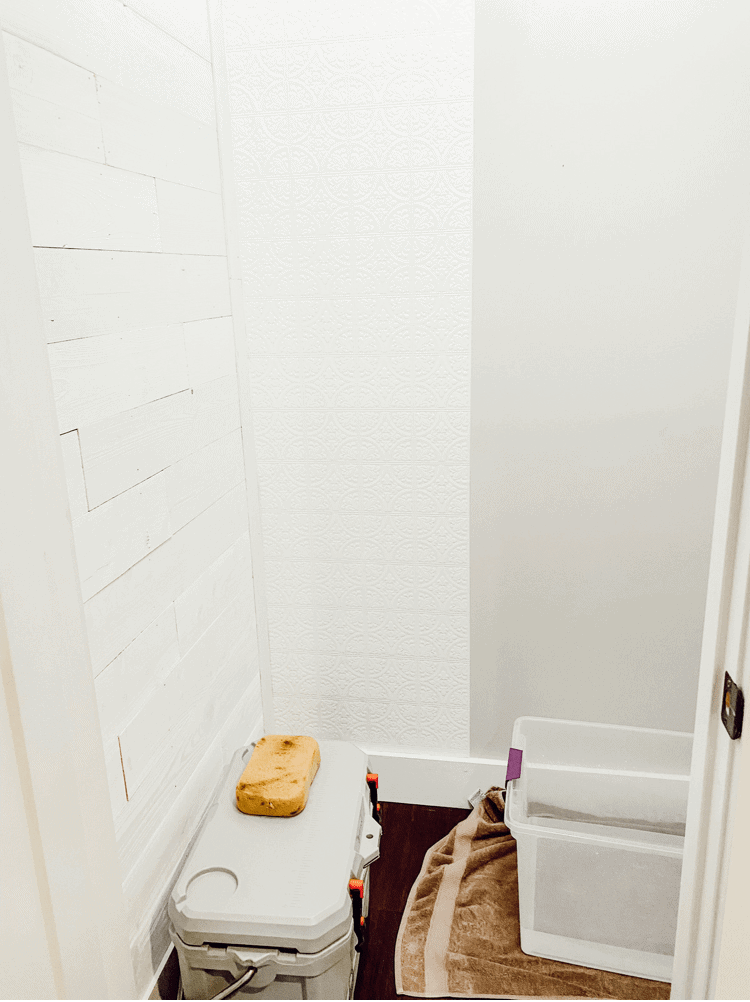
Soaking the wallpaper in container
Here is the set up we used for soaking the wallpaper. Even with laying a towel down, there was still a lot of water that went everywhere!

By doing it this way, we ended up losing a few strips of wallpaper too. It got too wet and then when we would try to adhere it to the wall, it would rip.

I think we only got one strip on after doing it this way. And then after two more failed attempts, we ditched this method and went back to the first one.

Tips and Tricks for Your First Time Using Wallpaper

As I mentioned above, we ended up going back to the first method we tried. It worked for the rest of the wall but here are some things I wish that I knew beforehand:

  • Really get the back of the wallpaper wet with the sponge. Don’t be afraid to get it too wet with this method. I think that’s where we went wrong the first couple of times since we didn’t get it wet enough.
    • Also, really wet the wall good too. The spray bottle wasn’t really enough, so we ended up using the sponge to wet the wall too before applying the wallpaper.

  • Cut the strips a little longer than you actually need them for. Because when you line them up on the wall, you want them to match up. You can always use a knife to trim off the excess as well.

  • Take a break when you need to and be patient. This process was pretty difficult for us to do. It was honestly probably one of the harder DIYs we have tackled. So obviously, we got a little frustrated and confused since we have never done this before. When you are feeling overwhelmed, it’s important to take a step back and relax!

  • When smoothing the wallpaper out, use medium pressure. If you’re too aggressive with it, the wallpaper could tear or rip. And not putting enough pressure on it will cause it not to adhere well to the wall. We ended up using the wet sponge again too to help smooth everything out and make it stick a little better.
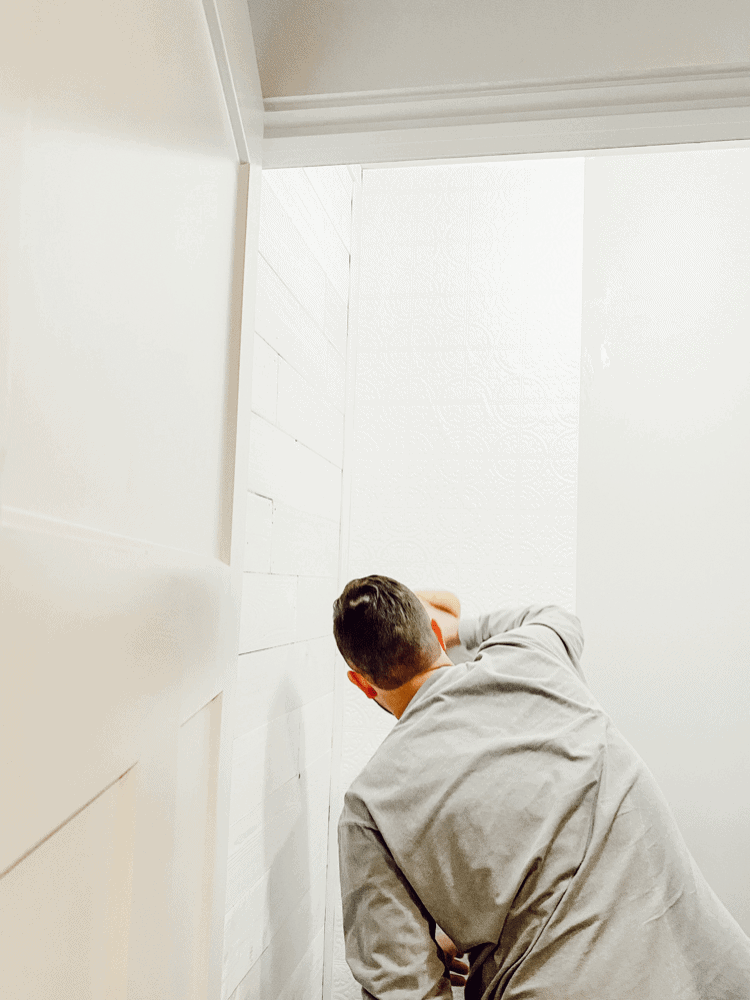
Smoothing the Wallpaper
Here my hubby is smoothing over the wallpaper with the sponge as well.
  • Also, don’t worry if your wallpaper doesn’t match up perfectly on the top or bottom. As you can see in the picture below, it’s definitely not centered on the top. But, we ended up adding some trim to it and now you can’t even tell. Plus, the trim really made the wallpaper pop!
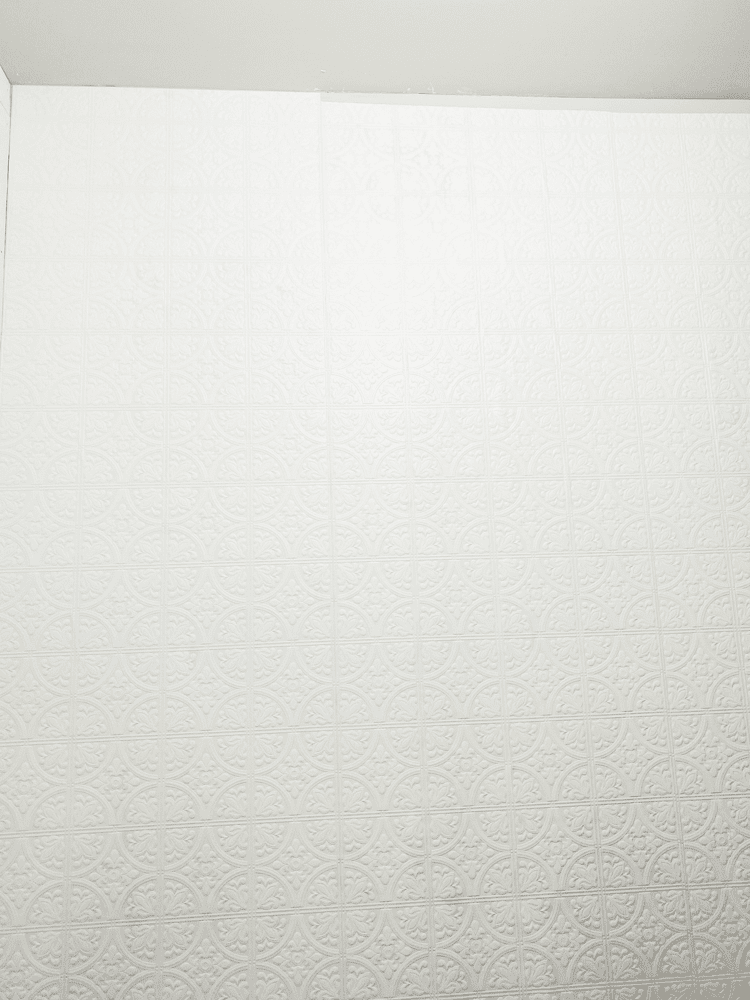
Add Trim to the Wallpaper
You can see how uneven it is on the top here. It’s a simple fix with some trim to hide it!

Paint the Wallpaper

Now, this part is totally optional. And especially if you are using a peel and stick kind of wallpaper, you probably don’t need to paint it.

This wallpaper is paintable and I knew that going into it. I thought it would be fun to paint it once it was all done. Again, I was wrong!
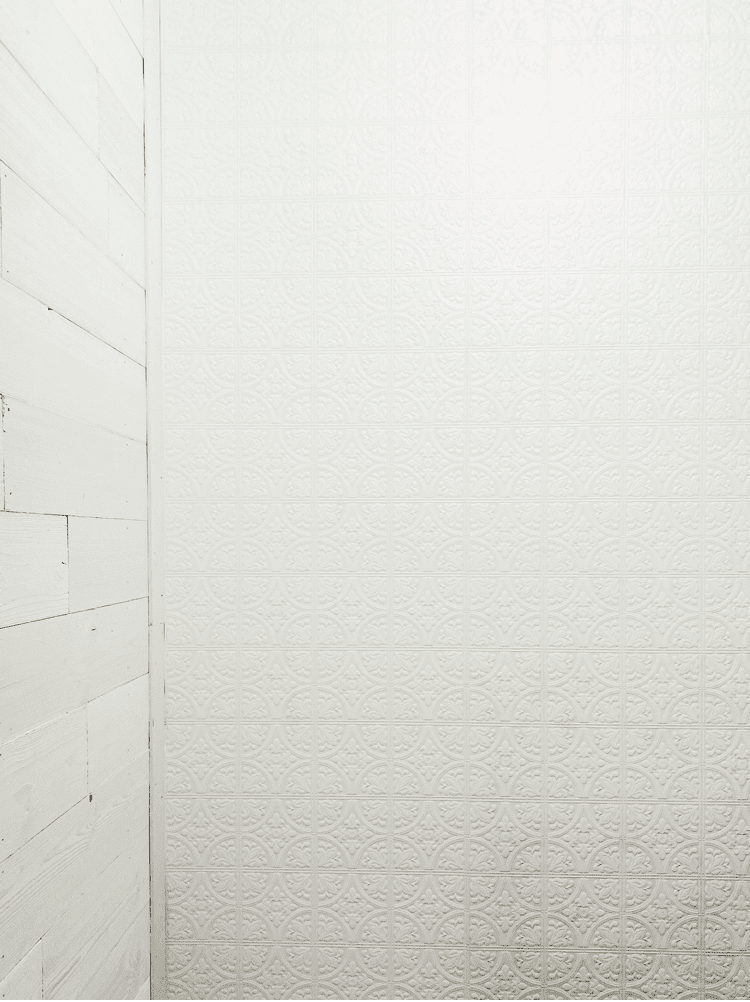
Finished Wallpaper
The wallpaper is all finished here! It’s beautiful white, but I wanted to give it a pop of color. Especially since it is beside the white shiplap wall.

I probably would have kept it the original white if it wasn’t beside the white shiplap wall. But I wanted a contrast so I decided to go ahead and paint it.

The only problem with painting this wallpaper was that you couldn’t use a roller. It’s textured and 3D so I had to use a paintbrush and really get into all the nooks and crannies of the wallpaper.
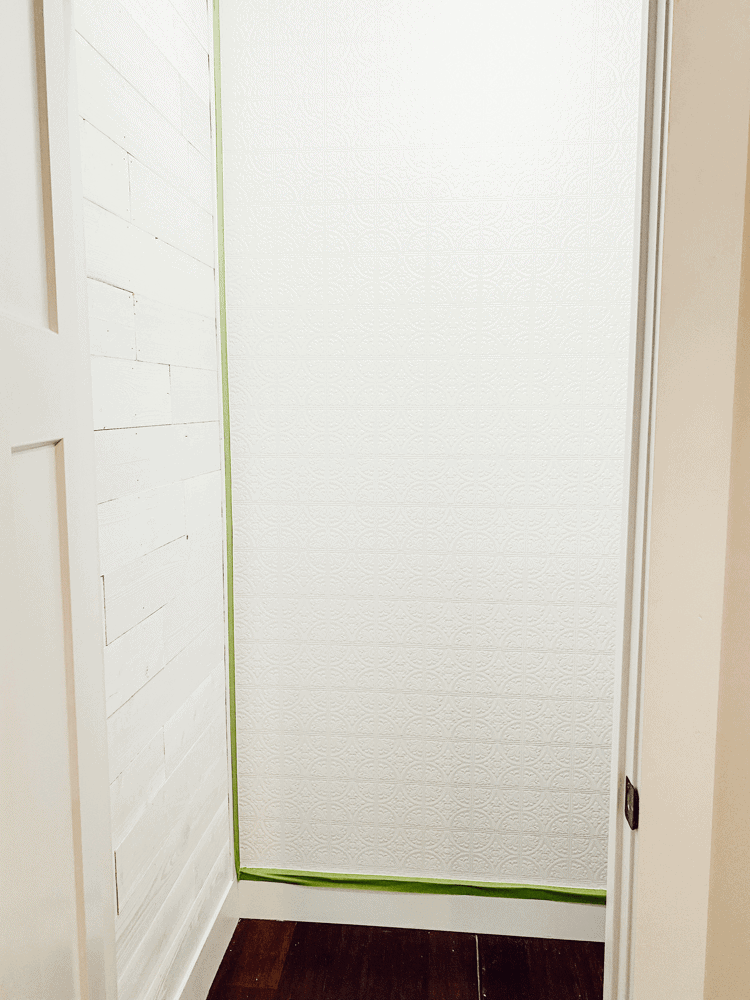
All Ready to Paint!
All ready to paint!

My first thought about color was to paint it black to make it really stand out against the shiplap wall. Although I was worried that it would be too dark and really make the space feel small.

And this is already such a small space, I didn’t want that. I ended up having some leftover wallpaper and I decided to cut out a few squares of it to test paint on.

I had some leftover paint already too and wanted to use what I had on hand to keep cost down.
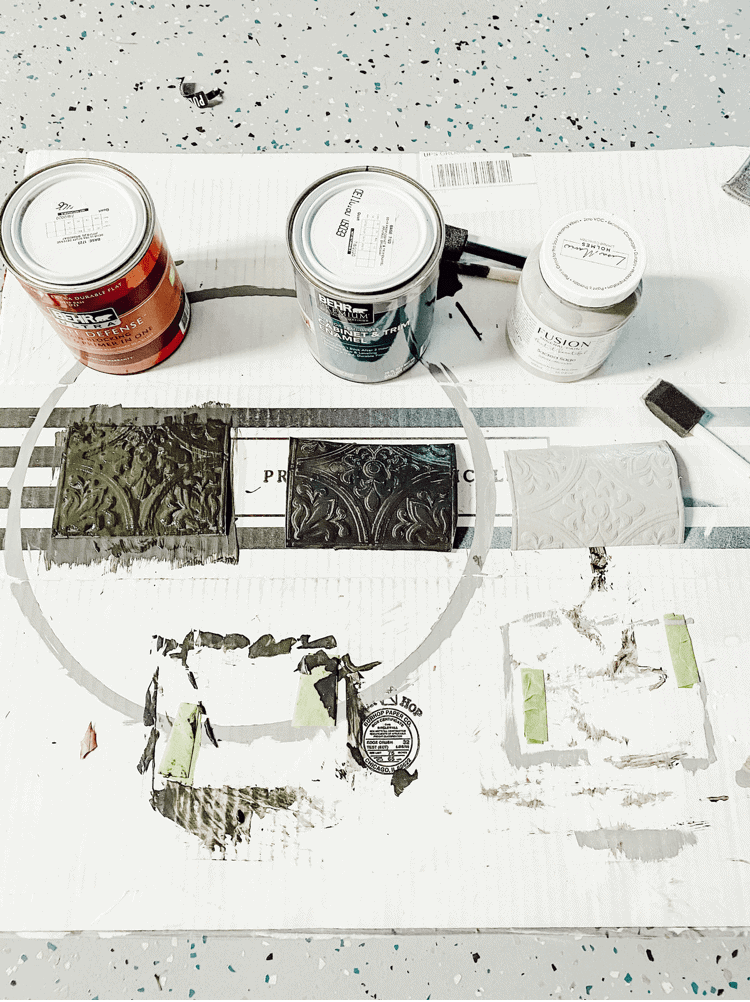
Paint Samples on Wallpaper
Testing out the paint colors on some extra pieces of wallpaper.

I ended up liking Fusion Mineral Paint in Sacred Sage the best. If you remember, I shared all about Fusion Mineral Paint last year and even re-did a mirror with it as well too.

It’s honestly one of the better paint brands in my opinion and goes on so smooth! But for this wall, with all of the texture, it ended up taking me a total of three coats to fully finish it.
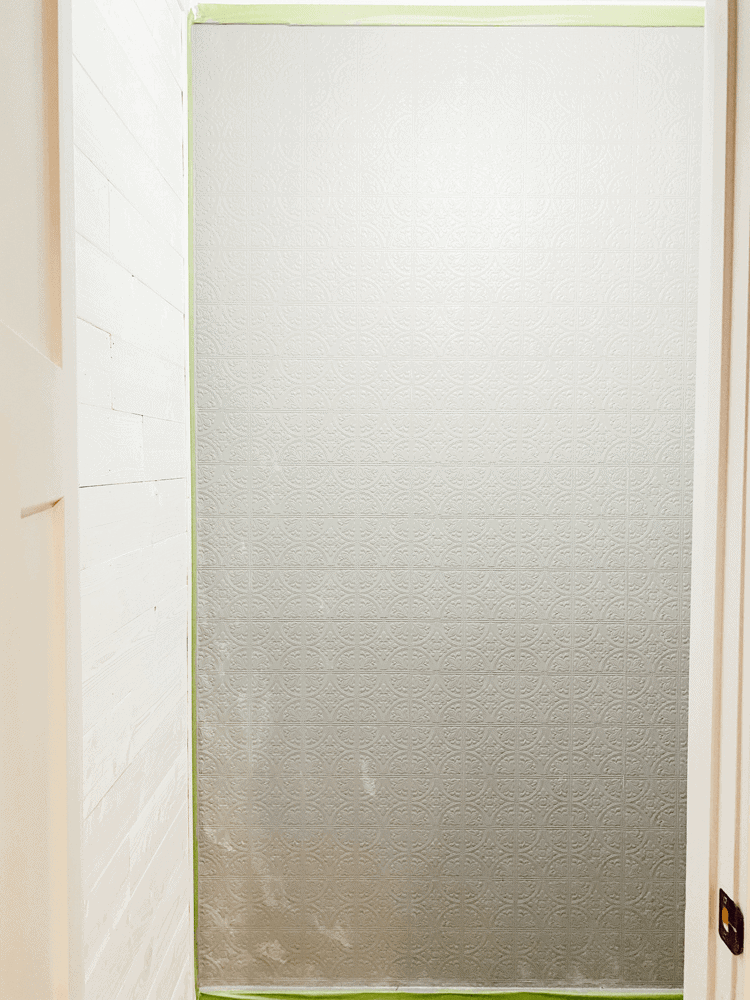
Painting the Wallpaper
Here it is after 2 coats. As you can see, it needed one more coat to fully complete it.

First Time Painting Wallpaper Tips:

  • When we placed the wallpaper on the wall, we noticed there were a few spots of bubbling. We didn’t think too much of it because it was past the door where you didn’t see it much. However, after I painted it and let it fully dry, the bubbles went away! I don’t really have the answer as to why it did this, but I was so relieved. I did notice that the bubbles got worse as I painted over them, but then when it dried overnight, they were all gone!

  • If you do end up getting a few air bubbles and they don’t come out after painting them, don’t fret! You can order a wallpaper repair kit from Amazon. That’s what we did at first too, but ended up sending it back after we realized the bubbling had disappeared.
    • To repair it, all you would need to do is get some wallpaper seam glue and some syringes. You would then fill the syringes up with glue and poke it into the bubbled area and release the glue. Then you would just smooth it out. There are several Youtube videos on this too that you can reference. I will link what we ordered though in case you’re curious too:

Conclusion

Well, I hope you enjoyed this post about my first time using wallpaper. I am glad we did it to say that we did it, but will we ever do it again? If I am being honest, probably not.

At least not the pre-pasted kind. I would be interested in trying the peel and stick kind to see how that differs. But that one was more expensive too so that’s another reason why we chose pre-pasted for this project. I am also very glad we did it in a small space and not some huge wall.

I would definitely recommend starting in a smaller space too if it is your first time using wallpaper as well.

Custom Cat Furniture

All in all, I am happy that this part of the project is complete. And now we are one step closer to finishing Toby’s room! I don’t think he cares though about all the hard work that we have put into it so far!

Have y’all ever tried out wallpaper before? If so, what was your experience like? Did you love it or hate it? Let me know, I’m dying to hear!
Tips and Tricks for First Time Using Wallpaper
Pin for later!

In: Home Improvement · Tagged: DIY, wallpaper

About Charity Gentry

I love Jesus, coffee, and home decor. I also love to cook and bake as well as read in my spare time! Follow along with me for all my latest DIY projects and ideas!

join the club

You’ll Also Love

Close Up of DIY Wooden RiserEasy and Simple DIY Wooden Risers
DIY Garden MarkersDIY Garden Markers
DIY Raised Garden BedsDIY Raised Garden Beds

Comments

  1. Kayleigh Zara says

    March 3, 2021 at 11:12 am

    This looks so cool! I’ve personally not painted on wallpaper before so it was so interesting to read about! Thanks for sharing x

    Reply
    • Charity Gentry says

      March 4, 2021 at 12:12 am

      Thank you! I am so glad you thought so too!

      Reply
  2. Cristina Rosano says

    March 3, 2021 at 1:43 pm

    I love how this came out and I think that this wall changed the look of the room! I have never applied wallpaper but had quite. a lot of experience in taking it off when we moved with my family years ago and it’s no fun! Thank you for sharing x

    Reply
    • Charity Gentry says

      March 4, 2021 at 12:18 am

      Lol yeah I bet. I have no plans on removing this anytime soon!

      Reply
  3. Sue Berk Koch says

    March 3, 2021 at 3:26 pm

    You’re brave! Your end result is lovely, too.
    I haven’t ever put up wallpaper, but I did take it down, twice. It was such an experience that I wrote about it on my blog! (It was my second ever post!) I’ll include the link here, but it may scare people away from giving this a try…

    –Sue
    https://susanberkkoch.com/blog/sue-against-glue/

    Reply
    • Charity Gentry says

      March 4, 2021 at 12:20 am

      Thank you so much! I am happy with how it turned out as well!

      Reply
  4. Lucy says

    March 3, 2021 at 4:05 pm

    It takes a lot of skill to put up wallpaper without it falling back down again and you did amazing! This is a lovely wallpaper pattern x

    Lucy | http://www.lucymary.co.uk

    Reply
    • Charity Gentry says

      March 4, 2021 at 12:20 am

      Thank you so much Lucy! It was a laborious process for sure, but I am so happy with the end result!

      Reply
  5. Tiffany McCullough - Metaphysical Mama says

    March 3, 2021 at 4:22 pm

    Wow! That looks great! When I was young, everyone wallpapered. It would usually take a couple tries to get the paper on straight and line up the pattern. Then painting walls became all the rage and we had to strip all the wallpaper off.
    I have to say though, the wallpaper from when I was young was not as nice as this and it definitely wasn’t paintable. I love it!

    Reply
    • Charity Gentry says

      March 4, 2021 at 12:23 am

      Lol yes it has changed a lot for sure! I love that it’s paintable too because you can really customize it that way!

      Reply
  6. Under Flowery Sky says

    March 3, 2021 at 5:50 pm

    Beautiful decor, looks so elegant..

    Reply
    • Charity Gentry says

      March 4, 2021 at 12:23 am

      Thank you so much

      Reply
  7. Sarah says

    March 3, 2021 at 7:07 pm

    That looks really good!! I’ve been wanting to try wallpaper but I was worried it would be difficult. I didn’t even know you could get paintable wallpaper, either! Thanks for sharing. 🙂

    Reply
    • Charity Gentry says

      March 4, 2021 at 12:25 am

      Yes I didn’t know you could get it either until I saw it in store! I love that you can paint it and customize it that way!

      Reply
  8. Stephanie says

    March 3, 2021 at 9:26 pm

    Between the shiplap and the wallpaper, your cat’s little room is going to be the loveliest palace a kitty has ever had! I’m glad you have a space to use for “test runs” so to speak. You did a great job with the wallpaper!

    Reply
    • Charity Gentry says

      March 4, 2021 at 12:29 am

      Awe thank you so much! He definitely will have such a lovely kitty room! And I am definitely so happy to have had this room as a test run too! It was very helpful!

      Reply
  9. A Capone Connection says

    March 3, 2021 at 10:19 pm

    That wallpaper is awesome. I used to have that exact paper in my office on the ceiling. (It’s a law office). It was painted with a faux paint texhnique to look like a tin ceiling. I have had hundreds of clients comment on it and everyone thought it was a real tin ceiling. Great job on your first time using it!

    Reply
    • Charity Gentry says

      March 4, 2021 at 12:31 am

      Oh my gosh, we were just talking about how good this paper would look on our ceiling downstairs too! We would love to have like a tin ceiling like that too!

      Reply
  10. LetsTakeAMoment.com says

    March 4, 2021 at 3:16 am

    Wow, this looks like a big project. Thank you for taking the time to share these tips. 😊

    Reply
    • Charity Gentry says

      March 4, 2021 at 11:49 am

      No problem at all! It was a big project but I am very happy with how it turned out!

      Reply
  11. Eleanor Jones says

    March 4, 2021 at 11:27 am

    I’ve never personally used wallpaper, but I do love the effect it adds to a room- almost an old-fashioned look! Thank you for sharing these tips to approaching wallpaper for the first time x

    Reply
    • Charity Gentry says

      March 4, 2021 at 11:50 am

      Thank you so much! I am happy with how it turned out, it was just kinda difficult to do lol

      Reply
  12. Karalee Shotola says

    March 4, 2021 at 1:00 pm

    I always thought wallpaper was easy to do, but I can see how using the pre-pasted wallpaper was challenging because it was either not enough wet enough or too wet. It’s great you bought extra & figured out what worked.
    I think it turned out great after you painted it, but I imagine it would take a LONG time to do a regular size room with this wallpaper.

    Reply
    • Charity Gentry says

      March 5, 2021 at 3:51 pm

      Thank you so much! Yes, it would take a VERY LONG time for a regular sized room. So I am so glad we decided to test it out first in a smaller space!

      Reply
  13. Fadima Mooneira says

    March 4, 2021 at 1:03 pm

    Using wallpaper to decorate your house is so cool. It gives an image to your house. Thank you for sharing this.

    Reply
    • Charity Gentry says

      March 5, 2021 at 3:52 pm

      Thank you. I love how it gave some texture to this wall too!

      Reply
  14. Ruth| Ruthiee loves Glamour says

    March 4, 2021 at 1:19 pm

    This looks so cool. I really love how it came out. We have been trying to renovate our home and we decided to get wallpapers for the wall. We haven’t gotten the wall papers yet but this post has definitely given me an insight on how to go about applying the wallpaper. By the way, the wallpaper you got looks so good.

    Reply
    • Charity Gentry says

      March 5, 2021 at 3:52 pm

      Thank you so much Ruth! It was a labor of love, but I am so happy with the finished product!

      Reply
  15. markstraveljournal says

    March 4, 2021 at 1:22 pm

    Wallpaper is great but almost forgotten. As you point out, it does require work but the result is fabulous with texture, patterns and color. It really can add a lot to a room as it did in your case. Thanks for the post,

    Reply
    • Charity Gentry says

      March 5, 2021 at 3:53 pm

      Thank you so much! Yes, I think it was worth the work because it definitely made this space look amazing afterward!

      Reply
  16. Jenny in Neverland says

    March 4, 2021 at 1:49 pm

    Wow can’t believe this was your first time using wallpaper! We’ve always used wallpaper although I don’t have wallpaper in any of my rooms (bedroom and office) now. It can certainly be tricky and glad the bubbles went away! It looks fab 🙂 xxx

    Reply
    • Charity Gentry says

      March 5, 2021 at 3:53 pm

      Thank you so much Jenny. I have always been too scared to try it out! I am glad I finally did it though

      Reply
  17. Jodie | That Happy Reader says

    March 4, 2021 at 1:55 pm

    These are the projects that really test a marriage! I love your finished result and I love when issues like bubbles resolve themselves. Thanks for sharing.

    Reply
    • Charity Gentry says

      March 5, 2021 at 3:54 pm

      Lol they sure do! And we did this on Valentine’s Day weekend which probably wasn’t the best idea! But it all turned out just fine in the end!

      Reply
  18. Kia Singh says

    March 4, 2021 at 5:45 pm

    So much of detailing. I am definitely going to try this out.
    Thanks 😊

    Reply
    • Charity Gentry says

      March 5, 2021 at 3:54 pm

      Thank you! You definitely should!

      Reply
  19. Kia Singh says

    March 4, 2021 at 6:00 pm

    Thanks for detailed article. I have been thinking to do it for quite a long time. Got the courage after reading your article.
    Thanks for sharing

    Reply
    • Charity Gentry says

      March 5, 2021 at 3:54 pm

      I am so glad this gave you some courage then!

      Reply
  20. Katy Stephenson says

    March 5, 2021 at 11:20 am

    I’m about to order some wallpaper for our spare room so I’m so glad I stumbled across this! Definitely bookmarking to read again before we put it up!

    Katy | http://www.katystephenson.com | http://www.thegrownupsclub.com

    Reply
    • Charity Gentry says

      March 5, 2021 at 3:55 pm

      Yay! So glad this could be so helpful to you then!

      Reply
  21. Narasinh Purohit says

    March 5, 2021 at 4:20 pm

    Thanks for sharing your experience in details. We opted for wallpaper. We only had to select and the rest was done by professionals.
    But wallpapers do give something afresh feeling, that is our experience.
    Thanks again.

    Reply
    • Charity Gentry says

      March 6, 2021 at 8:49 pm

      Yes, if I ever do it again, I think I will hire professionals too! That’s definitely the way to go!

      Reply
  22. Jaya Avendel says

    March 5, 2021 at 9:36 pm

    Woo boy, you went in and you learned, and at least you had fun! The finished wall looks lovely and I love the print you chose; beside the shiplap wall it provides a welcome contrast.
    Thanks for sharing what you learned! If you are driven enough to do something the end result usually turns out satisfactorily. 🙂

    Reply
    • Charity Gentry says

      March 6, 2021 at 8:51 pm

      Thank you so much! That is very true! I am glad we stuck with it and it ended up being perfect!

      Reply
  23. Nancy says

    March 6, 2021 at 2:24 am

    It is great that you got to use wallpaper for the first time. Big plus when it is easy to apply – with just soaking the water. I never thought about painting wallpaper. Learned so much from this post!

    Nancy ✨ mdrnminimalists.com

    Reply
    • Charity Gentry says

      March 6, 2021 at 8:52 pm

      Thank you so much Nancy! I am so glad you learned something from it too!

      Reply
  24. Graham Crosby says

    March 6, 2021 at 10:41 pm

    I’m full of admiration for you for having a go with wallpaper. I’ve lived in my house over 20 years and still haven’t found the courage or patience to give it a go! It looks great by the way!

    Reply
    • Charity Gentry says

      March 7, 2021 at 5:20 pm

      Lol thank you so much! It does take a lot of work so it isn’t an easy feat at all! But I am so happy with how it turned out thankfully!

      Reply
  25. Tammy Miller says

    March 6, 2021 at 11:09 pm

    This is a great post. It been so long since I did wallpaper, it has just been painting the walls.

    Reply
    • Charity Gentry says

      March 7, 2021 at 5:20 pm

      Thanks so much. It was fun to do something different!

      Reply
  26. Lisa | Mind and Body Intertwined says

    March 7, 2021 at 9:28 am

    Haha in my family we say that if you can put wallpaper on properly with your partner without fighting, your relationship can handle anything 😂 we’ve actually stopped with wallpaper because of all the annoying things of it not sticking and bubbles and everything. However, it looks like you did a good job in the end 😁

    Reply
    • Charity Gentry says

      March 7, 2021 at 5:26 pm

      Lol that is so very true. It is a marriage test for sure! And thank you so much. I am so happy it turned out okay in the end!

      Reply
  27. Alexandra says

    March 7, 2021 at 4:19 pm

    My husband and I did an accent wall with wall paper as well and my gosh was it ever a task! Ours wasn’t activated by water but we had to roll on the actual glue. We 100% had our moments of frustration lol, wall paper is no joke. Needless to say we probably will never do wall paper again unless its the peel n stick kind, lol. Yours turned our beautiful though, love the paint colour you chose!

    Reply
    • Charity Gentry says

      March 7, 2021 at 5:27 pm

      Oh my gosh that sounds terrible too. I totally agree. We are not planning on doing anymore wallpaper anytime soon lol

      Reply
  28. Della Driscoll says

    March 7, 2021 at 8:01 pm

    I’ve not used wallpaper before but this is a great and helpful post for newbies like me! Thank you for sharing – the wall looks fab x

    Reply
    • Charity Gentry says

      March 9, 2021 at 12:58 am

      Thank you so much! So glad you found it to be helpful

      Reply
  29. Ellis James Designs says

    March 8, 2021 at 10:24 am

    Wallpaper is intimidating to me, like many, so this helped me learn more about using it! Turned out great, amazing job!

    Reply
    • Charity Gentry says

      March 9, 2021 at 12:58 am

      Thank you so much. It was super intimidating for me at first too!

      Reply
  30. Mehr Israan says

    March 8, 2021 at 10:56 am

    Love how this came out! Definitely need to try painting on wallpaper!

    Reply
    • Charity Gentry says

      March 9, 2021 at 12:59 am

      Thank you! It was a lot of fun

      Reply
  31. Heidi says

    March 9, 2021 at 7:06 am

    You are so brave to try wallpaper! I think it was smart to do it in a small space and I love that you were so honest about your experience. I especially like how you said to take a break if you get frustrated. That is so important. I think it looks wonderful and I’m sure Toby absolutely loves his room now! 😉 Cats are the best!

    Reply
    • Charity Gentry says

      March 9, 2021 at 11:54 am

      Thank you so much. Cats definitely are the best! And I’m glad we started small in a little space too first!

      Reply
  32. Jennifer says

    May 6, 2021 at 8:19 am

    Bless your heart! I admire you for jumping in and learning. Next time will be easier!! I’m 72 years old & have wallpapered many times. I love wallpaper!! I have one pattern that I loved so much that I bought extra rolls and have used it on at least one wall in my bedroom in every house we’ve lived in!😂. One suggestion; Even if the paper is pre-pasted, always use wallpaper paste!! Set up 2 sawhorses with a board or piece of plywood longer than the height of your wall and a little wider than your paper. Brush paste on the entire back. One smooth coat will do and be sure to cover edges. “Book” the paper by folding one short side up to the other short side. Smooth the paper together with your hand, but DON’T crease your paper in the middle! After about 3-5 min. Unfold and hang. Use a brayer (roller) to be sure paper is smooth, then go over with a damp sponge from middle to outside edges to remove any bubbles & remove any paste that may have gotten on the front of your paper. I’d also suggest you drop a plumb line (google how to) an inch or two shorter than the width of your paper, from the corner of your wall. Start your 1st paper on the plumb line then trim excess in the corner with a sharp exacto (or other) knife. Hope these “tried & true”, old-time suggestions help!!

    Reply
    • Charity Gentry says

      May 7, 2021 at 3:26 pm

      Thank you so much! I will have to try out these tried and true suggestions if I ever attempt to do wallpaper again!

      Reply
  33. Brenda says

    May 7, 2021 at 3:25 pm

    I said more bad words putting up peel& stick wallpaper than I ever did with pre-pasted. You can slide the wallpaper around a bit to get it just where it needs to be, I was working with 8′ lengths of peel&stick and it was a nightmare. Yes, wallpapering is messy but can be beautiful when done. I have never done the paintable kind, but with “regular” wallpaper you want to make sure you are getting good quality vinyl coated paper and it does not tear when it is wet. Unfortunately I had experience with cheap wallpaper back in the day and learned my lesson.

    Reply
    • Charity Gentry says

      May 8, 2021 at 11:02 am

      Lol yes it can be such a nightmare! And that is some great info! Thanks so much for sharing those tips!

      Reply

Leave a Reply Cancel reply

Your email address will not be published. Required fields are marked *

Recipe Rating


Next Post >

DIY Shiplap Wall

Recent Posts

  • DIY Glass Pumpkin Jar: Easy Target Dollar Spot Fall Decor
  • Apple Cider Crinkle Cookies With Brown Butter
  • DIY Dollar Tree Pumpkin Topiary: Easy Fall Porch Decor
  • Apple Cider Donut Cake
  • Easy 3-Ingredient Apple Cobbler with Sugar Cookie Dough

Archives

Categories

  • About Me
  • Christmas
  • DIY
  • Everyday Decor
  • Fall
  • Home Improvement
  • Lifestyle
  • Outdoor
  • Recipes
  • Repurpose and Upcycling
  • Spring
  • Summer
  • The Blog
  • Travel
  • Uncategorized
  • Whimsy Home Wednesday
  • Winter

About Me

About Me

Follow along with me for all things home decor and modern farmhouse style! I also love sharing simple DIY projects and how to style and decorate every room of your house! Thanks for stopping by!


Shop My Home!

join the club

trending now

instagram

Follow @mornings_on_macedonia

The second I saw this black cat in the Target Hall The second I saw this black cat in the Target Halloween decor section, I knew exactly what I had to do… turn it into Charlie. 😹

Obviously, I couldn’t just leave this little black cat statue as-is when I have my very own fluffy tuxedo cat at home! So I grabbed some paint while I was at Target and came home for a little Halloween craft night with my very attentive supervisor. 😂

And when I say Charlie supervised… I mean she watched VERY closely to make sure I got her likeness just right. 👀

I used white paint to recreate her adorable tuxedo face, pink for her little nose, and green for her eyes. Her eyebrow whiskers came out slightly wonky, but honestly… hers are a little wonky in real life too, so we’re calling that accuracy. 😂

When the DIY cat statue was finally finished, Charlie inspected my work and… well… I’m not sure she was impressed. 😹
Obviously she knows she’s MUCH prettier in person, so her Target Halloween decor dupe simply wasn’t up to her standards.

But I think it turned out absolutely adorable! 🐈‍⬛🎃 This was such an easy and fun way to personalize inexpensive Halloween decor and make it look just like your own pet.
Now I need to know… would you paint one to look like your cat?! 👇🏻

Comment SHOP below to receive a DM with the link to this post on my LTK ⬇ https://liketk.it/6nshX

#halloweencat #catmom #halloweendecorations #halloweendiy #diyhalloween
🍎 Don’t let those fresh orchard apples go to waste 🍎 Don’t let those fresh orchard apples go to waste! Freeze them instead! 😉

Have you ever tried freezing fresh apple slices?! This is one of my favorite fall kitchen hacks, especially after a trip to the apple orchard! 🍏

Every fall, I come home with WAY more apples than we could possibly eat before they go bad 😂 So instead of letting them sit on the counter, I prep and freeze a big batch of apple slices to use all season long!

It takes a little extra time upfront, but having fresh apple slices ready in the freezer makes fall baking SO much easier. 🥧 You can grab exactly what you need whenever you’re craving apple pie, apple crisp, apple cobbler, apple bread, or any of your favorite cozy apple recipes!

Plus, it’s such an easy way to preserve those delicious fresh-picked apples from the orchard and enjoy them long after apple season is over. 🙌🏻🍎

Want to know how to freeze fresh apples the right way so they’re ready for all your fall baking?!

Comment “APPLES” below and I’ll send you my full step-by-step guide! 🍎❄️

And tell me, what’s the FIRST apple recipe you’d make with them?! 👇🏻

Comment SHOP below to receive a DM with the link to this post on my LTK ⬇ https://liketk.it/6m9Qm

#freshapples #frozenapples #kitchenhack #applerecipes #appledessert
There’s just one tiny problem… I can’t dance to sa There’s just one tiny problem… I can’t dance to save my life, I’m not Mormon, I’m not a mom, and I’m pretty sure binge-watching every season of The Secret Lives of Mormon Wives does NOT count as an application. 🤣

But seriously… why do all the Mormon wives look SO cute in their matching sweat sets?! Like they just casually throw one on and look effortlessly put together.

Meanwhile, most sweat sets have me looking like an oversized pumpkin with a drawstring. 🎃😂

BUT THIS ONE?! 👏🏻

This Aerie sweat set might finally be my MomTok moment because I’m obsessed. It’s comfy, cute, and actually makes me feel put together while still basically wearing pajamas, which is exactly the kind of fashion I support. 😂

And obviously, the only appropriate activity while wearing it is binge-watching the new season of SLOMW. 👀

So… who else already blew through the entire season?! 😂 I need to know ALL your thoughts because I have opinions. Drop yours below! 👇🏻

Comment SHOP below to receive a DM with the link to this post on my LTK ⬇ https://liketk.it/6nglm

#secretlivesofmormonwives #slomw #momtok #taylorfrankiepaul #realitytv
POV: you made the cutest DIY Halloween decor witho POV: you made the cutest DIY Halloween decor without buying a single thing 👻📖

This is your reminder that fall decor doesn’t have to be expensive! Some of my favorite seasonal decorations are DIY projects made with supplies I already have at home, and this spooky cute DIY ghost banner might be one of my favorites yet.

I started by brewing about 4 bags of black tea and letting it cool. While the tea was cooling, I tore a few pages out of an old book I already had and placed them in a shallow baking dish with the tea. I let the pages soak for several hours to give them that perfectly aged, vintage look.

Once the tea-stained book pages were dry, I used a ghost-shaped cookie cutter to trace little ghosts onto each page. Then I cut them out, added tiny faces with a Sharpie, and attached them to twine using mini clothespins.

And that’s it! 👻

I hung my DIY ghost garland on the hutch in my dining room, and I think it adds the perfect amount of spooky cute Halloween decor without spending a bunch of money.

You could easily customize this budget-friendly fall DIY too! Instead of ghosts, try pumpkins, leaves, bats, or whatever shape fits your fall decor. The possibilities are endless!

Save this easy DIY Halloween decor idea for your next fall craft night, and tell me: would you make the ghosts or switch them out for another fall shape?!

Comment SHOP below to receive a DM with the link to this post on my LTK ⬇ https://liketk.it/6ncXT

#diyhalloween #diyhalloweendecorations #halloweencrafts #diyfalldecor #halloweendecorations
If you have a major sweet tooth like me, you NEED If you have a major sweet tooth like me, you NEED to try this fun fall dessert idea! Instead of a traditional charcuterie board, load it up with all your favorite cookies, candies, chocolates, and seasonal treats for the ultimate fall dessert charcuterie board. 🍫🍬🍪

The best part?! It’s completely NO BAKE 🙌 Just grab your favorite fall and Halloween treats, arrange them on a board, and you have an easy dessert that looks like you put way more effort into it than you actually did. 😂

This would be SO cute for a Halloween party, fall girls’ night, Friendsgiving, movie night, or any fall get-together. 🎃👻 And you can easily customize it with whatever treats you love!

Honestly, I think dessert charcuterie boards might be better than regular charcuterie boards… but maybe that’s just my sweet tooth talking. 😆

Would you make a fall dessert board like this?! And more importantly… what treat are you grabbing FIRST?! 👇🏻 

#charcuterieboard #dessertcharcuterie #fallcharcuterieboard #dessertboard #falldesserts
Come style my screened in porch for fall with me! Come style my screened in porch for fall with me! 🎃

Who says the front porch gets to have all the fun?! 😂 I spend WAY more time on our screened-in porch, so of course I had to give it a cozy little fall makeover too!

This bar cart is one of my favorite spots to decorate because it’s so easy to switch out with the seasons. A few pumpkins, some warm fall colors, and simple seasonal touches instantly make this space feel so much cozier for fall. 🍁

And since this is basically my favorite spot to enjoy my morning coffee, I want it to feel just as festive as the rest of our home!

Of course, the cats also think the pumpkins are here specifically for them to knock over. 😹 Apparently they have VERY strong opinions about my fall porch decor.

Are you decorating your outdoor spaces for fall too, or do you keep all the pumpkins inside?! 🎃

Comment SHOP below to receive a DM with the link to this post on my LTK ⬇ https://liketk.it/6mGqj

#fallporch #fallporchdecor #screenedinporch #screenedporch #halloweenporch
DIY mercury glass pumpkins that still look this go DIY mercury glass pumpkins that still look this good YEARS later?! Sign me up! 🎃

I made these mercury glass pumpkins several years ago, and I’m still so in love with how they turned out! They honestly look just as good today as they did when I first made them, which makes this one of my favorite budget-friendly fall DIYs.

There’s just something so satisfying about taking an inexpensive Dollar Tree pumpkin and turning it into fall decor that looks way more expensive than it actually was. 🙌🏻 These have that beautiful vintage mercury glass look and are perfect for adding a little cozy, high-end touch to your fall and Halloween decor.

And the best part? You only need a few supplies and a few dollars to recreate them!

Comment “mercury glass” below and I’ll send you the full step-by-step tutorial! 🎃

Would you try this Dollar Tree fall decor DIY too?! Let me know below what you think! 

#dollartree #dollartreediy #dollartreefinds #potterybarndupe #mercuryglass
🍎🍂 SEPTEMBER MEANS IT’S OFFICIALLY TIME TO BAKE AL 🍎🍂 SEPTEMBER MEANS IT’S OFFICIALLY TIME TO BAKE ALL THE FALL THINGS!

And these Apple Cider Crinkle Cookies need to be at the top of your fall baking list! 😍 Made with nutty browned butter, a homemade apple cider reduction, and warm autumn spices, these cookies are rich, chewy, cozy, and basically taste like apple orchard season in cookie form.

They may sound fancy, but I promise this apple cider cookie recipe is actually so easy to make! 🙌

If you love apple desserts, fall cookies, and anything that makes your kitchen smell like autumn, you HAVE to try these! 🍎🍪

Comment “RECIPE” below and I’ll send you the full apple cider crinkle cookie recipe! 🍂

#applecider #applecookies #fallbaking #appledessert #falldesserts
Flower Lovin’ Friends! POV: YOU’RE READY FOR FALL… Flower Lovin’ Friends! POV: YOU’RE READY FOR FALL… BUT YOUR SUMMER FLOWERS DIDN’T GET THE MEMO 😂

I’ve been working on my fall front porch this weekend, and I’m loving how it’s coming together so far! 

It’s still SO warm here in North Carolina, which means all of my summer flowers and plants are still going strong. So instead of my usual neutral fall porch decor, we’re going a little more colorful this year and I think it looks so pretty! 🍂🌸

I added a new pumpkin doormat for a little fall refresh, but everything else is fall decor I’ve reused from years past. Proof that you definitely don’t need to buy all new decorations every season to give your porch a fresh look! 🙌🏻

And can we talk about FAUX MUMS?! I bought these last year, and it may have been one of my best fall decorating decisions because I can pull them out year after year and they still look perfect. Which is especially helpful considering I somehow manage to kill the real mums every single fall. 💀🤣

I still have a few finishing touches to add, but I’d say my colorful fall porch is off to a pretty good start! 🎃

Are you team REAL MUMS 🌼 or team FAUX MUMS because you can’t keep them alive either?! 😂

Hosts: 
@almost3acres
@jayhawkvintage
@mymapleleafhome 
@seaside_cottage_couture
@thecrowsnestsignco

Guest Hosts:

Heather @heathers_vintagecottage
Heather @turtledriftvintage

Returning Guest Hosts:
Cindy @tre.vue
Faith @the_retired_housewife

DM @flowerlovinfriends to join
#flowerlovinfriends #fallporch #mums #fallflowers #fallhomedecor
POV: you finally found a board game you’re guarant POV: you finally found a board game you’re guaranteed to win. 🤣🧀🍇

I LOVE board games… especially when people put meat and cheese on them. Maybe some fruit, crackers, and a few other snacks too. Now THAT is a game I’m really good at. 😂👏🏻

Okay, I’ll be honest, I’m actually not a huge board game person. But I AM extremely competitive, which means I only enjoy playing if there’s a decent chance I’m going to win. 😜 And if I’m not good at the game? Suddenly I’m no longer interested. 😂

But give me a charcuterie board filled with cheese, meats, crackers, fruit, and all the yummy snacks, and I’ll happily play all night long. 🙌🏻

Plus, an easy charcuterie board is one of my favorite entertaining ideas for fall get-togethers, game nights, girls’ nights, and holiday parties. It looks impressive, requires basically no cooking, and everyone can grab exactly what they want!

So tell me… are you a REAL board game person 🎲 or are you more of a charcuterie “board game” person like me?! 🧀🤣

Comment SHOP below to receive a DM with the link to this post on my LTK ⬇ https://liketk.it/6mUYM
#charcuterieboard #charcuteries #charcuterieplatter #boardgames #boardgamer
Never thought I’d be making a binder with dividers Never thought I’d be making a binder with dividers for doctor notes, lab results, treatments, medications, scans, surgeries, symptoms, and medical records at just 33 years old… but here we are. 😂

After months of appointments and still feeling like no one can put all the puzzle pieces together, I’ve officially decided I’m becoming that patient. You know, the one who walks into every appointment carrying a giant medical binder, receipts in hand, ready to advocate for herself and get some ANSWERS. 😂👏🏻

Because if navigating chronic illness has taught me anything, it’s that sometimes you have to become your own medical historian and your own biggest advocate.

There is a little bit of good news though! 🙌🏻 I was able to get an appointment with Duke’s Electrophysiology Clinic to hopefully get more help with my inappropriate sinus tachycardia (IST) and figure out a better treatment plan. The downside? My appointment isn’t until October 30th. 🙃 So once again… we wait.

I’m really hoping that by the end of this year, I’ll finally have more answers, a treatment plan that actually helps, and a clear path forward. 🤞🏻

Until then, catch me organizing my medical records like they’re a high school research project. 😂📑

Anyone else with chronic illness have a giant medical binder too?! Because I have a feeling I’m definitely not the only one. 👇🏻

Comment SHOP below to receive a DM with the link to this post on my LTK ⬇ https://liketk.it/6mM0j

#inappropriatesinustachycardia #ist #chronicillnessawareness #chronicillnessjourney #endometriosis
🚨 CAT LOVERS, RUN! MY FAVORITE HALLOWEEN CAT SHIRT 🚨 CAT LOVERS, RUN! MY FAVORITE HALLOWEEN CAT SHIRT IS ONLY $20! 🐈‍⬛🎃

If you’ve been looking for the cutest Halloween shirt for fall, this is your sign! My favorite Halloween cat tee from @pinklily is part of their Labor Day Doorbusters and is marked down to just $20 (normally $35!). 👏

And trust me, this isn’t the only good deal! 👀 There are SO many cute Labor Day Doorbusters happening right now, PLUS you can get 35% off everything else with code LABORDAY35! 🛍️

So if your fall wardrobe needs a little refresh, now is definitely the time to shop! 🍂 Whether you’re looking for cute fall outfits, Halloween graphic tees, cozy seasonal pieces, or just an excuse to treat yourself… Pink Lily has you covered. 😂

And obviously, as a cat mom, I couldn’t resist this Halloween cat shirt. 🐈‍⬛ I mean… LOOK AT IT! 😍

Are you team 🎃 HALLOWEEN or 🍂 FALL when it comes to seasonal graphic tees?!

Comment SHOP below to receive a DM with the link to this post on my LTK ⬇ https://liketk.it/6mxGl

#catmom #catmoms #catmommy #halloweencat #labordaysale
🎃YOU’D NEVER GUESS THESE PUMPKINS CAME FROM DOLLAR 🎃YOU’D NEVER GUESS THESE PUMPKINS CAME FROM DOLLAR TREE!

I found these adorable stackable pumpkins at Dollar Tree for only $5 each, and of course I immediately started thinking about how I could give them a little high-end fall makeover! 🍂

I started with a coat of black spray paint, then went over them with a metallic bronze spray paint to add the prettiest subtle shimmer. ✨ I finished them off with a cute little bow on top, and just like that—a simple Dollar Tree find looks like expensive fall porch decor! 🙌🏻

My porch definitely isn’t fully decorated for fall yet, but I think these DIY Dollar Tree pumpkins are a pretty cute start, don’t you?! 😍

There’s just something so satisfying about taking an inexpensive Dollar Tree find and transforming it into something that looks way more high-end! And this one was SO easy to do. 🎃

Would you try this Dollar Tree fall decor DIY?! 🍁

Comment SHOP below to receive a DM with the link to this post on my LTK ⬇ https://liketk.it/6mwqY

#dollartreediy #dollartreefinds #dollartreecrafts #dollartreehacks #diyfalldecor
Who’s already dressing their pets up for Halloween Who’s already dressing their pets up for Halloween? 🎃👻

Apparently Little Miss Riley is NOT a fan of her new Halloween cat sweater… and she made that very clear. 😹 I, on the other hand, think she looks absolutely adorable in her tiny spooky outfit!

Honestly, I’m shocked we even got the sweater on her. She’s so fast that catching her is usually the hardest part. 😂 Don’t worry though—we only kept it on long enough for a quick fit check before Halloween, then took it right back off and rewarded her with plenty of treats for being such a good girl. 🖤

I have a feeling this may be the first and last time she models her Halloween outfit this year… unless the treats convince her otherwise. 🤣

Are your pets team “dress up for Halloween” or team “absolutely not”? 🎃🐈

Comment SHOP below to receive a DM with the link to this post on my LTK ⬇ https://liketk.it/6mEdm

#halloweencat #halloweencats #catcostume #halloweenpet #halloweenpetcostume
POV: it’s still 100 degrees outside, but your hous POV: it’s still 100 degrees outside, but your house smells like FALL 🍂🕯️😂

It may officially be September, but apparently the weather didn’t get the memo. 🤣 That’s okay though because I REFUSE to light anything but a fall scented candle from now on!

And the Fall Day candle from @ellerydesigns x @antiquecandleco is basically autumn in a jar. 🍁 It’s the perfect cozy fall scent to make your whole home smell like fall, even when it still feels like the middle of summer outside. 😂

Because if I can’t have crisp fall mornings and sweater weather yet, I can at least have a cozy home that SMELLS like fall, right?! 🍂☕️🕯️

If you’re looking for the best fall candles to kick off September and make your home feel extra cozy, definitely add this one to your list!

Comment “Candle” below and I’ll send you the link! And be sure to use code the code MACEDONIA20 for 20% off!

Are you already burning fall candles too, or are you waiting for the weather to cool down?! 👇🏻

#fallcandles #septembervibes #bermonths #fallscents #fallcandle
This rich, decadent chocolate pecan pie is surpris This rich, decadent chocolate pecan pie is surprisingly easy to make and puts the BEST twist on classic pecan pie. The bourbon adds just the right amount of warmth, while that homemade bourbon maple whipped cream takes every bite to the next level. 😍

It would be the PERFECT addition to your Thanksgiving dessert table or fall baking lineup! 🍂🦃

Save this for your Thanksgiving menu and comment “RECIPE” below and I’ll send it your way! 👇🏻

#pecanpie #thanksgivingdessert #falldesserts #thanksgivingpie #pierecipe
🚨 ASHEVILLE FRIENDS: THIS IS YOUR SIGN TO GO RUG S 🚨 ASHEVILLE FRIENDS: THIS IS YOUR SIGN TO GO RUG SHOPPING THIS LABOR DAY WEEKEND! 🏡

If a new rug or a little home refresh has been on your wishlist, now is the perfect time to check out @rugandhomeash! Their Labor Day Weekend Sale is happening NOW, and you can score some seriously beautiful rugs at incredible prices. 🙌

But here’s the thing, you definitely don’t need to be shopping for a rug to stop by! 😂 They have SO many unique home decor pieces, accessories, furniture, and one-of-a-kind finds that you just don’t see at your typical big box store. I could seriously wander around looking at everything forever!

So if you’re looking for things to do in Asheville this Labor Day weekend or want to give your home a little fall refresh, add @rugandhomeash to your weekend shopping list! 🛍️🍂

Are you currently shopping for a new rug, or are you like me and always somehow shopping for home decor?! 😂

#ashevilleshopping #labordaysale #ashevillelocal #ashevillebusiness #828isgreat
🍂 A $3 TARGET PUMPKIN… BUT MAKE IT LOOK POTTERY BA 🍂 A $3 TARGET PUMPKIN… BUT MAKE IT LOOK POTTERY BARN EXPENSIVE 👀🎃

When I spotted these adorable glass pumpkin jars in the Target Dollar Spot, I immediately knew I wanted to give one a little high-end fall makeover! And y’all… I’m OBSESSED with how this turned out. 😍

I grabbed some ColorShot spray paint in Metallic Bronze and gave the entire glass pumpkin jar a few coats, and that was literally it! Such an easy DIY fall decor project, but it completely transformed this $3 Target find.

Tell me this doesn’t look like something you’d find at Pottery Barn for WAY more?! 🙌🏼 I love finding inexpensive fall decor and turning it into something that looks high-end without the high-end price tag. Plus, you could customize this DIY pumpkin jar with any color to match your fall decor!

Now I just need to figure out what to put inside it… 🤔 Any ideas?!

SAVE this easy Target Dollar Spot DIY for your fall decorating inspo! 🎃🍂

Comment SHOP below to receive a DM with the link to this post on my LTK ⬇ https://liketk.it/6mtrk

#targetdollarspot #potterybarnstyle #potterybarndupe #diyfalldecor #diypumpkins

Copyright © 2026 Mornings on Macedonia · Theme by 17th Avenue