
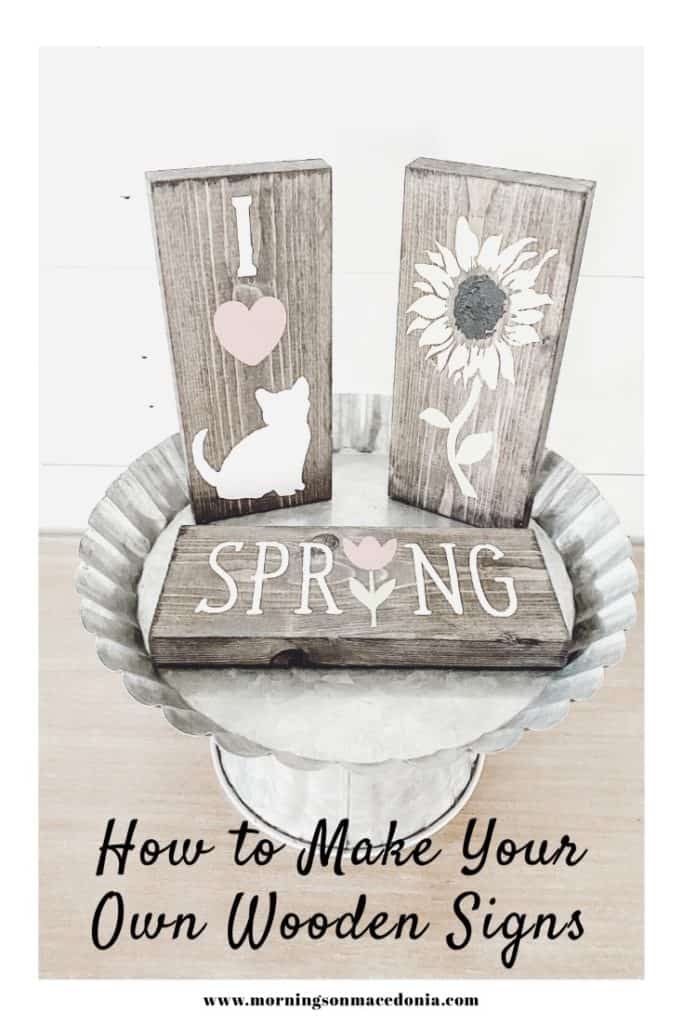
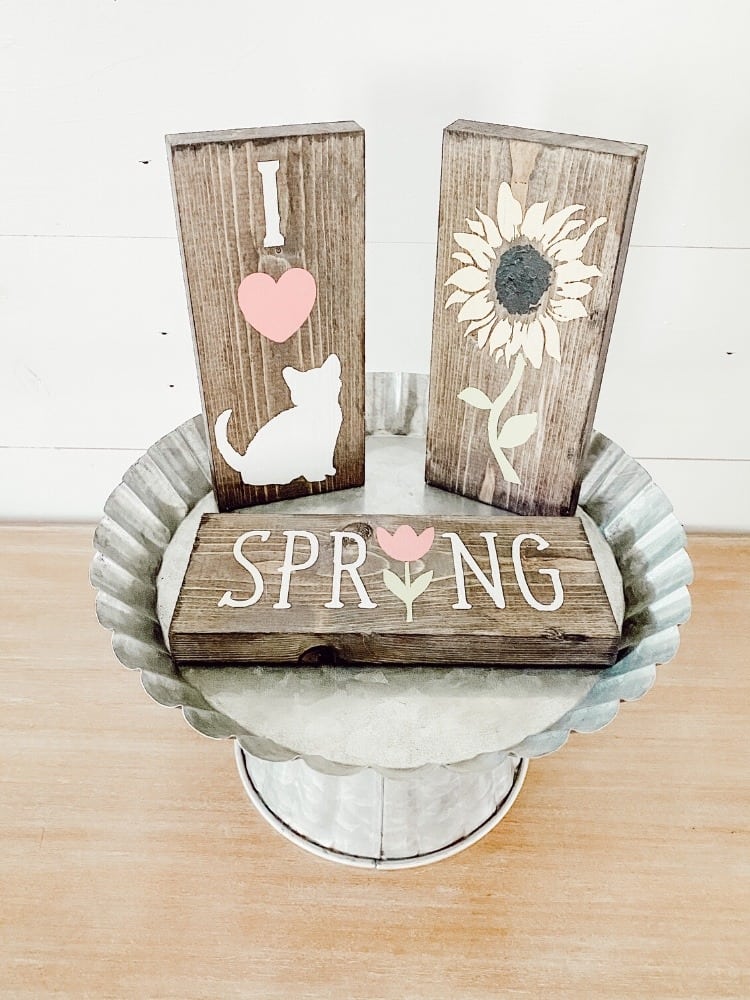
Last month, for my birthday, my mom gave me such a fun gift! It was a DIY kit full of supplies needed to create your own wooden signs! Which the timing of it was perfect since we were still pretty much shut down from everything here because of coronavirus.
So I thought it would be fun to share with you guys what I did and everything that my kit came with. And you can totally do this without your own kit too. Basically, if you have the supplies on hand, you can make whatever kind of sign you want.
This post contains affiliate links. Click here to read my disclosure policy.
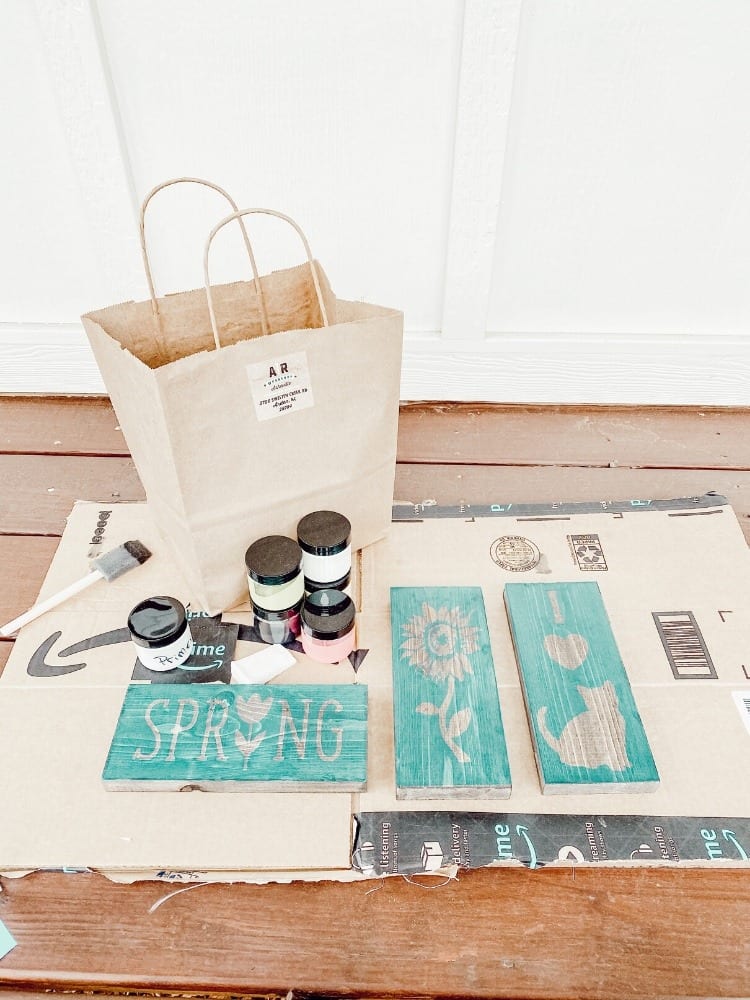
In The Kit:
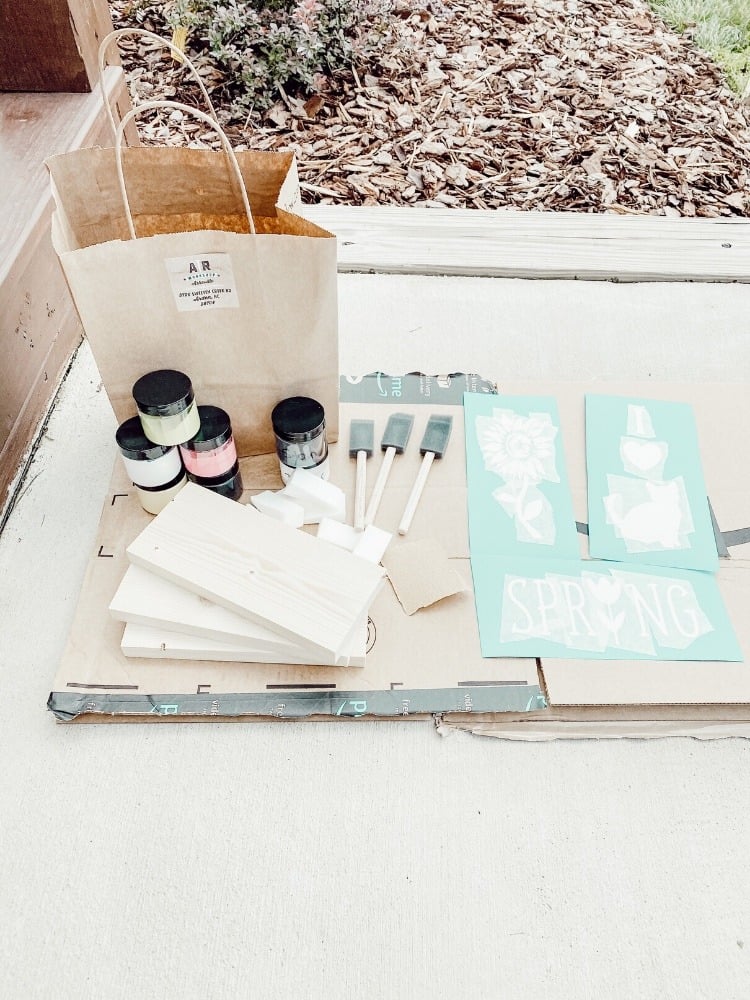
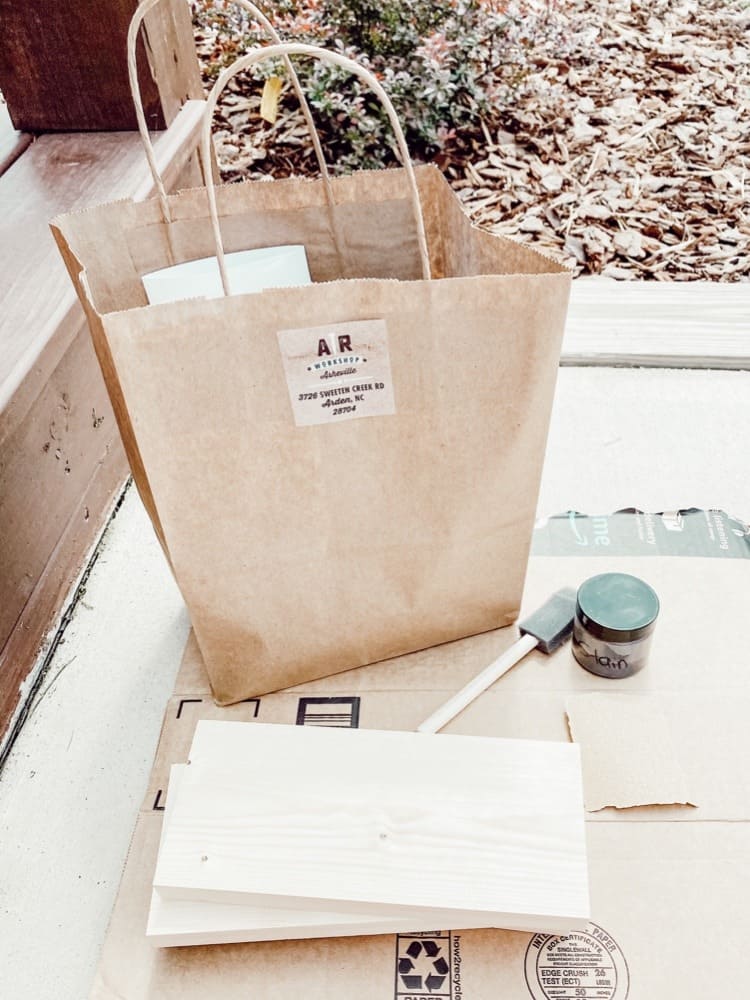
This DIY kit for wooden signs was purchased from AR Workshop. They are a cool company local to us that does a lot of crafting and DIY workshops.
But since everything was shut down at the time, they were creating little “to-go” DIY kits, which is such a perfect idea!
Here is everything that my kit included (and all the supplies you need if you want to try to do this yourself as well):
- Wooden blocks to make the signs with
- Stain
- Various paint colors
- Pre-cut stencils
- Foam brushes and sponges
- Primer

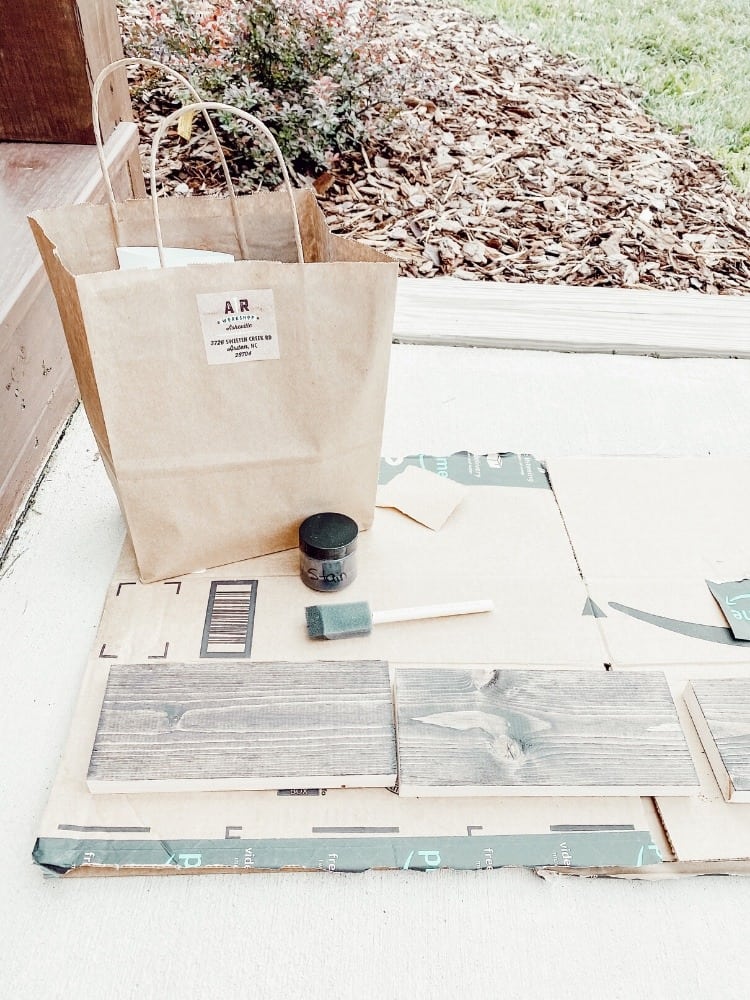
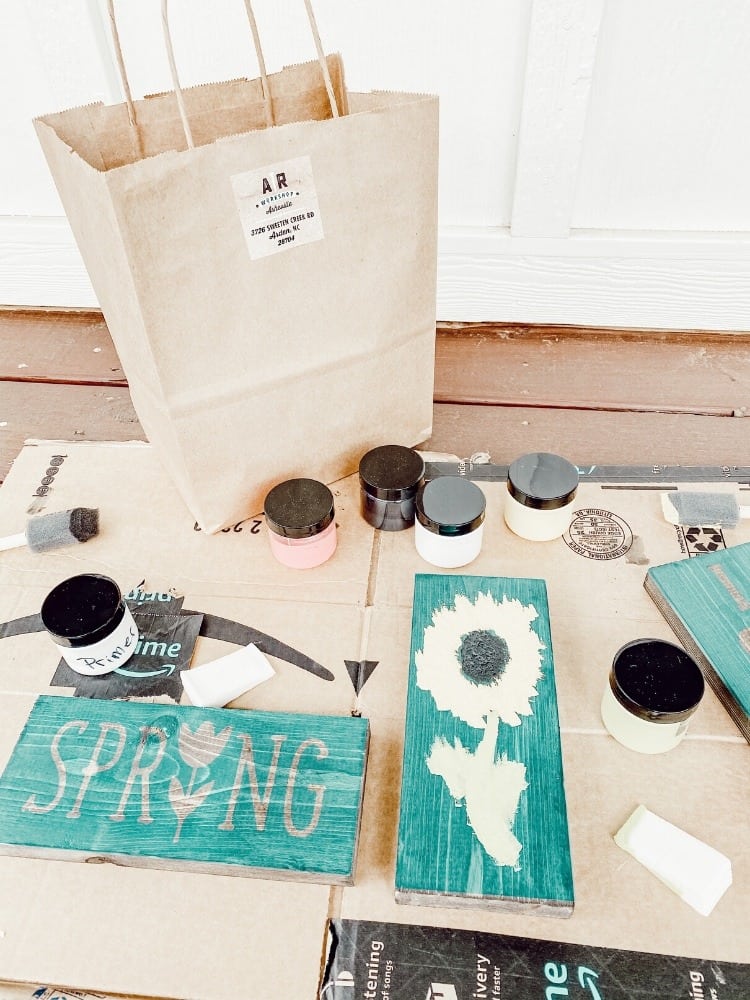
Stain the Wooden Signs
So the first step to this project was to stain the wooden signs, which was super easy to do. I did it outside on some cardboard, mainly because it was a beautiful day and I wanted to soak up the sunshine!
I just stained as many sides as I could, then I let it dry for about 15-20 minutes in between. After it was dry, I flipped the signs over and stained the other sides as well. Easy peesy!
I used a foam brush to apply the stain, which those are so easy and cheap to find. I can usually get a whole pack of them for just a few bucks, but thankfully it was provided in this kit already.
If you didn’t want to stain your signs, you could also just paint them instead. I think a white or a black painted sign would look great as well!
Place the Stencil
Once your stain has completely dried, it is now time to place your stencils and start painting! Like I said above, the pre-cut stencils were already provided in this kit, but you could totally make your own or purchase some.
I like how they provided mine and it was already cut to the exact size of the wooden board so it made it super easy to apply! It basically worked like a sticker so I was able to easily place it on the board.
Just be sure if your stencil has a lot of cuts and/or designs in it, you lay it down completely flat t prevent your paint from bleeding through.
Paint the Wooden Signs
Now that your stencil is on, it’s time to paint them! The most fun part in my opinion. In this kit, they already gave me a few sample sizes of different paint so I just used what they gave me.
But you could totally use whatever paint you like or have on hand as well.
I was nervous about the paint bleeding through the stencil, but thankfully it didn’t. I used one of the pre-cut sponges provided and simply dabbed a little paint on it, wiped the excess off, and then dabbed it onto the stencil.
I think the key is to just “dab” when stenciling and not use complete paint strokes. If you’re a serious stenciler, then I am sure you have a great stencil brush!
But I haven’t gotten myself one yet unfortunately. The sponges worked just fine for me for these DIY wooden signs though!
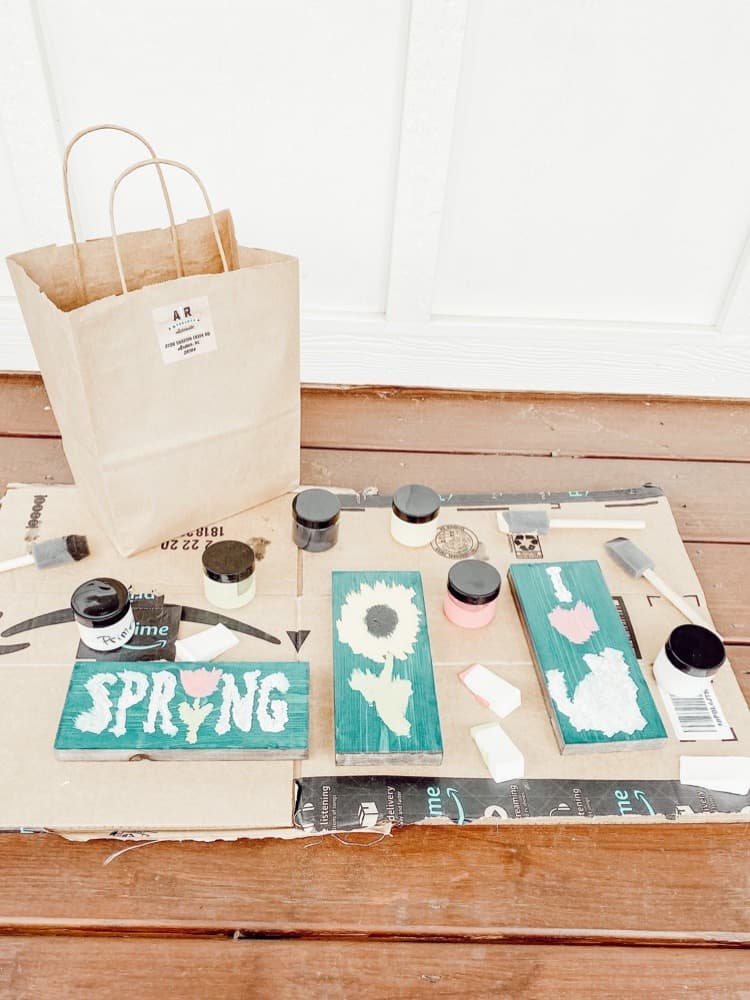
I did have to do multiple coats of paint just because the stain was pretty dark so the paint didn’t shine through as easily. Especially the white paint!
But after about three coats and a few touch ups, I think it came out perfectly!
Peeling Off The Stencil
Once you’ve painted your signs and they have dried, you can finally take off the stencil. My tips to do that are to definitely peel against the grain to prevent splinters from happening in your wood.
Also, if your stencil design is intricate and has a lot of little pieces to it, use a toothpick to help lift up the smaller areas. That definitely helped me when I tried that one some smaller spots!
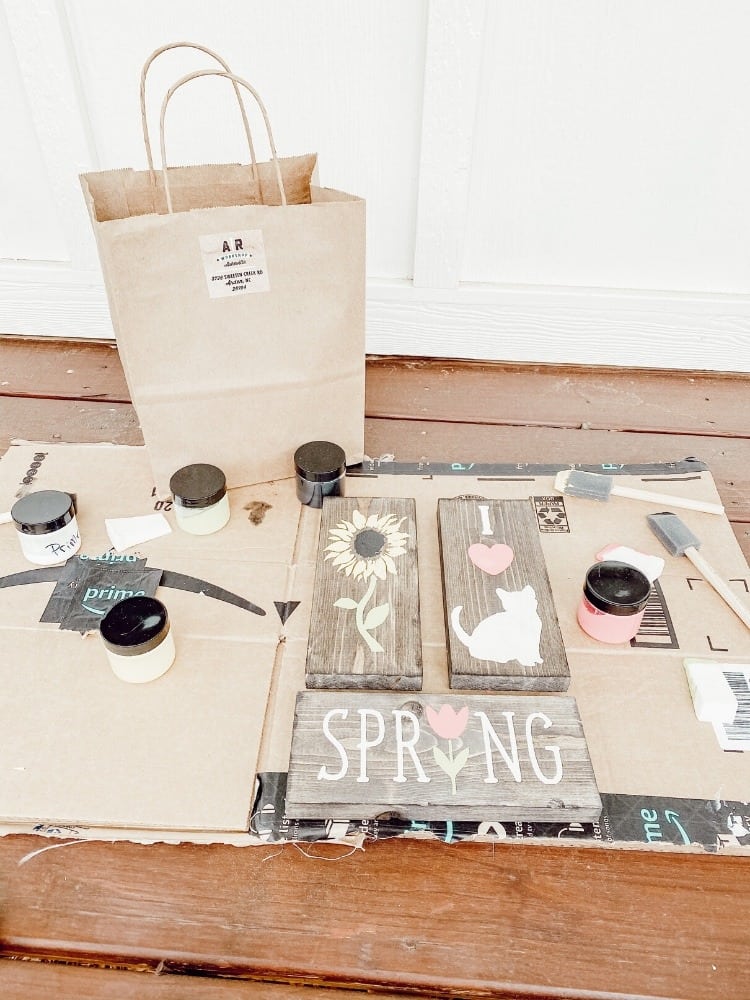
Priming The Signs
The last step for these DIY Wooden Signs are to prime them. Again, the primer was given to me in the kit, but you could use whatever you have on hand.
I just used very thin strokes of primer with a foam brush to seal it all up. Super easy and simple and now they are more protected with the primer on them!
Conclusion
So all in all, this was such a fun and easy project! It literally just took me one afternoon to complete and I love how they turned out.
If you’re looking for a DIY kit of your own, you can even order some from AR Workshop online too!
They have plenty of different ones to choose from too so you don’t have to get the same exact ones that I got as well.
But like I said earlier, if you have some extra wood, paint, and stencils lying around, you could definitely make your own sign that way too!
You could even freehand something too if you don’t have any stencils.
Although, I probably couldn’t because I have very shaky hands lol If y’all have ever done something similar to this, let me know below! I’d love to hear all about it!
Omg those are so cute!!🤩 I’ll have to check out out!
Thank you so much! You definitely should!
Such a nice gift from your Mom!!! I have made several wooden signs and I find it to be a great craft project that anyone can enjoy. Using your tutorial I think anyone could make a sign that they would love to display:)
Thank you so much! Yes, it was a very fun and easy project to do for sure!
This is great!
Thank you so much
I love these! If I didn’t live on the other side of an ocean I would buy some. I will have to look for some over here.
lol yes! You will have to find something similar for sure!
Great post! These signs are so cute! I love them!
Thank you so much! I love them too!
Those signs look like great fun and a simple DIY project. And a nice gift to make for someone else too. Thanks for sharing,
Thank you so much! They would make a perfect gift too!
I love these! When I get my garden office, I’d love to get (or make) a sign like this for the outside to make it look and feel a bit more homely! x
Oh yes! That would be a great idea! It would look perfect there!
These are absolutely gorgeous!
Thank you so much Jodie. I appreciate it!
Oh wow, those wooden signs look amazing, I’d love to make something like that
Thank you so much! You should! It was definitely a lot of fun!
These are so gorgeous! We’ve got a new shed/den in our garden, and this would just be the perfect finishing touch. I love a good craft project as well!
Yes! Crafting is so much fun!
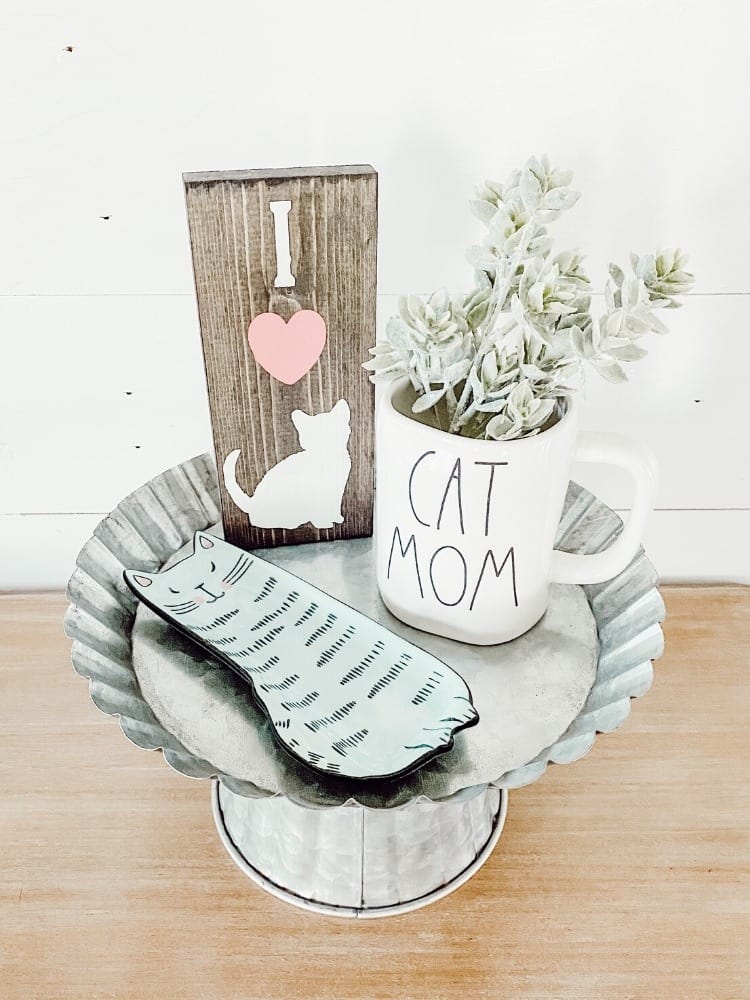
This is so cute especially the cat stencil. Thank you for sharing this painting idea.
Of course! I love the Cat stencil one as well!
Oh, I love this! What a fun DIY project! I’m glad to learn that you can buy it as a kit. It would be a great activity to do with kids (I may have to get it for my sister for her birthday). Thanks!
Yes! It really would be perfect for kids. And so much fun! I’m glad you enjoyed it!
I really love these wooden signs that are coming out – I already have a few myself!
Thank you so much! I love Wooden signs for sure too!
How beautiful! I love painting and doing crafts, so this seems like the perfect DIY project to do. Plus, I love how you can do this outside while getting some sunlight. Your signs turned out so cute. I love the “I heart cat” one. I’m going to have to look into these kits. Thanks for sharing! x
Much love always,
GABBY
No problem! Glad you enjoyed it! I love the cat one too! It was a great and easy DIY project for sure!
Wow you’re so creative, amazing. Once I bought the textille bunny
with the sign spring. It still stays in the kitchen as a deco..
That sounds like great decoration! Thanks so much!
These are so cute and they turned out great!
Thank you so much. I’m pretty happy with how they turned out too!
Wow those are sooo nice!! You are very creative..love the cat one 🙂
Thank you so much! I love the cat one too! It’s definitely my favorite! 😉
These are gorgeous signs what’s lovely gift from your mum! My favourite is the cat I love It!
Sarah
I know right?! Such a sweet gift. I love the cat one too! 😋
Ooooh! I love wooden signs! Looks so cute and vintage at the same time. I love that it is super easy to make. Thanks for sharing!
Nancy ♥ exquisitely.me
Thank you! I love the vintage look to them as well. You know me, I love anything vintage of course!!
These look so cute and adorable and very easy to make. To be fair I would love to put some of these on the outside of my house or even in the kitchen. I like the rustic feel that they bring.
Thank you so much! I would like to put some outside on my porch too. Especially the sunflower one. I think since they are all sealed up with the primer too, they should hold up just fine outside as well!
These turned out so cute!! I love making signs like this, they brighten up any space 🙂
I know right?! I do too! They are so fun and cheerful!
This looks like such a fun project and it turned out great!
Thank you so much Meaghan! I think they did too!
These are so cute! I’m not super crafty but I might be able to handle something like this haha
Lol these are so easy though! I think you definitely could!
Ahhh this looks like soo much fun! I definitely want to try this out, such beautiful signs. Meera-Abroad | travel, fashion & food
Thank you so much Meera! They were a lot of fun to make!
Wow, I love this easy way to make wooden signs! I have gifted wooden signs before, but never thought of making them, and love the inspiration of giving this a go soon.
Thanks for sharing!
No problem! Glad I could give you a little inspiration! They are a lot of fun to make!
The wooden signs are so cute, something I would love to make just so I can keep staring at it. Great post
Thank you so much! I loved making them and they are so cute to stare at too!
These look so nice and are such a great gift idea! Thanks for sharing 🙂
Thank you. It sure would make a great gift idea!
This is the cutest idea!! I’m definitely going to get into making wooden signs at some point, it looks like so much fun!
Thank you! You definitely should. They were so much fun to do!
These wooden signs are so pretty! Such a fun thing to make. Thank you for sharing.
Thank you! It was really fun to make!
These are sooo cute!
How To Get Shiny Healthy Hair With Spring + Vine | Vegan Fashion + Lifestyle Blog
Thank you Caitlin. Glad you think so!
This is such a great idea, and I love how the final product came out! The wood looks so cute and rustic when it’s stained, I’m totally going to try this 🙂
Anika | chaptersofmay.com
Thank you Anika! You definitely should try it, it was a lot of fun to make!
I love a fun craft project!! These look really simple to make and the end product looks SO good! I’d love to have a few of these around the house
Thank you so much! It was pretty easy and I am so happy with how they turned out as well!
I went to a sign-making party a few years ago with girlfriends and had a great time. Yours are so cute and you can easily make a ton of different signs if people bring supplies to share. Fun craft idea.
Thank you so much! Sign-making classes are so much fun!
All of them are so cute! I especially love that sunflower. Thanks for sharing the process!
Thank you so much! I love the sunflower one too!
Ohhhh, this is so cool! And how amazing that the blue stain completely disappeared into that lovely aged wood effect. My daughter would LOVE this, I’ll have to see what I can find over here now! Lisa x
Thank you so much! Yes, she definitely would! It was a really fun project!
Fun project! I’ll need to come up with a good slogan, then I’ll be all set. Thanks for the great instructions!
No problem! They were so fun to make too!
My inner creative and artist girl just jumped with joy. This seems like such a fun and rewarding activity !
Loved this post.
Thank you so much! It was a very fun and rewarding activity for sure!
What a great DIY gift kit! I never knew you could get something like this but would love to receive something like it. Can you change out what stencils go into the kit? Love how your signs have turned out, the stain just looks beautiful on the wood, and against the contrast of the stencilled pieces.
Thanks for sharing and the inspiration!
Aimsy xoxo
Yes! They had multiple options for the stencils so you could pick whatever you wanted. It was definitely a fabulous gift for sure!
Oh wow these are so cute 😍 And it looks like such a fun project too.
Thank you! It sure was, I enjoyed doing it!
Nice work, well done! Diy things are the best.
Thank you! I think so too!