
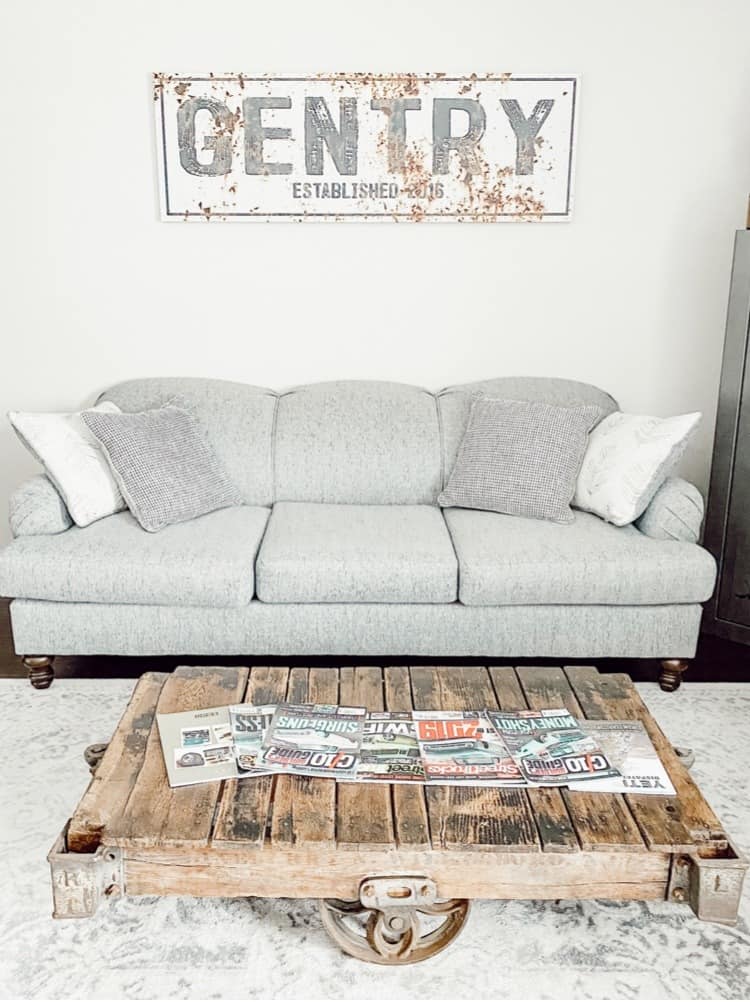
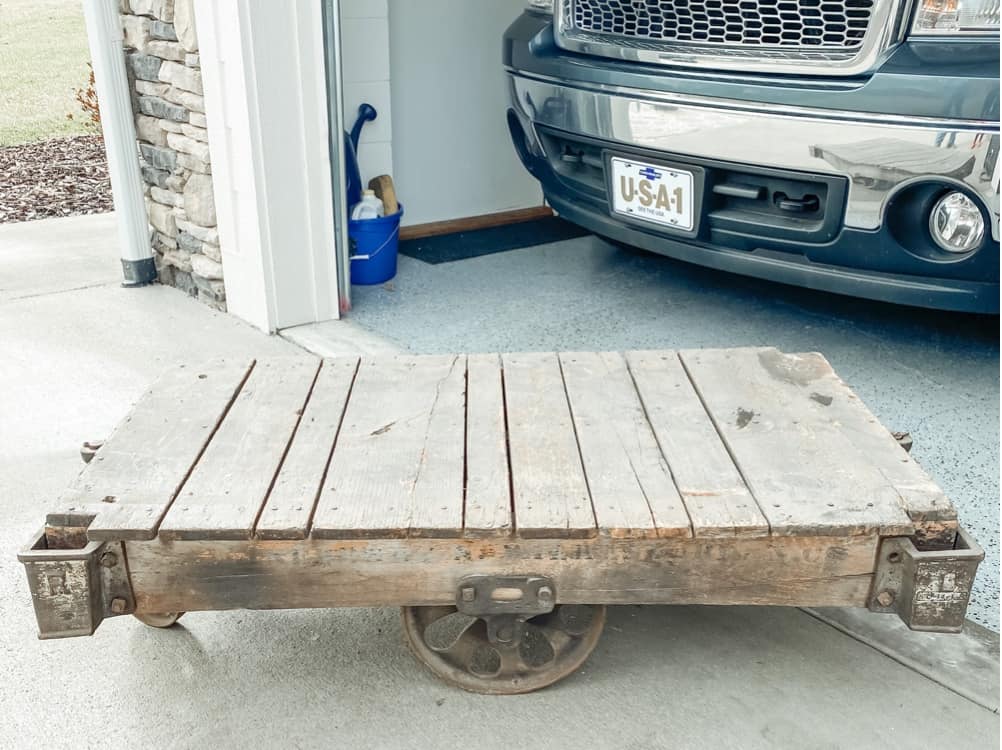
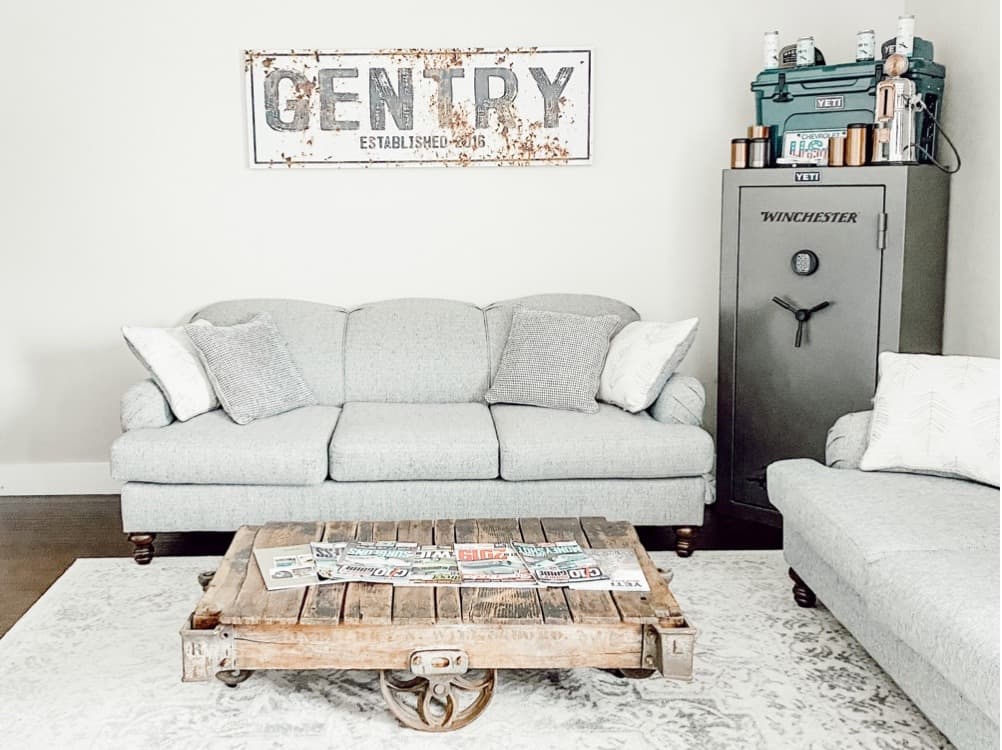
We were lucky enough to find an old railroad cart table at a local antique store with the original boards still attached to it! It looked pretty rough when we bought it, but we knew we could transform it and make it into something really special for our downstairs game room. We wanted an antique railroad cart table to use as our coffee table down there since we are trying to make it into a vintage game room eventually. So we knew when we saw this table, it was the one for us! I thought I would go ahead and share this easy DIY process with you all in case you find a similar table and want to transform it as well.
This post contains affiliate links. Click Here to read my disclosure policy.
Supplies Needed to Restore the Old Railroad Cart:
- Air Compressor
- Sandpaper or Electric Sander (We used the electric sander because it was much easier that way. But if you don’t have one, you could totally sand it down by hand. It just may take a tad bit longer.)
- Hammer
- Wood sealer
- Sponge brush to apply wood sealer

Get Rid of The Dirt and Grime
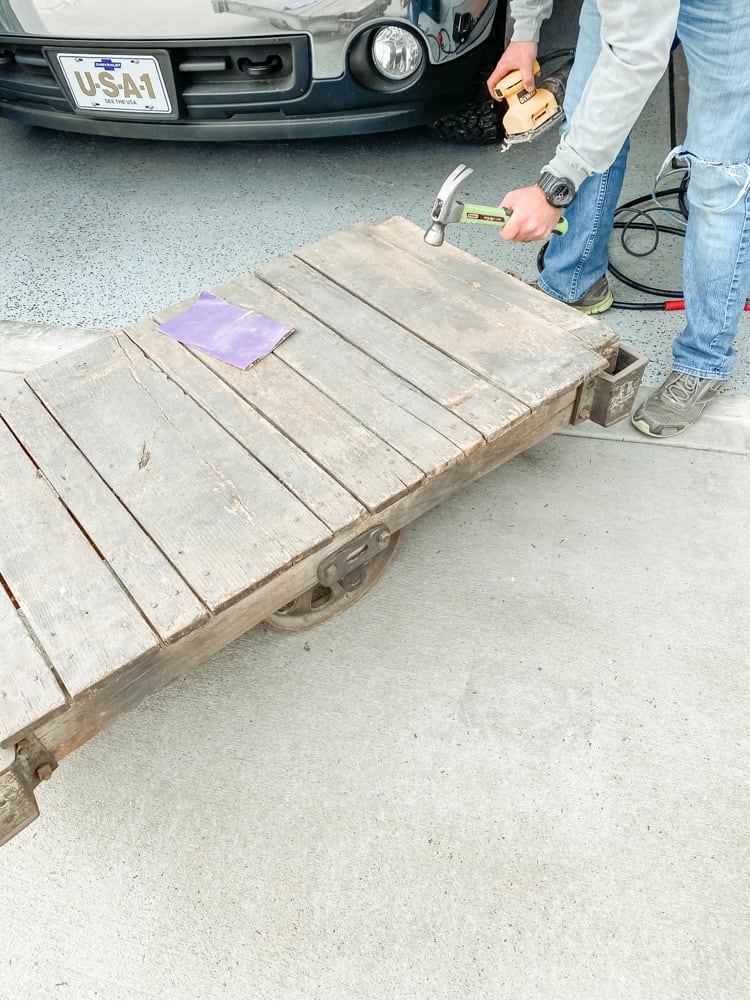
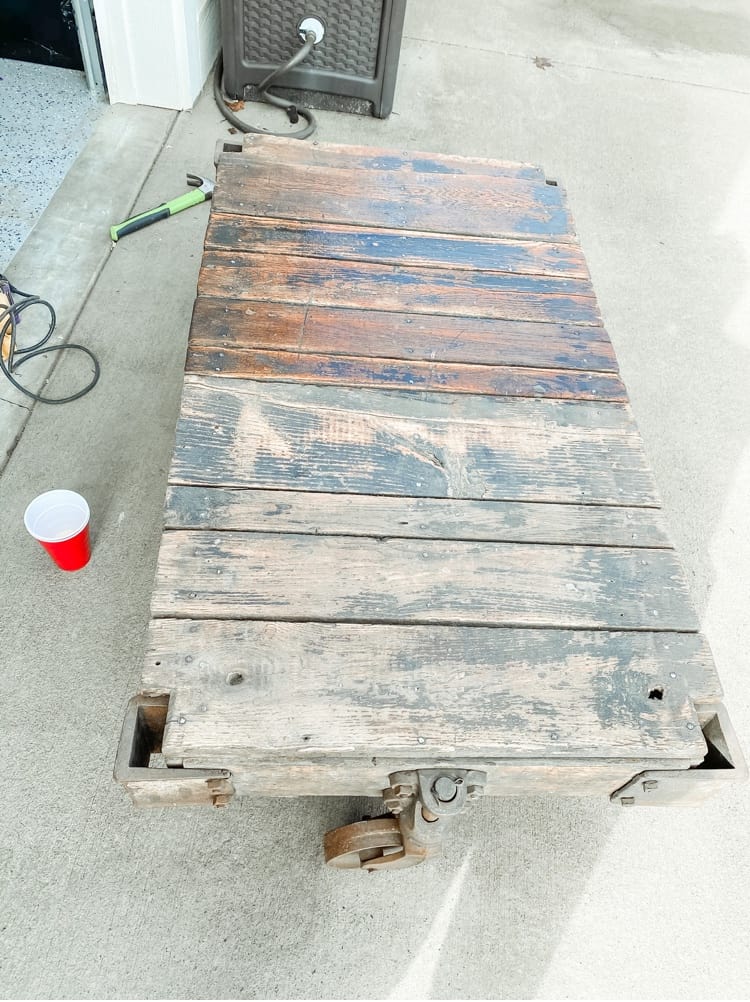
Obviously, the first step would be to get rid of all the dirt and grime covering the table. This one was pretty covered in dirt. It had been sitting outside of the antique store for who knows how long and it was not in perfect condition.
But we knew with a little TLC, we could get this table in working order again. My hubby used his air compressor in the garage and blew air all over the table to clean it up real good.
Then, we simply wiped it down with a dry cloth afterwards to remove any remaining debris hanging on.
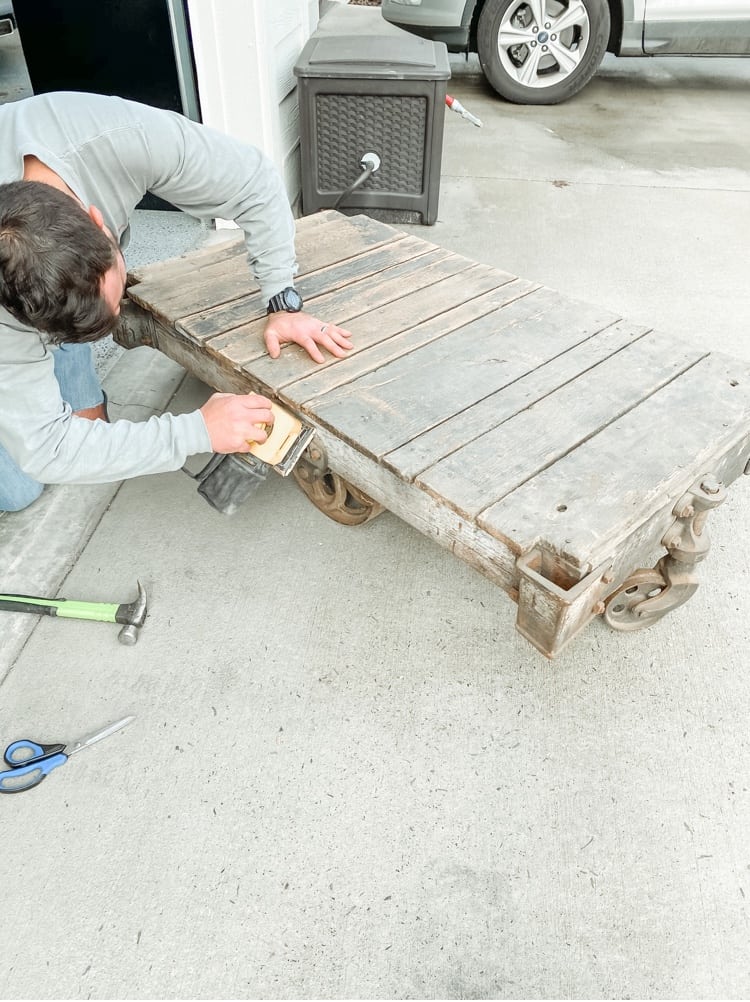
Sanding the Antique Railroad Cart Down
After you have the table all nice and clean, the next step would be to sand it down real good. As I mentioned above, we used an electric sander for this part and it made things go by pretty quickly.
I would strongly suggest investing in an electric sander if you like to re-do a lot of furniture pieces like this. It will definitely save you time in the long run!
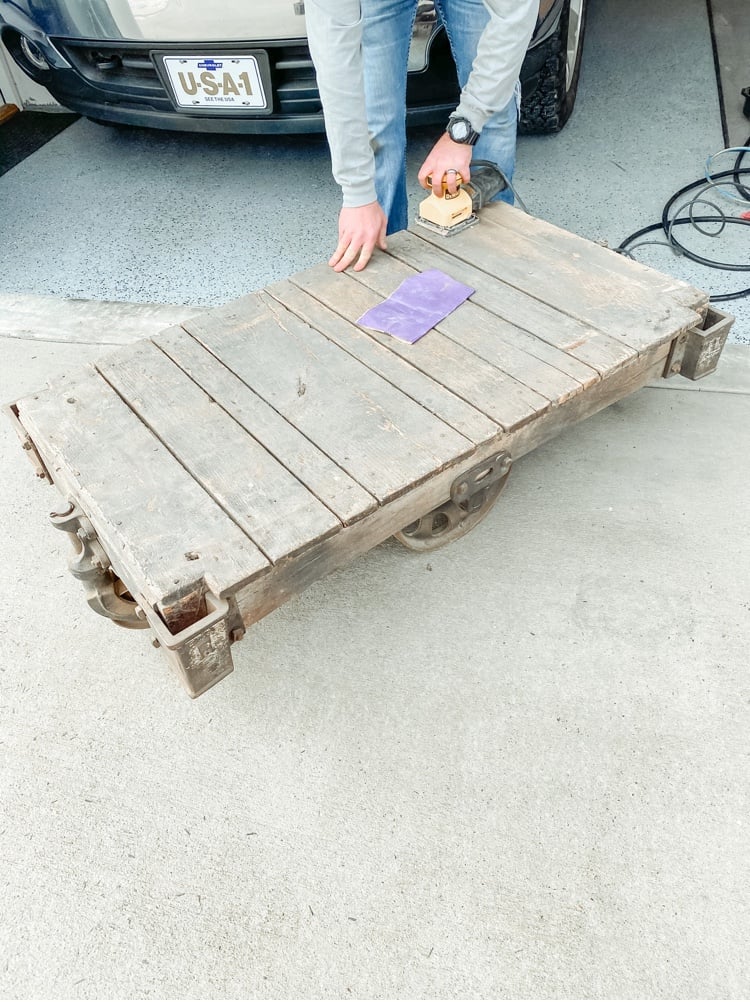
We did notice with this table that it had several nails sticking up from it. Which in turn, would rip the sandpaper off of the sander.
Because of that, we did have to hammer down a few nails before sanding the whole thing down.


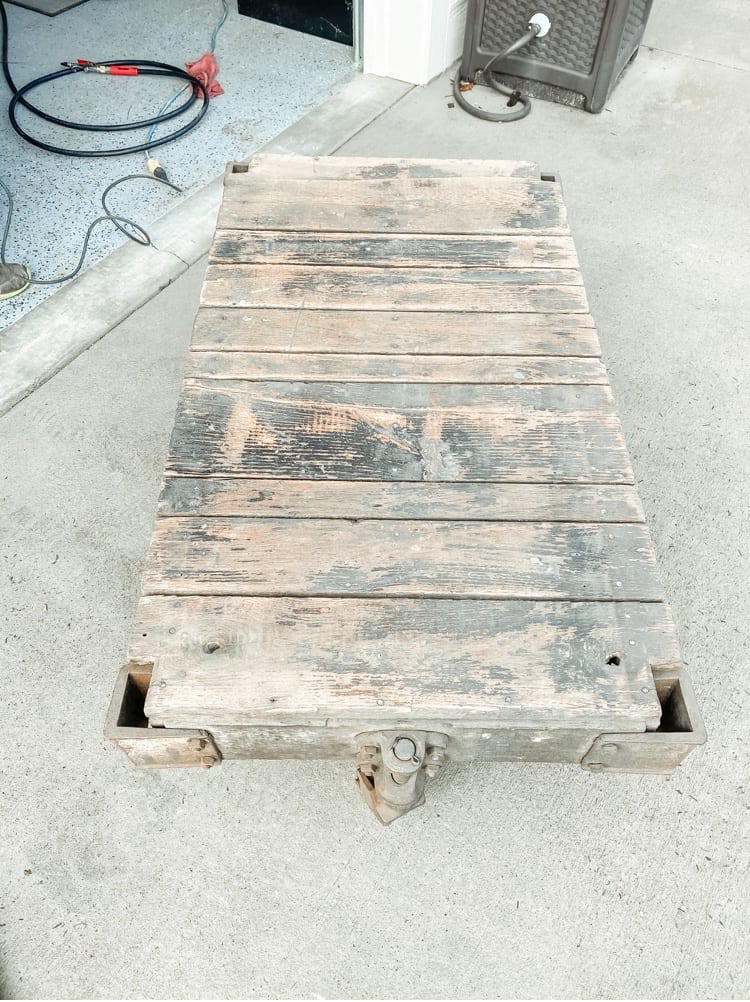
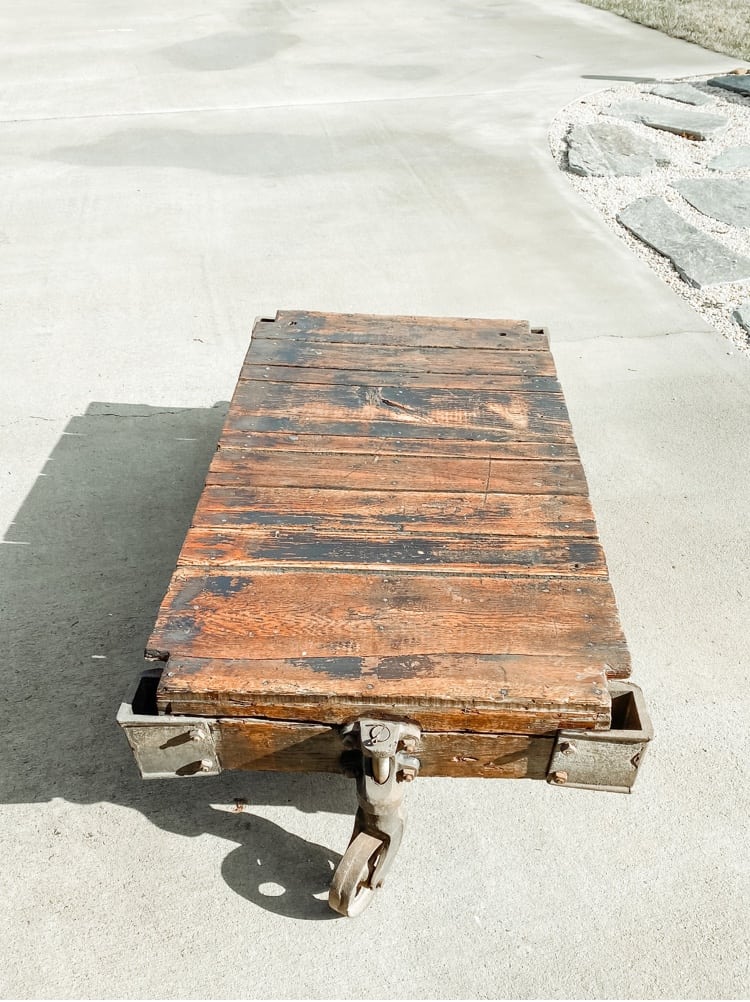
After sanding it down, it really brought out the old black paint color. I loved how rustic it made it look.
It is the perfect, authentic vintage looking table we were envisioning for in that room.
Apply The Wood Sealer Onto Table
After we got the table sanded down completely, my hubby used the air compressor again to blow off any remaining pieces left.
Once you do that, you are ready to seal it! We had some leftover sealer from when we applied the wooden shiplap onto our kitchen bar wall.
I am not sure of the exact name of the one that we used, but I do know it is a semi-gloss finish.
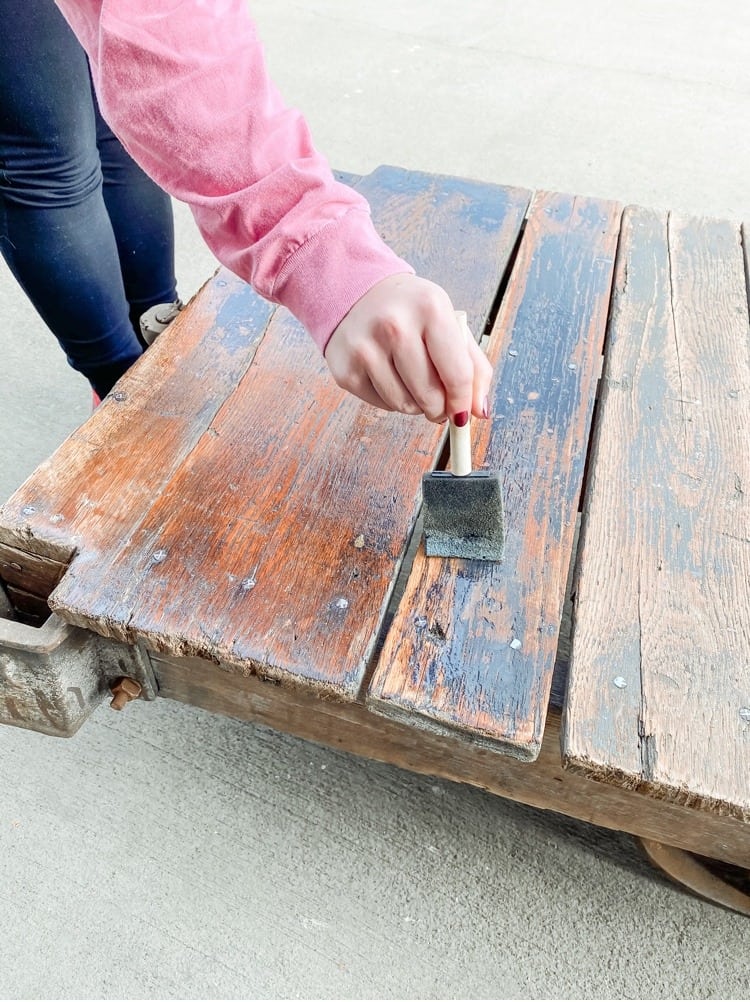
You can use whatever kind of wood sealer that you want for this project. I was really happy with the semi-gloss finish because it gave it just a little shine, but not too much.
I just used a cheap foam brush to apply the sealer on the table as well. I did go through about 4 total to finish it up, but thank goodness they are cheap and come in a big pack!
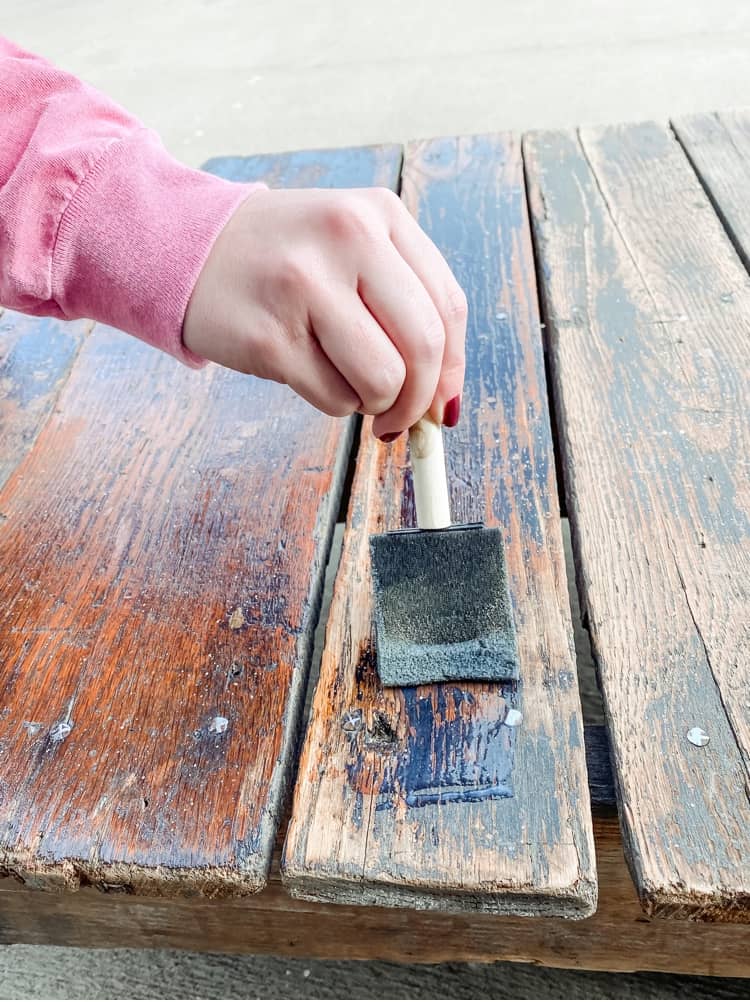
Tips for Applying the Sealer:
- Use at least 2 coats or more on top if you are planning on using it as a coffee table to set drinks down on (we did two on the top total).
- Don’t forget to apply the sealer on the sides too (I only did one coat there).
- Apply a generous amount in any areas that have cracks or holes in the wood. That way it is sealed up nicely in case anything ever spills there.
Enjoy Your New Railroad Cart Coffee Table
Well, that’s it! This was a super easy DIY project and it only took us a couple of hours from start to finish. The end result was so worth it and I am very happy with how it turned out.
This railroad cart coffee table is the perfect vintage touch that this space needed! If you are looking for more easy DIY projects like this, then check out how I transformed an old family heirloom that was handed down to me.
I love taking old pieces of furniture and making them new again with a little TLC!
Learn more about how to turn your builder grade home into something more here too!


I love upcycling! What an amazing project, it fits in with your living room aesthetic so well – thanks for sharing this x
Thank you so much. I love up cycling too!
That’s lovely and so unusual. 😀
Thank you so much
I love this upcycling idea! That coffee table is a lovely addition to the room x
Lucy | http://www.lucymary.co.uk
Thank you so much. I am so happy with how it turned out!
Wow! It looks amazing. I love the overall look of your room as well. Love an upcycling project.
Thank you so much. Up cycling projects are so much fun!
Wow what a find!!!!! Your beat up and rough vintage pick is now a gorgeous coffee table that looks fabulous:)
Awe thanks so much Maria. I appreciate that
That’s a great idea to turn it into something useful for the house. You have amazing pictures and decorations!
Thank you so much. I appreciate your kind words.
I love this project!! It’s such a great idea and looks amazing. Thanks so much for sharing the how to!
Thank you so much. I am so glad you enjoyed this project too!
I really love your DIY posts and this coffee table looks amazing! If I had space or I was back home, I would surely try to do it with my dad! He loves upcycling things and I enjoy helping him. Thanks for sharing x
Awe thank you! Yes, that would definitely be a fun project to do together for sure!
What an ambitious project, with a phenomenal result! Thanks for outlining the steps. I’ll need to keep my eyes open for a fun item to refurbish!
Awe yes you should! I absolutely love refreshing projects like this!
Okay I LOVE this! My boyfriend and I have been on lots of steam train holidays so I think if we had our own place, something like this would be really special. I love how it looks in your living room – so rustic and authentic! x
Awe thank you! Yes, this would be so perfect for y’all then!
That is so cool! I love it. Same vibe as the old steamer trunks as desks or coffee tables – vintage, unique, and just a bit steampunk.
Yes! I love the old vibe it brings into the room for sure!
I love finding new uses to old pieces and you’ve done a great job in this project! Well done. Thanks for sharing!
Thank you so much Jodie. I am so glad you enjoyed it!
What an awesome coffee table upcycle! It suits your home perfectly too! I love that all the rustic grain started to come out when you sanded it down, it gave it such a lovely look. The step by step guide is also really helpful. Thanks for sharing.
Thank you so much Eve. I am glad you enjoyed it and I am so happy with the rustic grain showing through as well!
I love the final look of this! It is so unique and a strange rustic-modern combination.
Thank you so much. I am so glad you like the final look of it too!
What a gorgeous table! This is seriously inspiring me to DIY a couple things around my home now. x
Thank you so much! You definitely should! I always love doing DIY projects!
Wow, this is great and looks so good in the end! I actually showed this to my mum who loves DIY and since we’re in lockdown, she will try recreating this too! Thanks for sharing 🙂
xoxo Olivia | https://www.oliviaandbeauty.com
Awe yay! I am so glad you both liked it! It’s so much fun to do DIY projects!
I really love this! It is simple and pretty and so useful. Upcycling is a wonderful way to continue the life of something hardy. We have many abandoned old railway tracks that used to run freight trains in our woods so we are always coming across pieces of wood still beautifully full of life.
Thanks so much for sharing!
Thank you! I am so glad you think so! I love up cycling things too. It’s so much fun!
This is so amazing!! I love your decor style!
Thank you so much. I am so glad you think so!
That looks fantastic! Wish I had a handy hubby 😉
Lol well you could totally do it yourself too! It wasn’t too challenging!
This is so gorgeous! I love styling things like this and upcycling projects. It’s sustainable and makes for a badass living room!
Awe thank you so much! I am loving the way it looks in the room for sure!
Wow…this looks so beautiful. You’ve done an amazing job. I love seeing people restore and bring things back to life x
http://www.nadinealex.blogspot.com
Awe thank you so much. I love restoring things and giving them new life too!
Wow this is gorgeous! I love these tips for encouraging furniture that looks authentic and gorgeous in your home. Thank you for sharing x
This looks like such a neat project! I’m hoping to do a lot of DIY furniture this year. Thanks for sharing x
http://www.lynnmumbingmejia.com
Yes I love doing DIY furniture projects like this. Can’t wait to see yours!
Absolutely love what you created!! The table turned our gorgeous 🙂 always loved upcycled furniture and enjoyed this read on how to do it myself, definitely saving.
https://mixingpassports.com
Thank you so much. I am so happy with how it turned out as well!
Thanks for sharing, this looks a great idea 🙂
Thank you so much! I am so glad you think so!
Now this is just too cool! I love the creativity! I would never think to upcycle something like this but you did an amazing job. It’s such a statement in the room and I bet it’s an awesome conversation starter!
Awe thank you so much! It sure is, I love the way it looks in this space!
Oh wow this looks so cool & I haven’t seen a railroad cart table before!
I just stumbled across this post. I have access to seven of those old carts, and I hope I can get them on the cheap. I’d love to save them for a purpose such as a table. Thanks for the info on your project. Great information!
Awe yay! I’m so glad you found it to be useful and stumbled across a few carts of your own too! That’s so exciting!!